The best bird-safe waterproofing system for a wooden bird feeder is two to three thin coats of a water-based exterior spar urethane (like Minwax Helmsman Water-Based Spar Urethane or Old Masters Exterior Water-Based Spar-Urethane), fully cured before any seed goes in. For cedar specifically, you need to add one extra step: seal the tannins first so they don't bleed through and wreck your finish. Clean the wood, let it dry completely, sand lightly, apply a tannin-blocking primer or sealer coat, then follow up with your topcoats. That's the core of it. Everything below fills in the details so you can do it today.
How to Waterproof a Wooden Bird Feeder Step by Step

Marcus Brennan
26 Apr 2026
Cedar vs. other woods: pick the right approach first

Cedar is the most popular wood for bird feeders, and for good reason: it's naturally rot-resistant, lightweight, and weathers well. But cedar has a catch. It's loaded with tannins and water-soluble extractives that bleed out when moisture hits the surface. If you brush a film-forming finish straight onto bare cedar without addressing the tannins, you'll often end up with brown or orange staining coming up through the finish, or the finish peeling because the extractives are interfering with adhesion. The Real Cedar authority specifically warns against transparent, non-flexible film-forming finishes (urethane, varnish, lacquer, shellac) applied directly to exterior cedar for exactly this reason.
That doesn't mean you can't use spar urethane on cedar. It means you need to handle the tannins first. Products like OWATROL Stan Protect or Rust-Oleum Bleed Control 100 are designed specifically to block tannin bleed on cedar and redwood before you apply a water-based topcoat. Apply one of those first, let it cure, then put your spar urethane over the top. For other woods like pine, plywood, or basswood (common in DIY feeder builds), tannin bleed isn't usually an issue, so you can go straight to surface prep and spar urethane without the extra blocking step.
| Wood Type | Tannin Bleed Risk | Blocking Step Needed? | Best Finish System |
|---|---|---|---|
| Cedar | High | Yes — use tannin blocker first | Tannin blocker + 2–3 coats water-based spar urethane |
| Redwood | High | Yes — use tannin blocker first | Tannin blocker + 2–3 coats water-based spar urethane |
| Pine / Poplar | Low | No | 2–3 coats water-based spar urethane |
| Plywood (exterior grade) | Low–Medium | Usually no | 2–3 coats water-based spar urethane |
| Basswood / Balsa | Low | No | 2–3 coats water-based spar urethane |
Surface prep: the step most people skip (and regret)
Thompson's WaterSeal is blunt about this in their FAQ: failure to follow prep and cleaning directions is the number one cause of flaking and peeling. I've seen this firsthand. A feeder I rushed through once started peeling within two months because I didn't let it dry fully before sealing. Don't skip prep. It takes less time than stripping and redoing the whole thing.
Cleaning

If you're sealing a brand-new feeder, wipe it down with a clean damp cloth to remove sawdust and any manufacturing residue. If it's an existing feeder that's been outside, you need to do more. Scrub off any mold, mildew, or algae with a mild bleach solution (roughly one part bleach to nine parts water), rinse thoroughly, and let it air dry completely. The USDA Forest Products Laboratory's finishing guidance is clear: blank" rel="noopener noreferrer">mildew and contamination have to be removed before finishing, or the problem comes back before the finish even has a chance to fail. If you've got heavy tannin staining on an older cedar feeder, a wood brightener with oxalic acid can help restore the surface, but rinse it off completely afterward and let the wood dry before moving on. Handle oxalic acid carefully: gloves, eye protection, keep it off the ground and away from bird areas.
Drying
This one's non-negotiable. The wood must be fully dry before you apply any sealer. Not just surface-dry, but dry through. For a fresh wash or after rain, give it at least 24–48 hours in a warm, dry spot. If moisture is still in the wood when you seal it, you'll trap it, and the finish will peel or blister. The SC DNR and US Fish and Wildlife Service both emphasize letting feeders dry completely before refilling with seed. The same logic applies here: wet wood and sealant don't mix.
Sanding and repairing
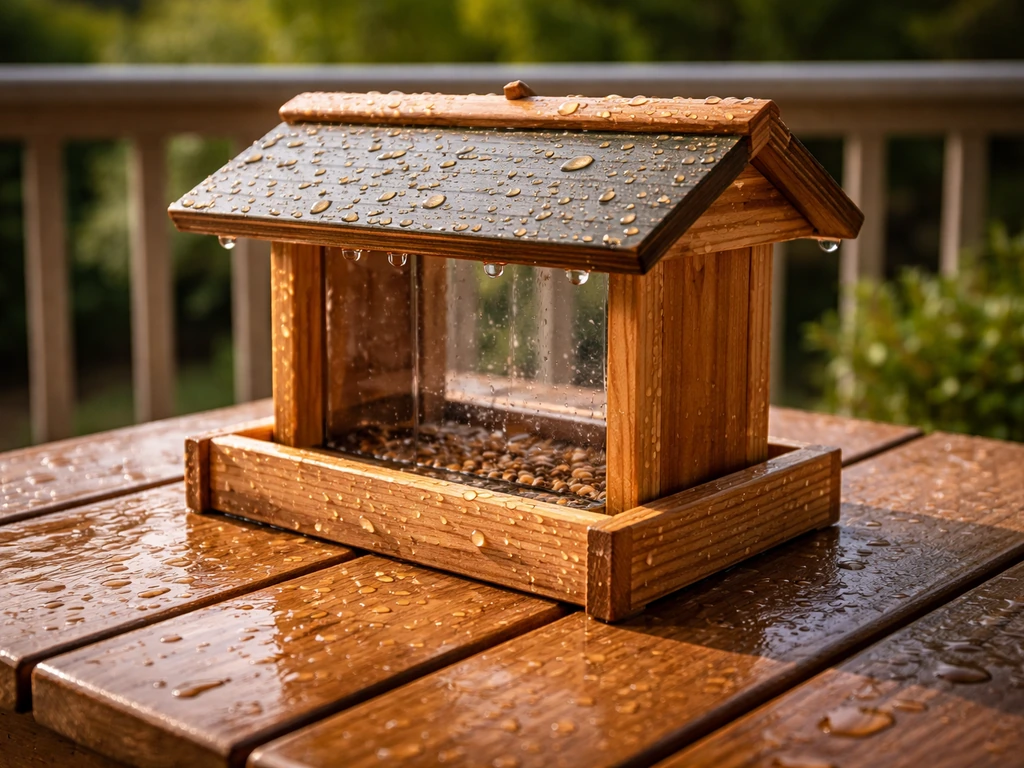
For new wood, start with 120-grit to smooth any rough spots, then finish with 180 or 220-grit. Old Masters' technical data sheet recommends sanding from medium grit to fine grit for a properly prepared surface. A word of caution from General Finishes: don't over-sand with very fine grit on bare wood, because it can close the grain and reduce how well the finish soaks in. Sand with the grain, wipe away all the dust with a tack cloth or damp rag, and let it dry. If the feeder has any open cracks or gaps (especially around the roof joints where water pools), fill them with a waterproof exterior wood filler or exterior-grade caulk before sanding. Let the filler cure fully per its instructions before you proceed.
Penetrating oils vs. film-forming sealers: what actually works on a feeder
There are two main categories of wood finish, and they behave very differently on something like a bird feeder that lives outside year-round.
Penetrating finishes (tung oil, teak oil, linseed oil, mineral oil) soak into the wood rather than forming a layer on top. They're easy to apply and re-apply, and they don't peel because there's no film to lift. The downside: they offer less water resistance than a film-forming finish, and according to the Forest Products Laboratory, they may need reapplication as often as every two years. For a feeder that sits in direct rain, penetrating oils alone often aren't enough.
Film-forming finishes (spar urethane, spar varnish, exterior polyurethane) build a hard, protective layer on top of the wood that sheds water and blocks UV effectively. Minwax Helmsman Spar Urethane, for example, specifically includes UV inhibitors to prevent graying and fading, and it's formulated for wood exposed to rain, moisture, and high humidity. The tradeoff is that if moisture gets under the film (because prep was skipped, or the film cracks with age), it peels. That's why prep and multiple thin coats matter so much.
For most wooden bird feeders, especially ones exposed to full weather, a water-based exterior spar urethane is the best practical choice. It's durable, handles rain and UV well, dries faster than oil-based versions, cleans up with water, and is lower in VOCs, which matters when you're finishing something birds will eat near. If you're finishing a cedar feeder, just make sure to use the tannin blocker first as described above.
Step-by-step: how to seal a wooden or cedar bird feeder
Work in a well-ventilated area, ideally in temperatures between 50°F and 90°F with low humidity. Have your materials ready before you start.
- Water-based exterior spar urethane (Minwax Helmsman Water-Based or Old Masters Exterior Water-Based Spar-Urethane are good choices)
- Tannin blocker (OWATROL Stan Protect or Rust-Oleum Bleed Control 100) — cedar and redwood only
- High-quality synthetic bristle brush (or foam brush for smaller feeders)
- Sandpaper: 120-grit, 180-grit, and 220-grit
- 220–320-grit foam sanding pad or maroon non-woven pad for between coats
- Tack cloth or clean rags
- Exterior wood filler or caulk (for cracks)
- Drop cloth or scrap cardboard to work on
- Clean the feeder thoroughly, remove all mold or mildew, rinse well, and let it dry completely (24–48 hours minimum).
- Sand the entire feeder with 120-grit, then 180-grit, working with the grain. Fill any cracks with exterior filler, let cure, then re-sand flush.
- Final pass with 220-grit to smooth everything. Wipe off all dust with a tack cloth.
- Cedar/redwood only: apply one thin coat of tannin blocker per the product's directions. Let it cure fully before moving on.
- Apply your first thin coat of water-based spar urethane with a quality brush. Work with the grain, don't overload the brush, and avoid puddling in corners. Old Masters' spar urethane dries to the touch in about 30 minutes and is ready to topcoat in about 1 hour.
- Lightly sand the cured first coat with a 220-grit foam pad or maroon non-woven pad to knock down any raised grain or dust nibs. Wipe clean with a tack cloth. Don't sand aggressively — you're just scuffing for adhesion.
- Apply your second thin coat. Let it dry. Minwax recommends at least 6 hours between coats when brushing, followed by a light 220-grit sand before the next coat.
- Apply a third coat if the feeder will be in heavy rain exposure or full sun. This final coat doesn't need sanding — just let it cure.
- Allow the fully coated feeder to cure for at least 24–72 hours in a dry place before hanging and refilling with seed. Don't rush this step.
Curing, recoating, and keeping it waterproof long-term
Dry to the touch and fully cured are different things. Water-based spar urethane might feel dry in 30 minutes to an hour, but it's still hardening for days after that. Give it a full 24–72 hours before the feeder goes out in the elements and before birds start feeding from it. This matters both for finish durability and for bird safety. Any residual solvent smell is a sign it's not ready yet.
For long-term maintenance, inspect the feeder every spring and fall. Look for areas where the finish is wearing thin, chalking, or showing bare wood. You don't need to strip and redo the whole thing each time. Lightly sand the worn areas with 220-grit, clean off the dust, and apply one or two fresh coats of spar urethane. A full recoat every one to two years is a reasonable rhythm for most climates. If you're in a particularly harsh environment with lots of sun, freezing winters, or very wet springs, you may need to touch up annually. Penetrating oil finishes (if you chose that route instead) tend to need reapplication more often, roughly every one to two years per Forest Products Laboratory guidance.
Each fall before the wet season hits is a good time to do a quick inspection. Pull the feeder, empty it, scrub it clean, dry it fully, and check the finish. A few minutes of attention each season will add years to the feeder's life.
What goes wrong and how to fix it
Peeling or flaking
This almost always comes down to prep: wood wasn't clean, wasn't dry, or had residue (grease, wax, old finish) that prevented adhesion. If the finish is peeling, strip it back to bare wood (scraper, orbital sander, or chemical stripper), then redo prep from scratch before recoating. Don't just paint over peeling finish.
Tacky finish that won't dry
Tackiness usually means the finish was applied too thick, the temperature was too cold, the humidity was too high, or it wasn't given enough dry time between coats. If a coat is still tacky after several hours, give it more time in a warmer, drier spot. If it stays permanently tacky, that coat may need to be sanded off and reapplied in thinner layers under better conditions.
Brown or orange bleed-through on cedar
This is tannin bleed, and it means the tannin-blocking step was skipped or the blocker wasn't fully cured before topcoating. Sand back through the bleed, apply a proper tannin blocker, let it cure completely, and then reapply your spar urethane over the top.
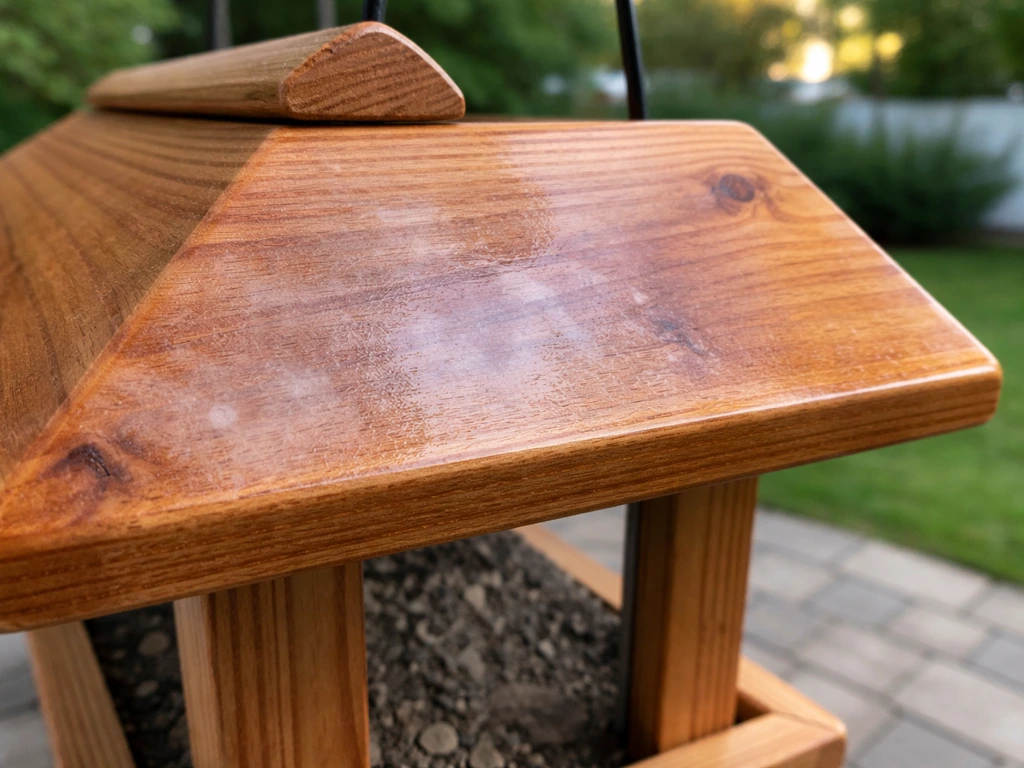
Cloudy or white haze in the finish
This is usually blushing, caused by moisture getting into the finish during application (high humidity, cold conditions, or damp wood). It's more common with oil-based finishes. If it's mild, sometimes it clears as the finish fully cures. If it doesn't, lightly sand the affected area and recoat on a dry, warmer day.
Water is still soaking in after sealing
One thin coat often isn't enough, especially on porous wood or in wet climates. Make sure you applied at least two to three coats and didn't skip the between-coat sanding that helps each layer bond. Also check that cracks and joints are properly filled and sealed, since water gets in at seams first.
Is the finish bird-safe?
Water-based spar urethane is the safer choice over oil-based, with lower VOC levels. Let it cure fully (at minimum 24–72 hours, longer is better) before hanging the feeder and filling it with seed. The finish needs to be completely dry with no smell before birds come into contact with the feeder. Avoid finishes with heavy biocides or pesticides listed in the ingredients. If you're unsure about a specific product, check the safety data sheet for VOC content and look for 'low VOC' or 'zero VOC' labeling.
Hanging and placement: the underrated part of feeder waterproofing
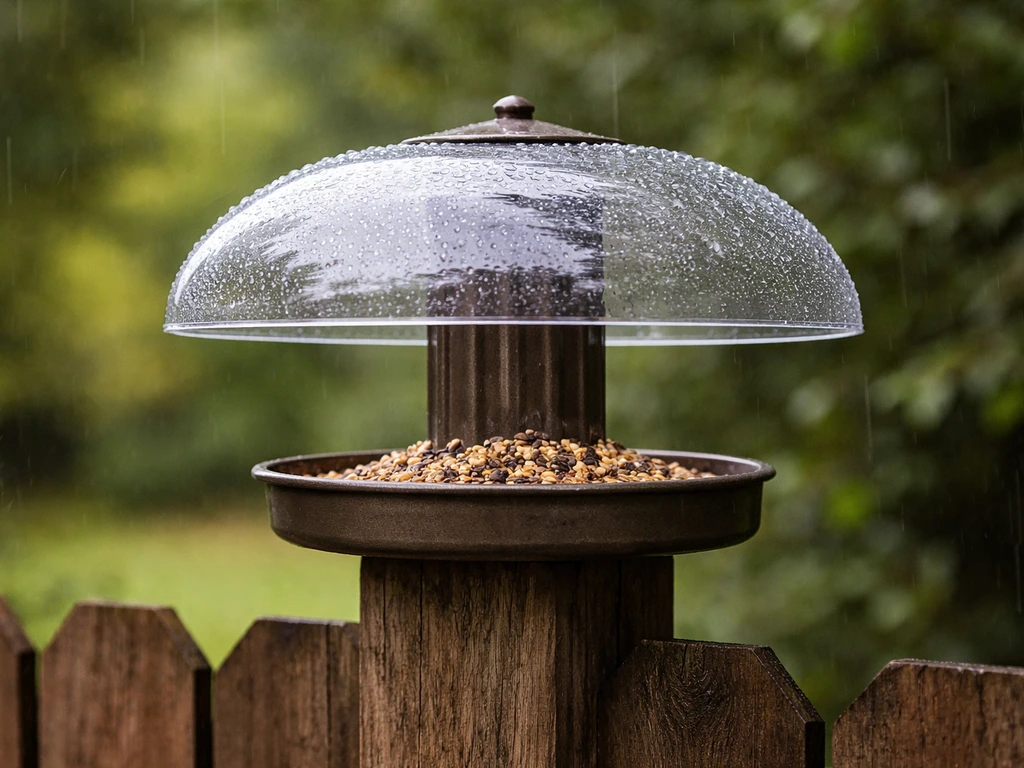
Even a perfectly sealed feeder will rot faster than it should if you hang it in the worst possible spot. Where you put the feeder changes how much abuse the finish has to take, and a little thought here goes a long way. If you're also looking at rain-proofing the design itself rather than just the finish, that's a related topic worth exploring on its own. Make sure your feeder design is bird-resistant too, since even a well-sealed feeder can attract unwanted visitors if the access points are easy bird-proof chicken feeder. If you're using a feeder with openings that are too easy to reach, you can reduce bird access with a truly bird-proof dog feeder design and safer access geometry bird-resistant. If you are building a feeder setup that also needs to be bear-proof, the pole and mounting choices matter as much as the finish rain-proofing the design itself. If you need to stop larger animals from getting to the food, use a bear-proof bird feeder design along with a truly weatherproof finish. If you want the most protection, combine a waterproof finish with smart design choices that keep rainwater from pooling and soaking the feeder rain-proofing the design itself. If you want, you can also focus on how to make a dove-proof bird feeder so it stays safe from larger birds while the finish cures.
- Hang under a roof overhang, porch eave, or tree canopy when possible. This dramatically reduces direct rain hitting the feeder and slows UV breakdown of the finish.
- Make sure the feeder hangs level so water drains off the roof rather than pooling. Pooling water at the roof-to-wall seam is one of the fastest ways to start rot.
- Avoid hanging directly against a fence or building wall where the back of the feeder gets no airflow. Trapped moisture accelerates mold and rot even through a good finish.
- Use stainless steel or galvanized hardware for hanging. Standard steel screws and hooks rust quickly and can stain the wood, compromising the finish around the fastener holes.
- Check that the feeder isn't sitting in a low spot where morning dew and ground moisture linger. Higher positions with good airflow dry out faster after rain.
- Inspect the hanging hardware and feeder roof joints every season. These are the first places where the finish fails and water gets in.
- If you live somewhere with harsh winters, consider bringing the feeder in during extended wet or freeze-thaw periods, or at least doing a touch-up coat before the wet season starts.
BarnWorld's feeder maintenance advice lines up with this: placement under a canopy combined with periodic sealant inspection and reapplication is the most practical way to keep a wooden feeder in good shape long-term. The seal and the location work together. A great finish in a bad spot still deteriorates faster than a decent finish in a sheltered spot. Think of the sealant and the placement as two parts of the same system, not two separate decisions.
FAQ
Can I waterproof a wooden bird feeder with a single thick coat instead of multiple thin coats?
It usually won’t last. Thin coats cure more evenly and build a flexible film that is less likely to crack at joints. If you use a thick coat, it can skin over on top while remaining soft underneath, increasing the risk of peeling later.
How long should I wait before putting seed in and letting birds use the feeder?
For water-based spar urethane, don’t go by touch-dry alone. Wait at least 24–72 hours for full cure, and only hang it after there is no noticeable chemical smell. If you’re in cooler temperatures or higher humidity, extend the wait.
What’s the best way to seal the underside and roof seams where water pools?
Do extra attention work at joints: fill gaps or cracks first with exterior-grade waterproof filler or caulk, let it cure fully, then sand smooth before topcoating. When applying finish, brush a slightly heavier pass along seams and edges, then keep an eye out for missed spots during the next coat.
Do I need to remove all old finish before recoating?
Not always, but you must not coat over failing areas. If the old finish is peeling, flaking, or lifting at the edges, strip or sand back to stable wood, then redo prep. If it’s intact, you can scuff-sand lightly and recoat, focusing on worn or gray areas.
Can I use spray-on finishes instead of brushing?
You can, but it’s easier to miss thin areas and build uneven film thickness with sprays. If you spray, apply multiple light passes, keep a consistent distance, and watch corners and edges closely. Still plan on full cure time before outdoor exposure and feeding.
Will penetrating oils like tung or teak oil fully protect a feeder in heavy rain?
Often not by themselves. Penetrating oils reduce water penetration but generally require more frequent reapplication (commonly every 1–2 years depending on climate and exposure). For feeders that get direct rain, a film-forming spar system usually holds up better.
How do I know if my problem is tannin bleed versus blushing or poor adhesion?
Tannin bleed shows up as brown or orange staining that migrates upward through the finish, typically on cedar where the tannin blocker step was skipped or not cured. Blushing looks like a milky haze from moisture trapped during application. Peeling or flaking usually points to adhesion issues, like sealing over damp wood or contaminates.
What should I do if the finish feels tacky after several hours?
First, increase drying conditions (warmer, drier, better airflow). If it remains tacky after a full day or longer, scrape or sand back that layer and reapply thinner coats under proper temperature and humidity. Tackiness often means either too-thick application or interrupted curing.
Is it safe to apply cleaners like bleach or wood brightener near birds?
You can use them on the wood, but rinse thoroughly and let the feeder dry completely before applying finish or letting birds access it. For oxalic acid, wear gloves and eye protection, and keep runoff away from bird areas and soil where it can contact animals.
Can I waterproof a cedar feeder without using a tannin blocker?
You risk staining and finish failure. Cedar’s extractives can interfere with adhesion and cause discoloration through clear coatings. If you choose not to use a blocker, you’re essentially accepting a higher chance of brown bleed or early peeling.
What temperature and humidity should I aim for while finishing?
A practical target is roughly 50°F to 90°F with low humidity. If it’s too cold or too humid, coatings can blush, cure slowly, or turn tacky. Plan your project for dry weather and give longer drying times when conditions are borderline.
How often should I inspect and recoat a feeder, and how do I spot early failures?
Inspect in spring and fall. Look for chalking, worn spots on edges and rooflines, bare wood showing through, or areas where water no longer beads. For early wear, scuff-sand those spots lightly (commonly around 220 grit), wipe clean, then add one to two fresh coats instead of stripping the whole feeder.
Next Article
How to Make a Rain Proof Bird Feeder Rain Guard Cover
Step-by-step DIY rain guard and cover designs to keep bird seed dry and protect feeders from wind-driven rain.