You can turn a fresh pumpkin into a working bird feeder in about 20 minutes with nothing more than a knife, some twine, and a bag of black-oil sunflower seed. Cut off the top, scoop out the guts, add seed, hang it from a branch or shepherd's hook, and birds will find it within a day or two. If you want to try a tin-can version instead, the same basic setup ideas apply for keeping seed dry and accessible to birds tin-can bird feeder. The trick is knowing which pumpkin to pick, how to set it up so it doesn't fall apart in a week, and how to keep the seed from going moldy. Here's exactly how to do all of that.
How to Make a Pumpkin Bird Feeder: Step by Step Guide

Marcus Brennan
11 May 2026
Pick the right pumpkin for a feeder
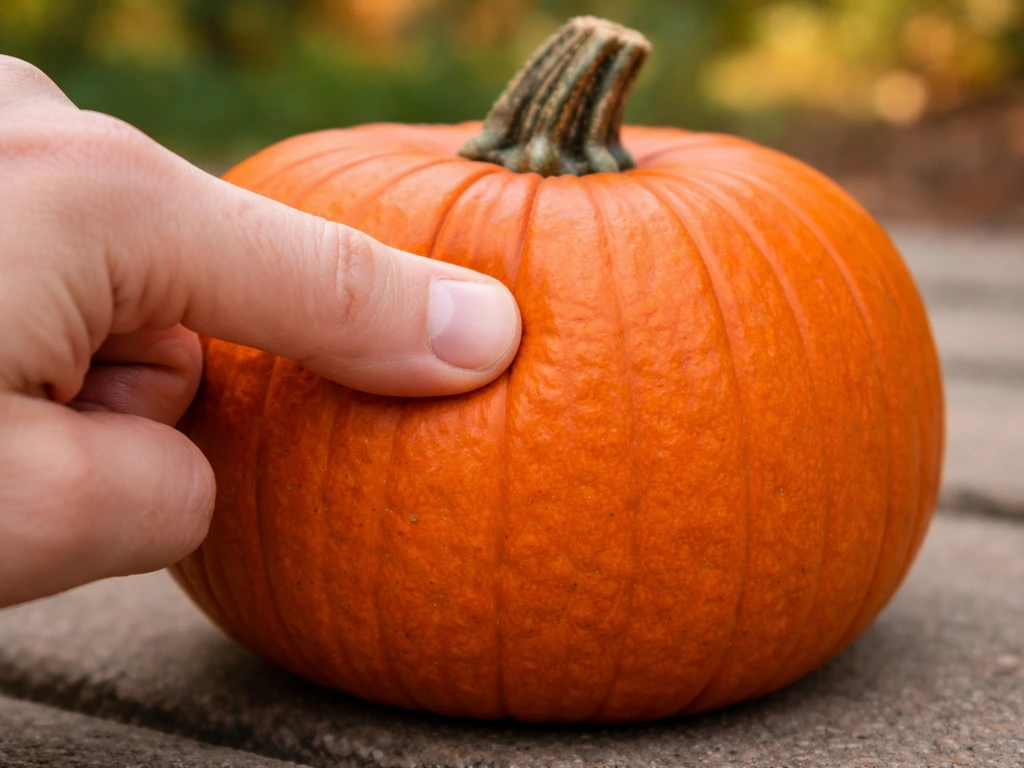
Not every pumpkin will hold up outdoors. The single most important thing is firmness: press your thumb against the skin and it should feel solid with no give whatsoever. A soft or squishy spot means the pumpkin is already breaking down, and it will collapse within days of hanging outside. Go with a pumpkin that feels heavy for its size, which is a sign of good maturity and dense flesh.
For size, aim for a medium pumpkin roughly 6 to 10 inches in diameter. Something in that range is large enough to hold a meaningful amount of seed but light enough to hang without needing heavy-duty hardware. Very large carving pumpkins (the kind sold at Halloween) tend to have thinner, more watery flesh that rots faster. Smaller pie pumpkins are dense and less grainy, which makes them more structurally stable and worth considering if you can find them. Either type works, but pie pumpkins generally last a few days longer.
Also choose a pumpkin with a relatively flat base if you plan to set it on a railing or post rather than hang it. A wobbly pumpkin tips over and spills seed immediately. Look for one that sits steady on its own before you get it home.
Tools and materials you'll need
You don't need much. Most of this is probably already in your kitchen or garage.
- 1 fresh, firm pumpkin (medium size, 6–10 inches across)
- Sharp kitchen knife or small serrated knife
- Large spoon or ice cream scoop for gutting
- Drill with a 1/2-inch to 3/4-inch bit (optional, for feeding holes or drainage)
- Sturdy twine, jute rope, or wire (at least 3 feet)
- Black-oil sunflower seed (the go-to choice for attracting the widest variety of birds)
- Wooden dowel, thick twig, or pencil for a perch (optional)
- Scissors or a utility knife
- Paper towels for cleanup
If you want to add suet instead of or alongside seed, pick up a suet cake from any hardware or farm store. You can press chunks of it into the seed cavity or wedge a small suet cage inside the hollowed pumpkin. For hanging, a shepherd's hook is ideal, but a low, stable branch works just as well.
Prep and carve your pumpkin safely
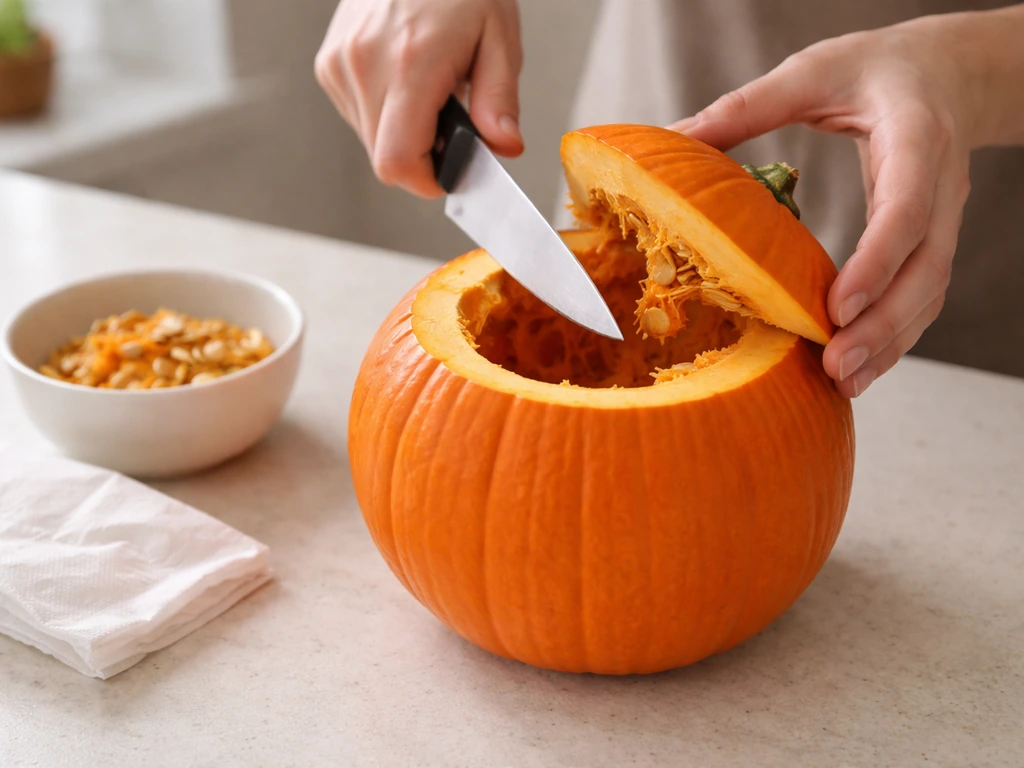
Start by rinsing the outside of the pumpkin and drying it off. A clean surface helps you get a better grip and removes any dirt that could introduce mold early.
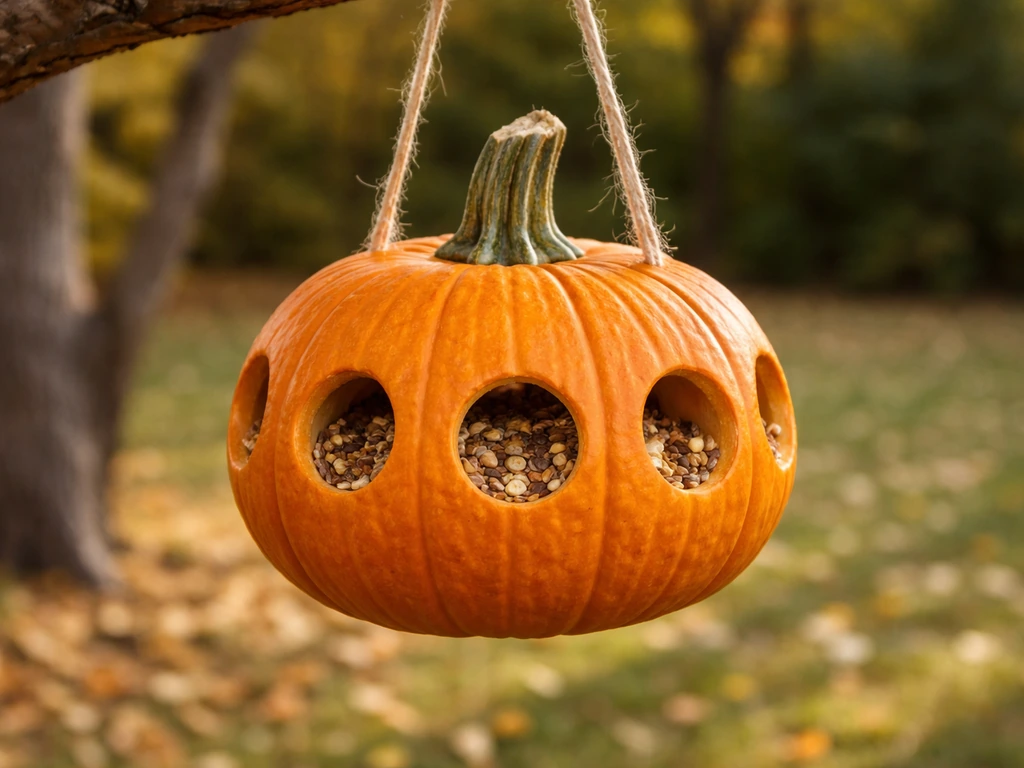
- Cut off the top like a lid. Angle your knife slightly inward at about 45 degrees so the lid doesn't fall through when you replace it. The opening should be wide enough for birds to access the seed easily, roughly 4 to 6 inches across.
- Scoop out all the stringy pulp and seeds with a large spoon. You don't need to scrape the walls completely bare, but remove the loose, wet fibers since they trap moisture and speed up rot.
- If you want a more open, tray-style feeder, cut the top third of the pumpkin off instead of just the lid. This creates a wider feeding bowl and lets more birds feed at once.
- Drill 3 or 4 small holes (about 1/4 inch) in the bottom of the pumpkin for drainage. This is one of the most important steps. Without drainage, rainwater pools inside, soaks the seed, and turns the whole thing into a mold factory within 48 hours.
- If you want feeding holes on the sides rather than an open top, use a 3/4-inch drill bit to make 2 or 3 openings near the middle of the pumpkin's body. These work well for clinging birds like nuthatches.
- To add a perch, push a thick twig or wooden dowel straight through the pumpkin just below a side feeding hole. It should stick out about 3 inches on each side.
A word on knife safety: always cut away from your hand and use a stable surface. Pumpkins roll. Put a damp towel under the pumpkin before cutting to keep it from sliding. If the skin is hard to pierce, a serrated blade works better than a smooth chef's knife.
Fill and design the feeding setup
Black-oil sunflower seed is the best all-purpose choice. It attracts cardinals, chickadees, titmice, nuthatches, finches, and sparrows, basically the full range of backyard birds you're hoping to see. If you want to target a specific species instead, like orioles, follow these steps for how to make an oriole bird feeder alongside your general seed choice. The shells are thin enough for small birds to crack, and the high fat content makes them appealing year-round.
Here's the key rule: only fill the pumpkin with enough seed for birds to eat within two to three days. A shallow layer works better than filling it to the brim. Seed that sits at the bottom gets wet, compacts, and molds quickly. Less seed, refreshed more often, is always better than a full feeder that goes bad before birds finish it.
If you want to try suet, press a small chunk into one corner of the seed cavity or wedge a mini suet cage inside. Suet is especially attractive to woodpeckers, and it holds up better in cool or cold weather than it does in heat. In warm weather (above 70°F), suet can melt and go rancid, so skip it if you're doing this project in late spring or summer.
For a simple decorative touch, you can press a ring of sunflower seed heads or dried corn cobs around the outside of the pumpkin using toothpicks or skewers. This adds extra visual interest and gives birds more to explore, though it's completely optional.
Hang and place it for birds (and stability)
How you hang the pumpkin matters a lot. A poorly tied feeder tilts, spills seed, and falls. Here's the most reliable method for hanging it from twine or jute rope:
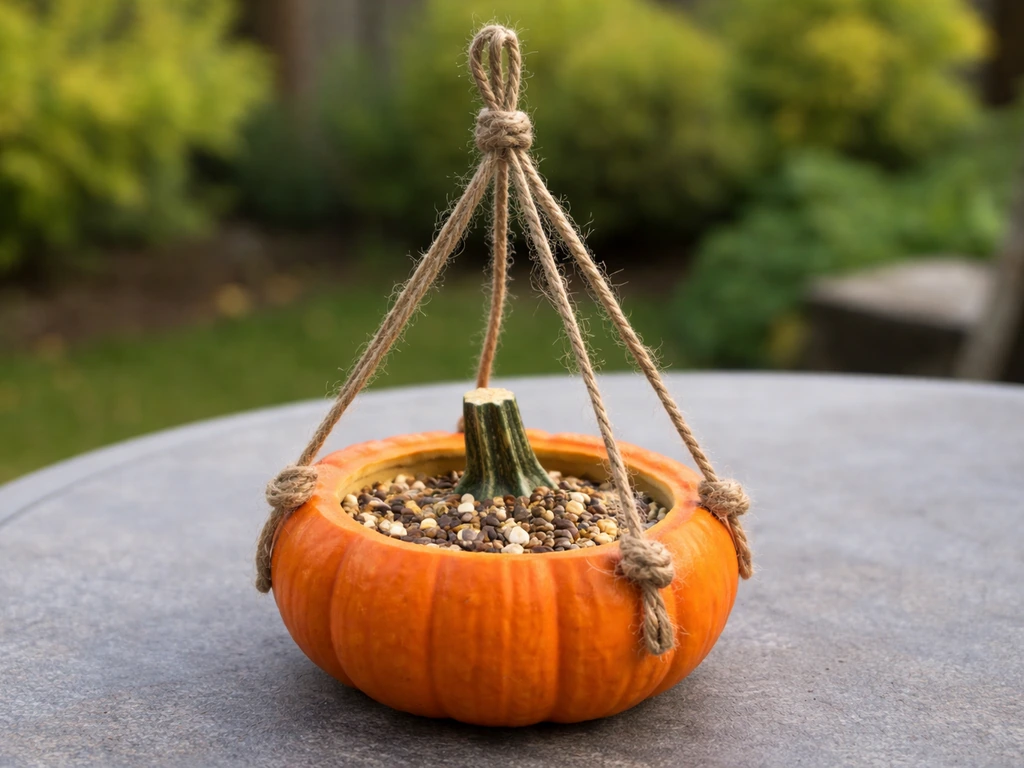
- Cut three equal lengths of twine, each about 18 inches long.
- Tie one end of each piece to the pumpkin by looping it around the stem or threading it through small holes you've drilled near the top rim of the pumpkin.
- Bring the three loose ends together above the pumpkin and tie them in a single overhand knot, leaving a loop at the top for hanging.
- Test the balance by lifting it: the pumpkin should hang level. If it tilts, adjust where the twine attaches.
- Hang the loop over a shepherd's hook, a sturdy branch, or a hook screwed into a post or overhang.
If you'd rather set the pumpkin on a flat surface, a wide railing, stump, or platform bird feeder works well. Just make sure it can't roll off, and that water drains away from underneath it.
For placement, hang the feeder at least 5 feet off the ground to give birds a sense of safety from ground predators. Place it near shrubs or trees so birds have a quick escape route, but not so close to branches that squirrels can leap directly onto it. Keep at least 8 to 10 feet of clearance between the feeder and any solid launch point like a fence, roof edge, or tree trunk. For window safety, either hang it within 3 feet of the glass (too close for birds to build up dangerous speed) or at least 25 to 30 feet away to reduce collision risk.
Maintenance, freshness, and cleaning to extend lifespan
A pumpkin feeder is a temporary feeder, and that's fine. Under normal conditions, a firm, well-drained pumpkin lasts about one to two weeks outdoors before it starts to soften and collapse. In hot or very rainy weather, expect closer to five to seven days. Cold, dry weather can extend it to three weeks. Check it every two or three days.
- Remove and replace wet or clumped seed immediately. Moldy seed can carry salmonella and other disease organisms that harm birds.
- Every few days, dump out any remaining seed, wipe the inside of the pumpkin with a dry paper towel, and refill with fresh seed.
- If you see any fuzzy mold inside the pumpkin itself (not just on the seed), it's time to retire it. Don't try to scrub and reuse a moldy pumpkin.
- If you're switching to a new pumpkin, rinse any hardware (hooks, twine attachments) and clean them with a solution of 2 ounces of bleach per 1 gallon of water before reuse. This is the standard sanitation recommendation for bird feeders.
- Shake out old seed hulls from the cavity each time you refill, since they block drainage holes and trap moisture.
One honest note: pumpkin feeders are inherently short-lived. If you want something that lasts all season, a more durable feeder made from wood, a mason jar, or a plastic bottle is going to be the better long-term investment. If you want a longer-lasting option, you can also make a bird feeder from a coke bottle with similar steps for filling and hanging. If you prefer something longer-lasting, you can also make a bird feeder from a 2L bottle and use the same ideas for drainage and filling plastic bottle. If you want something sturdier, you can also learn how to make bird feeders out of mason jars for a longer-lasting option mason jar bird feeders. If you want a different twist, learn how to make a bird feeder out of wine corks for a more compact, reusable design a more durable feeder made from wood, a mason jar, or a plastic bottle is going to be the better long-term investment.. But the pumpkin version is a fun, cost-effective project, especially in fall, and birds genuinely use them.
Troubleshooting and pest-proofing tips
Birds aren't showing up
Give it two to four days. Birds need time to discover a new food source, especially if they're not used to feeders in that spot. If nothing is happening after a week, try moving the feeder closer to shrubs or trees where birds already perch. Also check that the seed is fresh, stale or clumped seed gets ignored. Noise and foot traffic nearby can delay adoption too, so place it somewhere quieter if possible.
Squirrels and raccoons are raiding it
Squirrels are persistent and good at jumping. The most effective physical deterrent is a pole-mounted baffle, a dome or cylinder that blocks them from climbing up to the feeder. If you're hanging the pumpkin from a wire or rope between two points, add a plastic baffle above the feeder on the line. Keep the feeder at least 8 to 10 feet from any surface a squirrel can launch from, because they can cover that distance in a single leap. Raccoons are mostly a nighttime problem, so if seeds are disappearing overnight, try bringing the feeder in after dark and putting it back out in the morning.
The pumpkin is rotting too fast
Three things accelerate rot: rain sitting in the cavity, no drainage holes, and seed that stays wet. Clemson’s Home & Garden Information Center says a 10% bleach solution (1 part bleach to 9 parts water) is the most effective way to get rid of salmonella when blank" rel="noopener noreferrer">washing bird feeders. Make sure your drainage holes are clear and actually draining. A r/birdfeeding thread also recommends washing feeders regularly and using a 10% bleach solution (1 part bleach to 9 parts water) to manage feeder hygiene blank" rel="noopener noreferrer">drainage holes are clear and actually draining. In rainy weather, consider placing the feeder under a slight overhang or adding a loose cover (even the original pumpkin lid balanced loosely on top helps). Reduce seed fill to just a thin layer so wet seed doesn't sit against the pumpkin walls for days.
Seed is getting soaked and going bad fast
This usually means the drainage holes are blocked or the feeder placement is catching too much direct rain. Clear the holes with a toothpick or skewer. You can also line the bottom of the cavity with a small folded piece of landscape fabric or window screen mesh before adding seed. It lets water drain through while slowing down direct contact between the seed and the wet pumpkin floor.
Quick comparison: pumpkin feeders vs. other natural feeders
| Feeder type | Lifespan outdoors | Best season | Difficulty | Pest resistance |
|---|---|---|---|---|
| Pumpkin feeder | 1–2 weeks | Fall/early winter | Very easy | Low (open design) |
| Gourd feeder | One full season if dried | Spring/summer | Moderate (needs drying time) | Moderate |
| Orange half feeder | 3–5 days | Spring migration | Very easy | Low |
| Pine cone feeder | 2–4 weeks | Any | Easy | Low to moderate |
| Mason jar feeder | Indefinite | Any | Easy | Moderate (enclosed seed) |
The pumpkin feeder is one of the most accessible builds you can do, right alongside an orange half feeder or a pinecone rolled in peanut butter. It's not meant to replace a year-round setup, but as a seasonal project it's hard to beat for simplicity and the reaction it gets from birds. Once you've tried it, you'll probably find yourself grabbing an extra pumpkin every fall just for the yard.
FAQ
How do I keep the pumpkin feeder from leaking seed when it rains or when birds land on it?
Tie a simple stopper knot in the twine where it contacts the pumpkin (so the rope pulls straight, not at an angle), and avoid overfilling. If rain is heavy, hang it under a slight overhang and consider adding a loose “rain shield” like the original pumpkin lid balanced loosely on top, leaving the cavity open enough for birds to access.
Can I use a pumpkin that is already carved, or does it need to be fresh and intact?
It works better with a pumpkin that is still structurally intact. Carved pumpkins often have thinner walls and more surface moisture loss, so they soften faster. If you use a carved one, remove only the insides, keep wall thickness as even as possible, and plan on checking it every day.
Where should I drill or cut holes for drainage, and how many do I need?
Aim for small drainage openings at the lowest point of the hollow cavity, then clear them after storms. Start with a few holes rather than one large opening, because scattered holes drain more evenly and reduce wet seed pooling in one spot.
What if I don’t have black-oil sunflower seed, can I use other types?
You can substitute, but birds may not use it as reliably. Whole peanuts or mixed seed often creates waste and can go rancid faster; to reduce spoilage, use smaller amounts and choose ingredients with low moisture exposure. If using mixed seed, expect more selective feeding and more husks on the ground.
How do I prevent the feeder from attracting ants or other insects?
Keep the fill shallow and refresh on schedule, since damp, clumped seed is what invites insects. Also rinse and dry the pumpkin outside before filling, and avoid placing the feeder in a spot where debris and spilled seed accumulate at the base.
Will using suet alongside seed cause problems in warm weather?
Yes. Suet can soften, melt, and turn rancid when temperatures rise, and that can contaminate the seed cavity. If your weather is warm, use seed only, or keep suet for the cooler parts of the day and remove it if it becomes oily.
How close should the feeder be to trees or shrubs if I’m trying to reduce squirrel access?
Place it near cover for birds, but keep it away from direct climbing routes. Use the “launch point” clearance rule from the article, and if squirrels keep probing, shorten their access by moving the feeder farther from trunks, fence lines, and any easy jump points.
Do I need to bring the feeder in during freezing weather?
You usually can leave it out during cold, dry spells, but in extended freeze-thaw cycles the pumpkin walls can crack and the seed can clump. If your area gets wet snow or repeated thawing, bring it in overnight or switch to a looser rain-protected placement.
My birds won’t land on it yet, how long should I wait before adjusting anything?
Give it a full two to four days at the original spot, then troubleshoot. If after a week there is no activity, move it closer to nearby bird activity (shrubs or trees they already use), and replace any seed that looks clumped or damp, since stale seed delays adoption.
Next Articles
How to Make an Oriole Bird Feeder Today
Build a DIY oriole feeder fast, including Baltimore oriole food recipe, hanging tips, cleaning, and troubleshooting.
How to Make a Tube Bird Feeder Step by Step
Step-by-step how to make a tube bird feeder with materials, safe mounting, maintenance, and fixes for leaks and clogs.
How to Put Bird Seed in a Bird Feeder Step by Step
Step-by-step guide to add bird seed to hopper, tube, platform, and suet feeders, avoiding spills and jams.