You can build a solid, weatherproof PVC pipe bird feeder in a couple of hours with basic tools, a few dollars worth of pipe and caps, and no prior plumbing experience. A 2-inch diameter PVC pipe cut to about 18 inches long makes a great tube feeder for small songbirds, while a 4-inch pipe gives you higher seed capacity and works for a wider range of species. The steps below walk you through picking the right size, cutting and drilling it safely, sealing everything so rain doesn't ruin your seed, and hanging it where birds actually find it. If you plan to paint your bird feeder, choose an exterior, non-toxic paint and let it cure fully before filling so fumes and residues do not bother birds what color should i paint my bird feeder.
How to Make a Bird Feeder Out of PVC Pipe Step by Step

Marcus Brennan
13 May 2026
Pick a PVC feeder design and measurements
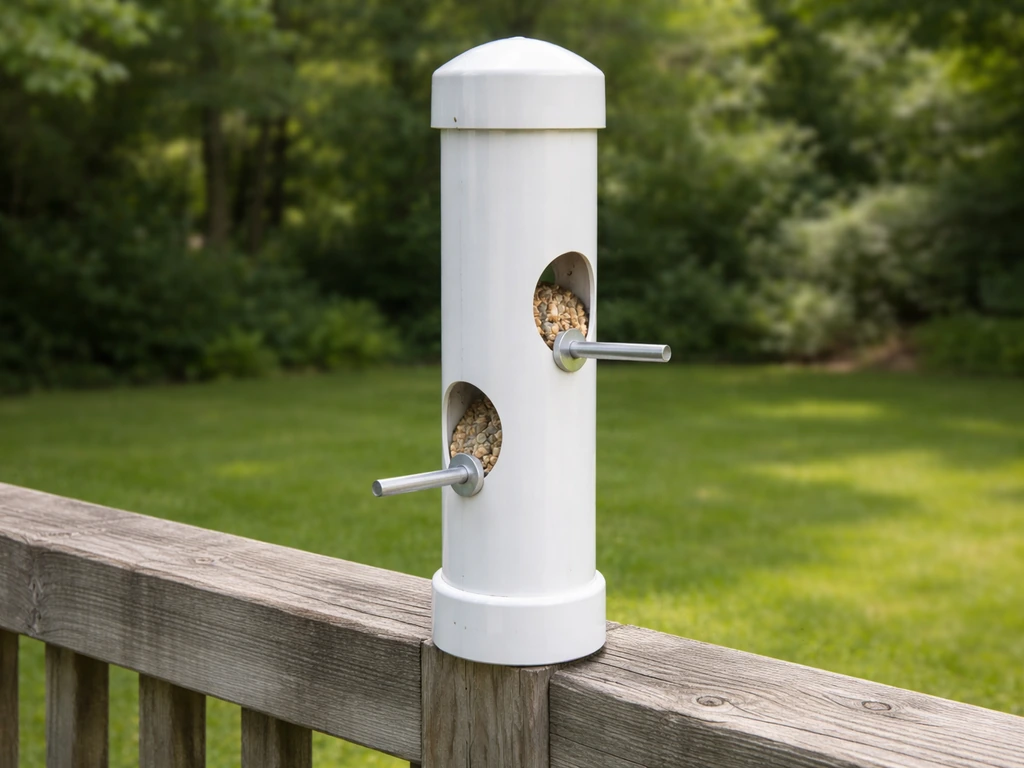
The two most practical designs are a basic tube feeder and a capped-pole feeder. For most backyard setups, start with a simple tube feeder: a length of PVC pipe, a cap on each end, and a few drilled feeding ports along the sides. This design is cheap, easy to clean, and holds enough seed to last several days without a refill.
For pipe diameter, 2-inch PVC works well for small birds like chickadees, nuthatches, and finches. It holds roughly 1 to 1.5 cups of seed, which is a good starting point. If you want higher capacity or plan to attract a broader mix of birds, go with 3-inch or 4-inch diameter pipe. A 4-inch pipe cut to 18 inches holds around 4 to 5 cups of seed and gives you more room to space out feeding ports.
For length, 12 to 24 inches is the sweet spot. Shorter feeders are lighter and easier to hang but need refilling more often. Longer than 24 inches and the feeder gets heavy and can swing awkwardly in wind. A good default is 18 inches: practical capacity, manageable weight, and easy to work with when drilling.
| Pipe Diameter | Seed Capacity (approx.) | Best For | Port Hole Size |
|---|---|---|---|
| 2 inch | 1 to 1.5 cups | Chickadees, finches, nuthatches | 3/4 to 1 inch |
| 3 inch | 2.5 to 3 cups | Mixed small-to-medium songbirds | 1 to 1.25 inches |
| 4 inch | 4 to 5 cups | Larger variety, high-traffic yards | 1.25 to 1.5 inches |
For a clean look and simple construction, a perchless tube design works well. Small birds like chickadees and nuthatches are agile enough to cling to the pipe and feed directly from the holes without needing a perch. If you want to attract slightly larger birds or just prefer the classic look, add short wooden dowel perches below each port hole.
Materials and tools you'll need
PVC is inexpensive and available at any hardware store. Stick with Schedule 40 PVC, which is the standard white plumbing pipe. Avoid conduit pipe (gray), which is made for electrical use and not the same material. You do not need pressure-rated fittings for a bird feeder, so the cheapest Schedule 40 caps and couplings are fine.
- 1 length of Schedule 40 PVC pipe (2, 3, or 4-inch diameter, cut or purchased at 18–24 inches)
- 2 PVC slip caps to fit your pipe diameter (one for the top, one for the bottom)
- PVC primer and solvent cement (for a permanent seal on one cap; leave the other removable for refilling)
- Wooden dowel rod (3/8-inch diameter works well for perches, cut to 4-inch lengths)
- Exterior-grade silicone sealant or weatherproof epoxy (for sealing around ports if needed)
- Eye bolt or screw hook rated for outdoor use (for hanging from the top cap)
- Zip ties, wire, or rope for hanging
- Drill with a hole saw or spade bit (sized to your port holes)
- A standard 3/8-inch or 1/4-inch drill bit (for perch holes)
- Marker or pencil, tape measure, fine-grit sandpaper
- PVC pipe cutter or hacksaw
One cap gets permanently cemented to the bottom. The top cap stays removable so you can pour seed in easily. For the hanging hardware, a stainless steel or galvanized eye bolt screwed through the center of the top cap is the most reliable option. Avoid plain steel, which will rust and stain the feeder quickly.
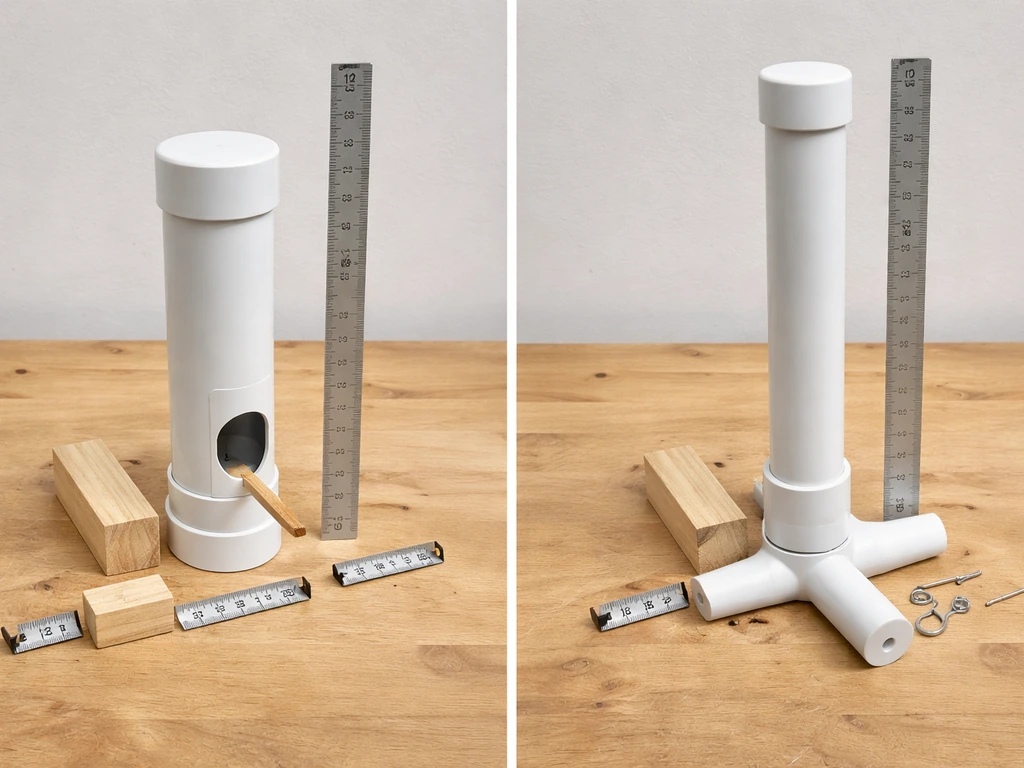
Cutting and assembling the PVC pipe body
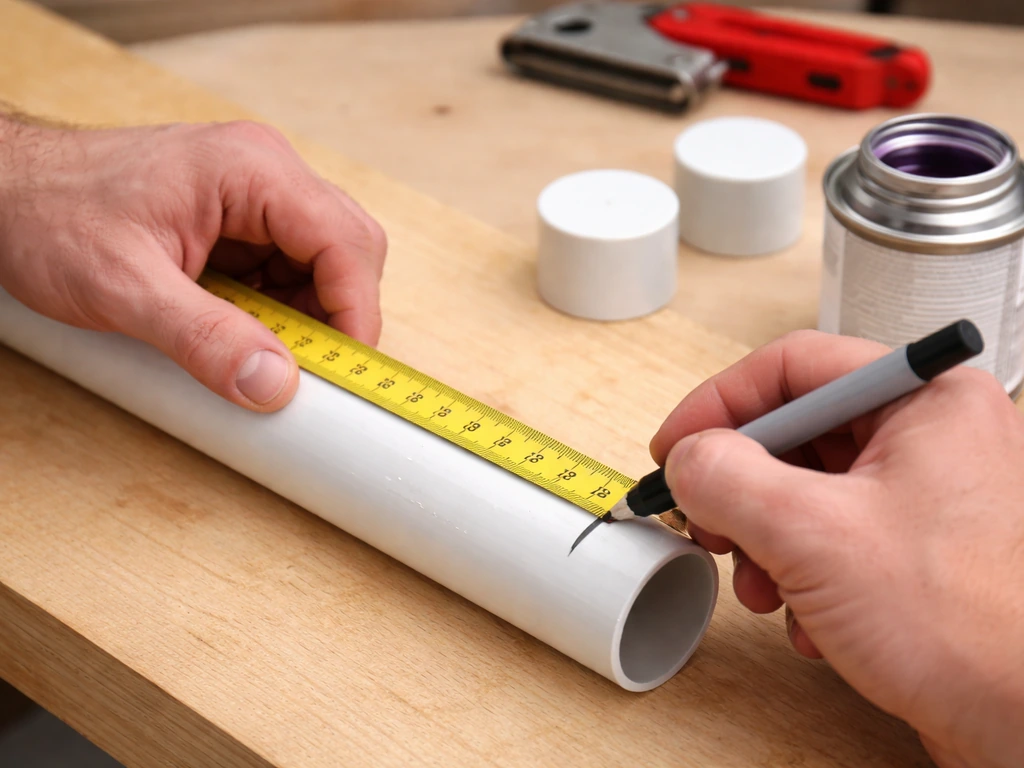
Start by marking your pipe to the desired length with a marker and tape measure. A PVC pipe cutter gives the cleanest, squarest cut and is fast to use. A hacksaw works fine too, just go slow and keep the blade perpendicular to the pipe. After cutting, use fine-grit sandpaper or a deburring tool to smooth the inside edge of each cut end. Rough edges can hang up seed and make cleaning harder.
To install the bottom cap permanently, apply PVC primer to the outside of the pipe end and the inside of the cap socket, let the purple primer flash off for about 30 seconds, then apply solvent cement to both surfaces and press the cap firmly onto the pipe with a slight quarter-turn twist. Hold it in place for about 30 seconds. At room temperature (above 60°F), a 2-inch or 3-inch joint typically reaches a set/handling time of around 15 to 30 minutes, but give it at least a few hours before filling with seed, and ideally wait overnight before putting it into service. In cooler temperatures, curing takes longer, so err on the side of waiting longer rather than rushing.
Leave the top cap unglued so you can remove it to fill the feeder. It will stay on securely with friction alone, but if you find it too loose, a small piece of foam weather stripping around the inside edge tightens the fit nicely without permanent adhesive.
Before you assemble, this is also the time to drill a small drainage hole (about 1/4 inch) in the bottom cap. Seed at the base of the feeder can trap moisture, and a drainage hole prevents that from becoming a soggy, moldy mess.
Add feeding holes, ports, perches, and weatherproofing
Mark your port locations before drilling. Space ports at least 4 inches apart vertically and stagger them around the pipe so multiple birds can feed at once without crowding each other. A common layout is two rows of ports offset by 90 degrees: two ports on one side, two on the opposite side, each pair about 4 to 6 inches apart vertically.
For port hole size, a 1-inch diameter hole works well for mixed seed with a 2-inch pipe. For sunflower seeds with a larger pipe, go up to 1.25 to 1.5 inches. Use a hole saw or spade bit for clean cuts. Clamp or secure the pipe before drilling so it doesn't spin. Drill slowly and let the bit do the work.
If you want perches, drill a 3/8-inch hole about 1 inch directly below each port hole. Cut wooden dowel into 4-inch lengths and push each one through both sides of the pipe so it extends about 1.5 to 2 inches on each side. No glue needed if the hole is snug. A little exterior wood glue at the entry point keeps it from shifting over time.
For weatherproofing, the sealed bottom cap and the tight-fitting top cap do most of the work. If the port holes feel loose or irregular after drilling, run a thin bead of exterior silicone sealant around the outer edge of each hole on the inside of the pipe before the glue dries. This also prevents seed from working its way into any small gaps. If you're in a wet climate, tilt the feeder very slightly (just a degree or two) during installation so any water that gets in drains out through the bottom hole rather than pooling around the ports.
Mounting and hanging: where and how high
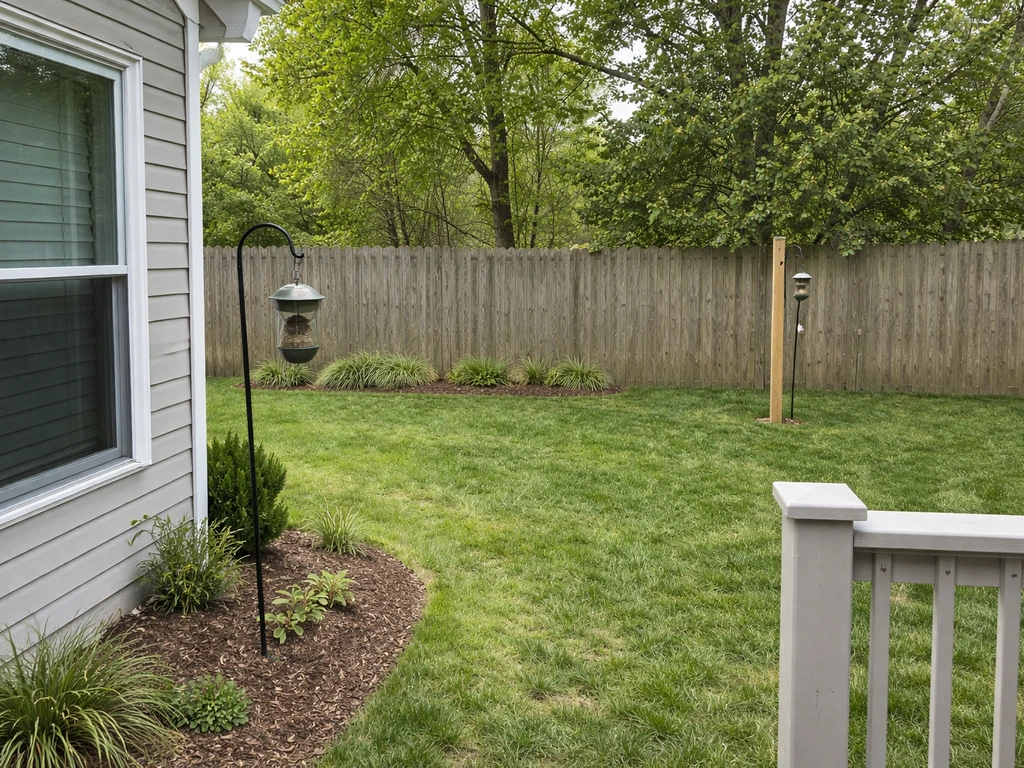
Where you put the feeder matters as much as how you build it. Keep it at least 8 feet horizontally from any branch, fence rail, deck railing, or roofline. That clearance makes it much harder for squirrels to leap over to the feeder. For height, position the bottom of the feeder at least 4.5 feet off the ground when pole-mounted, which keeps it out of easy reach of ground-level predators and most squirrels.
For window-collision safety, place feeders either within 3 feet of a window (close enough that birds can't build fatal speed) or more than 10 feet away. The danger zone is the middle range, where birds take off at full speed and hit the glass.
Hanging options
- Eye bolt and wire: Screw a galvanized or stainless eye bolt through the center of the top cap and hang from a shepherd's hook, tree branch bracket, or eave hook using wire or heavy-gauge rope.
- Pole mount: Attach the feeder to a metal or PVC pole using a pipe clamp bracket. Position the pole in open ground away from trees and structures.
- Rope or paracord loop: Thread a loop of weatherproof cord through the eye bolt and tie off to a bracket or overhang. Easy to lower for refilling.
- Bracket mounting: A standard L-bracket screwed into a wooden post or fence post with the feeder hanging off the arm works well for yards without open grass areas.
If you're attaching to a shepherd's hook pole, position the feeder 8 to 10 feet away from any structure a squirrel could launch from. If nearby trees are unavoidable, add a baffle to the pole (more on that in the troubleshooting section below). For birds specifically, placing the feeder near low shrubs or ground cover within 8 to 12 feet gives birds a landing spot and escape cover, which they strongly prefer. An exposed feeder in the middle of a lawn with no nearby cover will be ignored by many species.
Filling, cleaning, and preventing clogs

Remove the top cap, pour seed directly in, and replace the cap. Sunflower seeds (black oil type) are the all-around best choice for a tube feeder and work well in 1-inch to 1.5-inch ports. Nyjer (thistle) seed works great in 2-inch pipe with smaller 3/8-inch ports if you're specifically targeting finches. Avoid mixed seed with lots of milo or wheat, which tends to clump, clog ports, and get ignored by most desirable birds.
Clogging is the most common problem with tube feeders. Seed at the bottom of the pipe can compact and bridge across the ports, especially if it gets wet. The drainage hole in the bottom cap helps, but also check the feeder every few days after rain. If a port is clogged, push a pencil or thin stick through from the outside to break up the blockage. To prevent it in the first place, only fill the feeder about halfway in wet weather so seed doesn't sit long enough to compact.
Cleaning is non-negotiable. Moldy seed and decomposing hulls on and around feeders can make birds sick, so get into a regular cleaning routine. Every two weeks in dry weather, or after any significant rain event, is a good baseline. Disassemble the feeder (remove the top cap and the bottom cap if you made it removable), dump any remaining seed, and soak the pipe and caps in warm soapy water. Scrub the inside with a bottle brush to get rid of seed dust and residue. For deeper cleaning or after any sign of mold, blank" rel="noopener noreferrer">use a bleach solution: either 2 ounces of bleach per 1 gallon of water, or a 9:1 water-to-bleach ratio. Scrub all surfaces, rinse thoroughly, and let it dry completely before refilling. If you have an older feeder that is hard to clean or no longer safe to use, it is often better to replace it and transfer to a fresh setup old bird feeders. Never refill over damp or moldy seed.
Also clean up under the feeder regularly. Fallen seed husks and wet seed on the ground breed mold and attract rodents. A quick rake or sweep every week or two makes a real difference.
Troubleshooting, squirrel-proofing, and common fixes
Squirrels
If you're on a pole, a squirrel baffle is the most reliable solution. A torpedo or cylinder-style baffle mounted on the pole at around 4 feet off the ground physically blocks squirrels from climbing up. Make sure it's positioned so the top of the baffle is at least 4 feet high, and that the feeder is still at least 8 feet horizontally from anything a squirrel can jump from. For raccoons, you need a taller baffle: some products designed for raccoon protection are 28 inches tall. The key is keeping the feeder far enough from structures and high enough that a baffle on the pole handles the rest.
If the feeder is hanging rather than pole-mounted, squirrel-proofing is harder. A dome baffle hung above the feeder helps, but tree-hung feeders are always more vulnerable than pole-mounted ones because squirrels can approach from above. If squirrels are a serious problem, switch to a pole mount.
Leaks and water intrusion
If seed is getting wet inside the feeder, check the top cap fit first. A loose cap is the usual culprit. Add a strip of foam weather stripping inside the cap to tighten the seal. Also confirm your drainage hole is clear and not blocked by seed debris. If water is pooling at the ports, the feeder may be hanging perfectly level when it should have a slight forward tilt so water runs out rather than in.
Wobbling or mount failure
A feeder that swings excessively in wind will deter birds and stress your hanging hardware. Use two anchor points instead of one if you're hanging from a bracket: run a secondary cord or wire from the bottom of the feeder to a fixed point below, creating a triangle of tension that limits swing. If your pole is wobbling, pack the ground around the base with gravel or set it in a bucket of concrete for a permanent installation. For shepherd's hooks, push them at least 12 inches into the ground and stomp the base plate in firmly.
Birds not coming to the feeder
New feeders often get ignored for a week or two while birds discover them. Be patient. If it's been longer than two weeks, check the placement: is there any nearby cover like shrubs or small trees within 8 to 12 feet? Is the seed fresh? Old or stale seed loses its appeal fast. Also make sure the port holes aren't too small for the seed you're using. A sunflower seed jammed in a port that's slightly too small will stop birds from feeding and eventually clog the whole port.
Seed clumping and bridging
This is a PVC tube feeder's most common issue. Seed compacts inside the pipe and creates a bridge that stops flow to the ports even when the feeder looks full from the outside. The fix is to give the pipe a gentle shake every day or two to keep seed loose, especially after rain. Keeping the feeder less than completely full also reduces the weight and pressure that causes bridging. If it's a recurring problem, drill one additional small port near the bottom of the pipe so seed has more exit points and can't bridge as easily.
Building a PVC bird feeder is one of those projects where the materials cost less than $10 and the result genuinely outperforms a lot of store-bought plastic feeders in durability and ease of cleaning. Once you've built one and see how it holds up through a season, you'll likely want to make a second with a different port size or pipe diameter for a different seed type. If you're looking for more feeder ideas on a budget, there are plenty of creative approaches using other everyday materials that follow the same basic principles. You can also adapt this PVC plan into an eco friendly bird feeder by choosing low-impact materials, avoiding unnecessary chemicals, and using durable parts that last for years. If you enjoy DIY projects, you can also learn how to make bird feeders from old dishes by reusing everyday items with simple mounting and weatherproofing steps. If you want to go beyond a basic DIY build, learn how to decorate a bird feeder so it fits your space while still staying bird-safe creative approaches using other everyday materials.
FAQ
Can I use PVC glue without primer on a bird feeder?
It is not recommended. Primer helps the solvent cement chemically bond and reduces the chance of tiny leaks at the cap joint, which can let water wick into the pipe. If you skip primer, expect more loosening in wet weather and harder-to-maintain sealing around the bottom cap and drainage area.
What seed types should I avoid in a PVC tube feeder to reduce clogging?
Avoid mixed seed that includes a lot of milo or wheat, and avoid very small, dusty mixes that can pack into the ports. If you notice bridging after rain, switch to a drier, more uniform seed like black oil sunflower, or reduce the mix complexity and refill only partway so seed does not sit long enough to compact.
How do I prevent squirrels from stealing seed if the feeder is pole-mounted but close to trees?
Place the feeder far enough from any squirrel launch points and use a baffle on the pole. If trees sit within the reach distance, a baffle alone may not be enough because squirrels can approach from above, so the key adjustment is increasing horizontal clearance and positioning the baffle so it blocks both climbing and re-grabbing the feeder.
Why are birds not using the feeder even after I built it correctly?
Check three common causes: placement (no nearby landing or escape cover within about 8 to 12 feet), port size (seed can jam if ports are slightly undersized for the seed type), and seed freshness. Also expect a delay, often 1 to 2 weeks, because birds need time to discover the new food source and learn the routine.
How often should I refill a PVC tube feeder in wet or humid weather?
Refill less frequently and do not top it off when rain is forecast. Keeping the tube only partially full lowers the time seed sits in the feeder, which reduces bridging and wet compaction. After significant rain, inspect and clear any blocked ports before putting in more seed.
What is the best way to clean a PVC bird feeder without damaging joints or caps?
Soak and scrub with warm soapy water first, then fully rinse and dry completely before refilling. If using a bleach solution, scrub thoroughly and rinse until there is no bleach odor, because residue can deter birds. Let it dry fully, especially around the seams and inside the caps, since moisture left behind can lead to mold or sticky seed dust.
Can I make the top cap removable and still keep it weatherproof?
Yes. The removable cap can stay secure with a friction fit, and you can improve the seal with a thin strip of exterior-appropriate foam weather stripping. Keep an eye on fit after temperature swings, because expansion and contraction can loosen the cap if there is no compliant gasket layer.
Is there a way to reduce birds getting wet or seed staying damp inside the tube?
Start by confirming the drainage hole is clear, and ensure the feeder has a slight forward tilt during installation so any water drains away from the ports instead of pooling. Also verify the top cap is tightly fitted, since loose caps are a common reason water enters from above.
What should I do if a port hole seems too small for the seed I chose?
Do not force seed in and ignore it, because even slight jamming can cause a blockage that spreads across the feeder. Swap to a seed that matches the port size, or rebuild with the correct port diameter. If you drill larger holes, seal around the port edges again to keep the weatherproofing intact.
How can I stop the feeder from swinging too much when hung?
Use a secondary anchor point so the hanging system forms a stable triangle and reduces motion. If possible, tie a second cord from the feeder bottom to a fixed point below, which limits swing and protects the hardware from repeated twisting in wind.
What height and clearance should I use if I’m not mounting on a shepherd’s hook?
The safest general rules are to keep it well away from nearby branches, fences, and rooflines (at least 8 feet horizontally from launch points) and mount it high enough that ground predators and many squirrels cannot easily reach (around 4.5 feet or more off the ground for pole-style placement). Adjust based on your surroundings, especially if there are tall shrubs or nearby structures birds use as cover.
Do I need to do anything special for window safety with a tube feeder?
Yes, placement matters because the middle distance is the highest risk. Position feeders either very close (within about 3 feet) or far away (more than about 10 feet) from windows, and if you have limited options, consider using the near or far placement strategy rather than hanging at an intermediate distance.