To draw a bird feeder, start with a rectangle for the body, add a roof shape (triangle or trapezoid) on top, sketch a floor platform underneath, then add a hanging hook or post and small details like perch rods and feeding openings. Once the feeder looks right, drop a small bird onto the perch using a circle for the head and an oval for the body. That's the whole process, and you can get a clean, recognizable result in about 10 minutes even if you've never done this before.
How to Draw a Bird Feeder Step by Step for Beginners

Marcus Brennan
25 Apr 2026
Quick sketch basics for a bird feeder

Before you draw a single line, it helps to know what you're actually building on paper. A bird feeder, at its core, is a collection of simple geometric shapes stacked together. A hopper feeder is basically a box with a pitched roof. A tube feeder is a tall cylinder with a few perch holes. A platform feeder is just a flat tray on a post. Knowing which type you're drawing makes the whole process much easier because you already know what shapes to start with.
The golden rule for beginner sketching is: always start with light construction lines. These are your guidelines, and skipping them is the fastest way to end up with a lopsided feeder that's hard to fix. Use a pencil and press lightly. You'll darken the real lines later and erase the construction lines near the end. This approach works for the feeder and for any bird you add to the scene.
One quick perspective note before you start: if you're drawing the feeder from slightly below eye level (which looks most natural when it's hanging in a backyard), you should be able to see the underside of the roof slightly, not the top. If you're drawing it from above, you'd see the top of the roof but not the floor platform. Pick one and stick with it. A very common beginner mistake is drawing both the top and bottom surfaces visible at the same time when the perspective doesn't allow for it.
Step-by-step drawing a bird feeder (easy method)
This method uses a classic hopper-style feeder as the base because it's the most recognizable shape and translates well to simple geometry. Once you're comfortable with this version, adapting it to a tube or bottle-style feeder is straightforward.
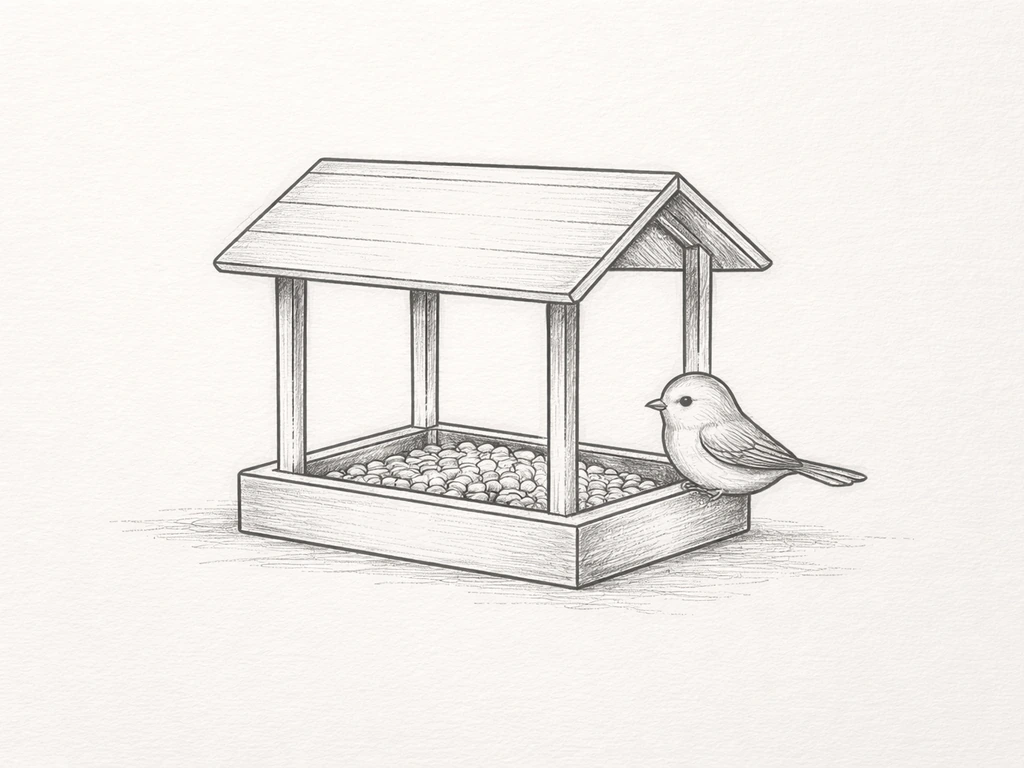
- Draw a rectangle for the feeder body. Keep it roughly 1.5 times taller than it is wide. This is your seed chamber. Press lightly.
- Add a roof. Draw a triangle or a low trapezoid sitting on top of the rectangle. A triangle with a slight overhang on each side looks like a classic peaked roof. The overhang should extend about a quarter of the rectangle's width on each side.
- Add the floor platform. Draw a thin, wide rectangle below the main body, extending slightly wider than the roof overhang. This is where seeds collect and where birds land.
- Sketch the feeding openings. On both sides of the lower portion of the seed chamber rectangle, draw a small gap or open slot between the chamber and the platform. This represents where seeds spill out onto the platform.
- Add a hanging hook or post. For a hanging feeder, draw a short vertical line from the roof peak, then curve it into a hook at the top. For a post-mounted feeder, extend a vertical line down from the platform center.
- Draw the perch rods. Add one or two thin horizontal lines crossing just below the feeding openings, sticking out slightly on each side of the feeder body.
- Refine your lines. Go over the main shapes with slightly heavier, more confident lines. Erase the rough construction marks underneath.
- Add optional details. A subtle wood grain texture (short parallel lines on the sides), a small decorative finial on the roof peak, or a screw head on the platform all make the drawing feel more grounded in a real object.
The whole sequence from first construction line to a clean finished feeder should take 10 to 15 minutes. Don't rush the construction phase. Getting the proportions right early saves a lot of erasing later.
Drawing a bird and a feeder together (simple composition)
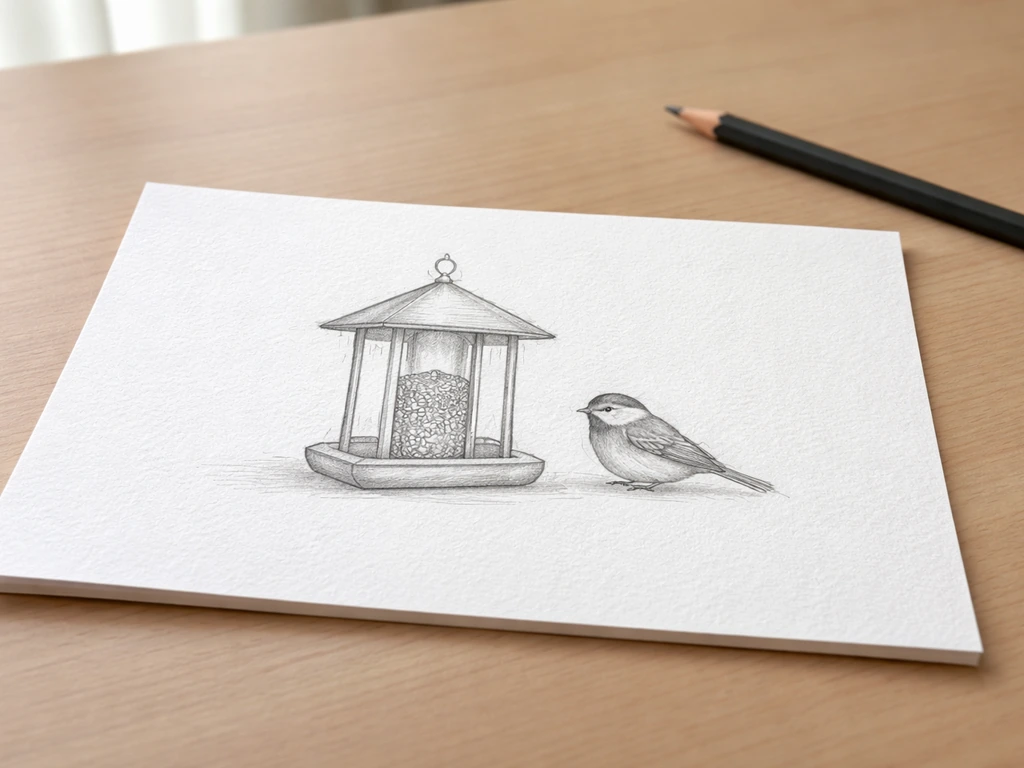
Adding a bird to your feeder drawing turns a diagram into a scene, and the key is getting the relative size right. After you sketch the bird and feeder, you can use placement and food choices to encourage more birds to visit your feeder. A small songbird like a chickadee or sparrow sitting on the perch rod should have its body roughly one-quarter to one-third the height of the feeder body.
If you want the feeder to actually work, learn [window bird feeder how to attract birds](/metal-mesh-feeders/window-bird-feeder-how-to-attract-birds) tips like choosing the right placement and food. If your feeder body rectangle is 4 inches tall on the page, the bird's body oval should be around 1 inch. Bigger than that and the bird looks like a parrot; smaller and it looks like a fly.
For the bird itself, think of it as a series of shapes built up in stages. Start with a medium oval tilted slightly forward for the body, then add a small circle at the front-upper end for the head. The head circle should overlap the body oval slightly. From there, add a short triangular beak pointing away from the feeder, a small triangular tail pointing backward and slightly downward, and two thin angled lines for the legs gripping the perch rod. Then carve in the wing outline and add a simple eye dot. That's a recognizable bird in about six shapes.
For the composition as a whole, try placing the feeder slightly off-center rather than dead in the middle of your page. A good rule of thumb is to position the main feeder body so it falls along one of the vertical lines dividing the page into thirds. Then place the bird on the perch on the opposite side, so your eye naturally travels between the two elements. This creates visual balance without making the scene feel stiff or static.
Leave some breathing room around the feeder. Negative space, the blank area around your subject, actually makes the feeder and bird look more intentional. A feeder crammed into the corner with no space around it feels awkward. Give it room to exist on the page.
Materials and shape choices for different feeder styles
If you've spent any time on this site, you know that bird feeders come in a lot of forms: classic wooden hoppers, plastic tube feeders, recycled bottle feeders, even pinecone feeders rolled in peanut butter. Each of those has a distinct silhouette, and drawing the right starting shapes makes each one instantly recognizable. Here's a quick breakdown.
| Feeder Type | Core Shapes to Start With | Key Details to Add |
|---|---|---|
| Hopper feeder | Rectangle body + triangle or trapezoid roof + wide flat platform | Feeding gaps at base of chamber, perch rods, hanging hook |
| Tube feeder | Tall narrow cylinder (draw as a rectangle with rounded top and bottom) | Small circles or slots for perch holes, a pointed cap on top, a bottom plug |
| Platform/tray feeder | Wide flat rectangle on a post or hanging flat | Low lip around the edge, open top (no roof), mounting post or chain lines |
| Bottle/recycled feeder | Bottle silhouette (tapered oval or elongated teardrop) | Bottle neck at top, feeding spout or hole near the bottom, wooden base platform |
| Pinecone feeder | Elongated oval with zigzag or scale texture on the outside | String tied at top, seeds or coating shown as small dots on the surface |
For pencil drawing, any of these work well. If you're drawing with pen or marker and want something forgiving for a first attempt, go with the hopper feeder. It's the most geometric and leaves the least room for ambiguity. The bottle-style feeder is a close second and is a natural fit if you're drawing alongside a recycled materials build project.
Common mistakes and how to fix proportions
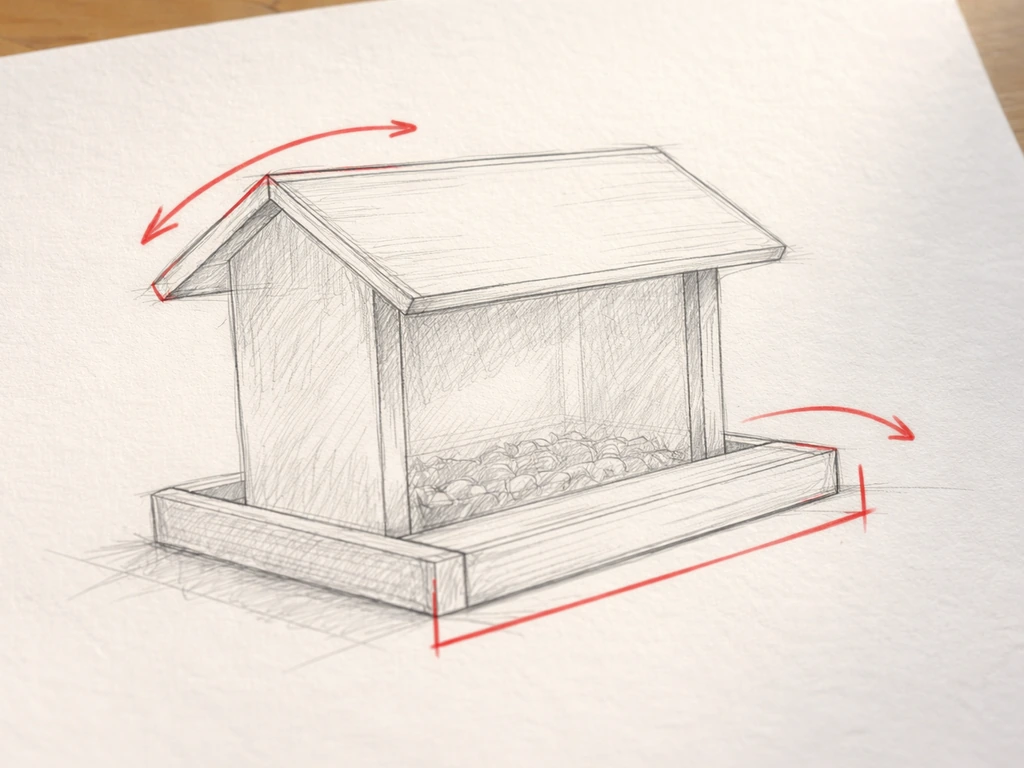
Almost everyone draws the roof too big on the first try. A peaked roof that towers over the feeder body looks cartoon-like rather than realistic. The fix: your roof height should be roughly half the height of the feeder body, not equal to it or taller. Sketch the roof lightly and compare it to the body before committing.
Another very common issue is the platform looking too narrow. In a real hopper feeder, the platform tray extends beyond the seed chamber on all sides so birds have somewhere to stand. If your platform is the same width as the chamber, it looks like the feeder has no landing zone. Push the platform at least 25% wider than the chamber on each side.
With the bird, the most frequent proportion problem is a head that's too small or too perfectly round. Bird heads are large relative to the body (that's part of what makes them look like birds rather than blobs), and they're rarely a perfect circle. A slightly flattened or tilted circle looks more natural. If your bird looks stiff, check whether the body oval is tilted forward slightly. A flat horizontal oval produces a bird that looks like it's standing at attention rather than perching comfortably.
Vanishing point distortion is a subtler issue that crops up when you try to add perspective to the feeder box. If you're placing vanishing points too close to the feeder on the page, the sides of the box will skew dramatically and look warped. Either keep vanishing points far off the edge of your paper, or simply draw the feeder in a straightforward front view (no perspective) until you're more comfortable. A flat, clean front-view feeder looks better than a badly distorted three-quarter view.
Line weight also makes a real difference. Thicker, heavier lines on the outer silhouette of the feeder and bird make them pop forward, while thinner lines for interior details (wood grain, perch rods) push those elements back visually. If your drawing looks flat, try going over the outer outlines with a slightly heavier hand or a thicker pen.
Next steps: simple improvements and practice plan
The best way to get faster and more confident is timed sketching. Set a timer for 2 minutes and draw just the feeder body, roof, and platform as many times as you can before the timer runs out. It sounds aggressive but it forces you to stop overthinking the lines and just commit. After a few rounds, your proportions will naturally improve because your hand starts to internalize the shapes. Try the same drill with just the bird: 1 minute, as many bird silhouettes as you can fit on the page.
Once the basic hopper feeder feels comfortable, try drawing a different feeder style from the table above. The tube feeder is a good second challenge because it introduces a cylinder shape (tricky to make look three-dimensional with just pencil lines). After that, try drawing from observation: set up an actual feeder, look at it for 30 seconds before picking up your pencil, then draw what you remember. This trains you to capture the essential shapes quickly rather than getting lost in details.
For the bird, try adding more species variety. A plump round junco looks very different from a sleek narrow-bodied nuthatch clinging upside down on the feeder side. You can find reference photos easily, and sketching from photos is a completely valid practice method. The goal isn't photorealism; it's getting the gesture and proportion right so the bird reads as a bird at a feeder.
If you're drawing because you're planning to actually build one of these feeders, the drawing process genuinely helps you think through the build. Sketching a tube feeder forces you to think about where the perch holes go relative to the seed ports, which is the same decision you'd make with a drill in your hand.
Project FeederWatch also recommends species-appropriate tube feeder designs, including guidance on feeder features like access points and where openings should be placed relative to the feeding area where the perch holes go relative to the seed ports.
And if you want to go further with the real-world side of this hobby, exploring a full bird feeder setup guide or a step-by-step build tutorial are natural places to go once your drawing is done and you're ready to take it off the page.
The Alaska Department of Fish and Game recommends placing feeders either closer than three feet to the window or more than 30 feet away to reduce window collisions [How to keep birds from hitting your window](https://www. adfg. alaska. gov/index.
cfm? adfg=wildlifenews. viewarticle&articlesid=4107). If you want to keep going after the sketch, a bird feeder setup guide can help you plan the real-world placement and parts.
If you want to bring that sketch into real life, a backyard bird feeder setup will help you choose the right location and parts before you drill or hang anything. If you want to build a real setup, you can follow a bird feeder setup guide next.
Don't wait until your drawing looks perfect before trying the next step. A slightly wobbly feeder sketch is still a useful sketch. The practice is in the doing, not in waiting for confidence to arrive on its own.
FAQ
How can I draw a bird feeder if I want to use pen or marker instead of pencil?
Use lighter, quicker construction with a very light pencil first, then ink only the final outer silhouette. For marker, start with the feeder shape only, let it dry, then add the roof and platform details last. If you ink the interior lines early, mistakes become permanent and can ruin proportions.
What if my roof still looks too big even after keeping it about half the feeder height?
Check the roof’s “overhang,” not just its height. In a hopper-style feeder, the roof edges should extend slightly past the sides of the box, otherwise the roof reads as an added block. Aim for roof width about 10 to 20 percent wider than the body rectangle.
How do I choose the right perspective so the underside of the roof and the platform both make sense?
Pick one viewpoint and draw only the surfaces that viewpoint allows. If you’re below eye level, draw the roof underside as a single angled plane, keep the floor platform mostly as a visible top surface, and avoid drawing its bottom or side edges at the same time.
My platform looks like it floats, how do I make it connect properly to the feeder?
Add small connector shapes (two short rectangles or trapezoids) where the platform meets the seed chamber, then slightly darken those contact lines. Without a visible attachment, the platform reads as a separate piece rather than a tray extending from the chamber.
How should I place the perch rod so it looks natural on a simple geometric feeder?
Instead of centering the perch exactly in the middle of the chamber, align it slightly below the feeding opening height. This makes the bird sit comfortably and prevents the bird from covering the “entry” area. Keep the perch rod thickness as a slightly tapered pair of lines, wider at the near end.
What if the bird looks like a blob or not like it is perching?
Make the head overlap the body oval more than you think, and tilt the body oval forward slightly toward the perch. Then ensure the legs touch the perch with angled “grip” lines (two lines that meet the perch), not straight down lines that miss the surface.
Can I draw multiple birds on one feeder without messing up scale?
Yes, but keep their bodies in a consistent size band. If the main bird body is 1/4 to 1/3 of the feeder body height, keep additional birds within plus or minus one small step (for example, 0.85x to 1.1x). Also vary posture, so not all heads and wings match exactly.
How do I draw a tube feeder version without it collapsing into a flat shape?
Use an ellipse for the front and back rim of the cylinder, then connect them with two slightly curved side lines. Add 2 to 3 short vertical seam lines to suggest curvature, and place perch holes as small circles that sit on the front third ellipse, not in the middle of the cylinder.
What line weight should I use if my drawing looks flat or too busy?
Use three levels: thick for the outer silhouette of feeder and bird, medium for major structural edges (roof to body, platform to chamber), and thin for small details (perch rods, wing outline, eye dot). If everything is the same weight, simplify interior details and keep the silhouette emphasized.
How can I avoid warping when I try a 3-quarter view?
Don’t place vanishing points near the drawing. If it’s hard to judge, switch to a front-view feeder for your first practice, get the proportions right, then add perspective later by making only the depth edge shift slightly.
What’s a simple way to make sure my feeder proportions are correct before adding the bird?
Before the bird goes on, measure relationships with your pencil. For example, confirm roof height is about half the feeder body height and the platform is at least 25 percent wider than the seed chamber on each side. Once these are right, the bird proportions become easier to place.
I want a more realistic look, but I’m drawing simply, what details matter most?
Prioritize the “readable” features: a clear roof outline, a believable platform edge that extends beyond the chamber, and bird anatomy cues (overlapping head, tilted body oval, and legs gripping the perch). Skip wood grain or tiny textures until the shapes and silhouette are strong.