Setting up a bird feeder with a camera is one of those projects that sounds simple until you're standing in your backyard holding a drill, a Wyze cam, and a bag of black-oil sunflower seeds, wondering where to start. The short answer: pick a feeder style that gives the camera a clear sightline, blank" rel="noopener noreferrer">place it within 3 feet of a window or more than 30 feet away to avoid bird collisions, mount it so it won't wobble in wind, plan your power and storage before you run cables, and then troubleshoot from there. This guide walks you through every step in the order you'll actually need it. If you still need the basics of building one, check the related walkthrough on how to draw a bird feeder for a simple step-by-step approach.
Bird Feeder Setup Guide With Camera for Better Bird Videos

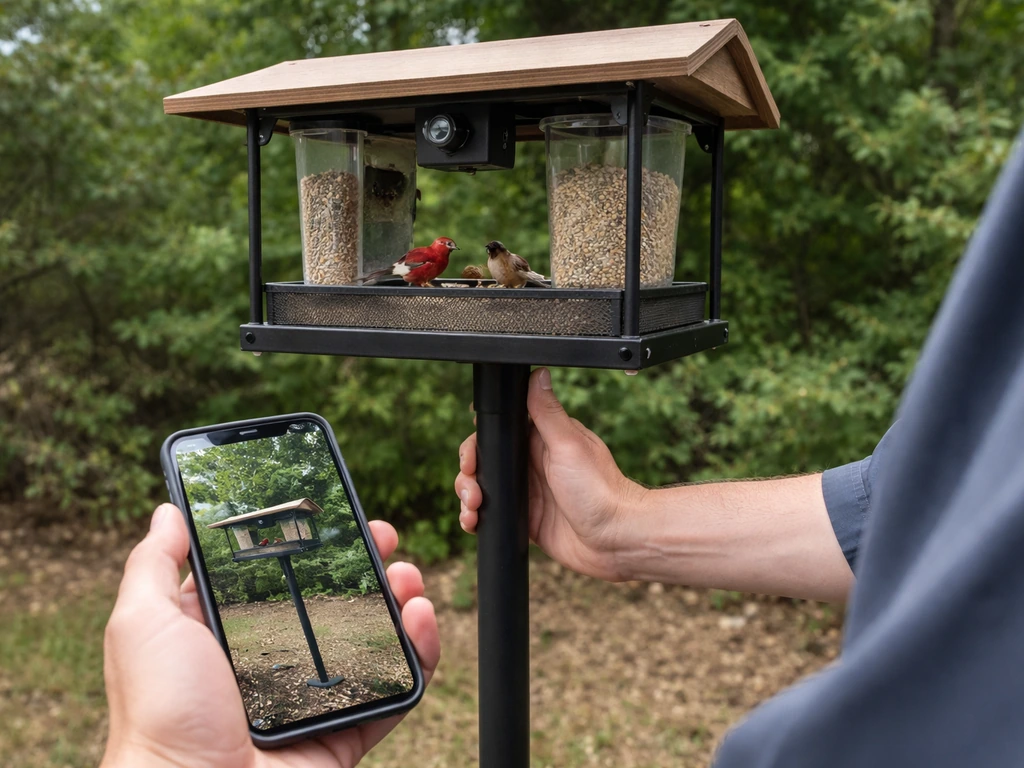
Choosing a camera-ready feeder setup
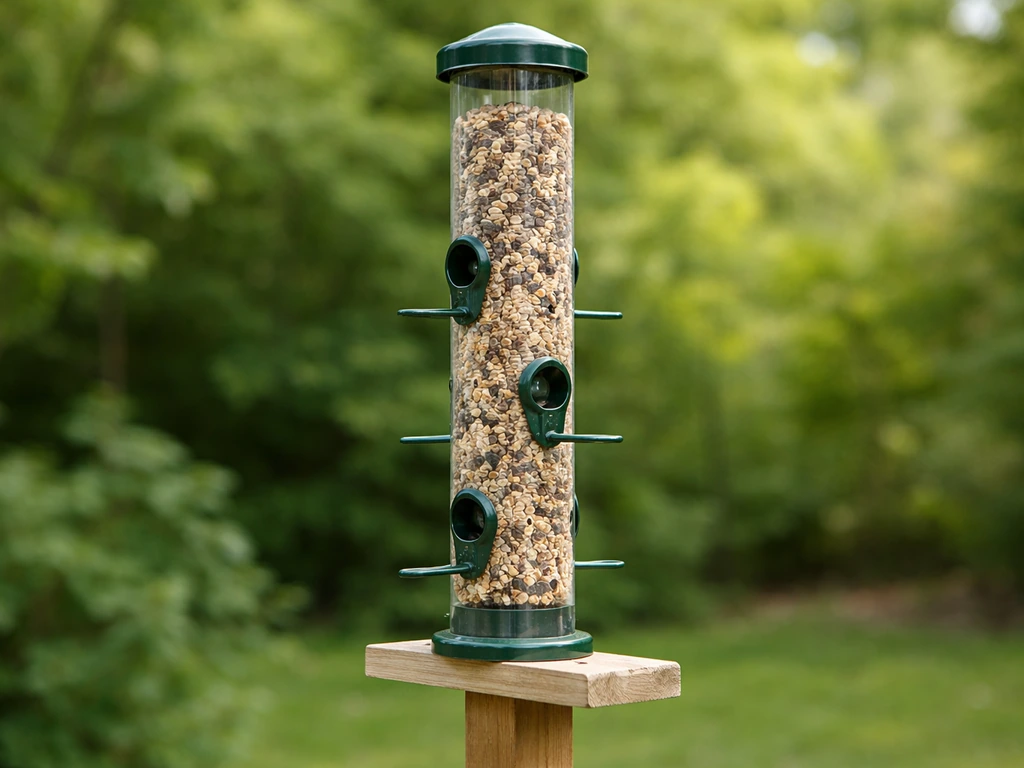
The feeder itself shapes everything downstream, including how well the camera can see the birds. For camera setups, you want a feeder with a relatively flat, open feeding platform or a tube feeder with perches on one side so birds land predictably. Tray feeders and platform feeders are the easiest to film because birds land in roughly the same plane and the camera can be positioned at a fixed distance. Tube feeders work well too, especially if you orient the camera toward the side with the most perches.
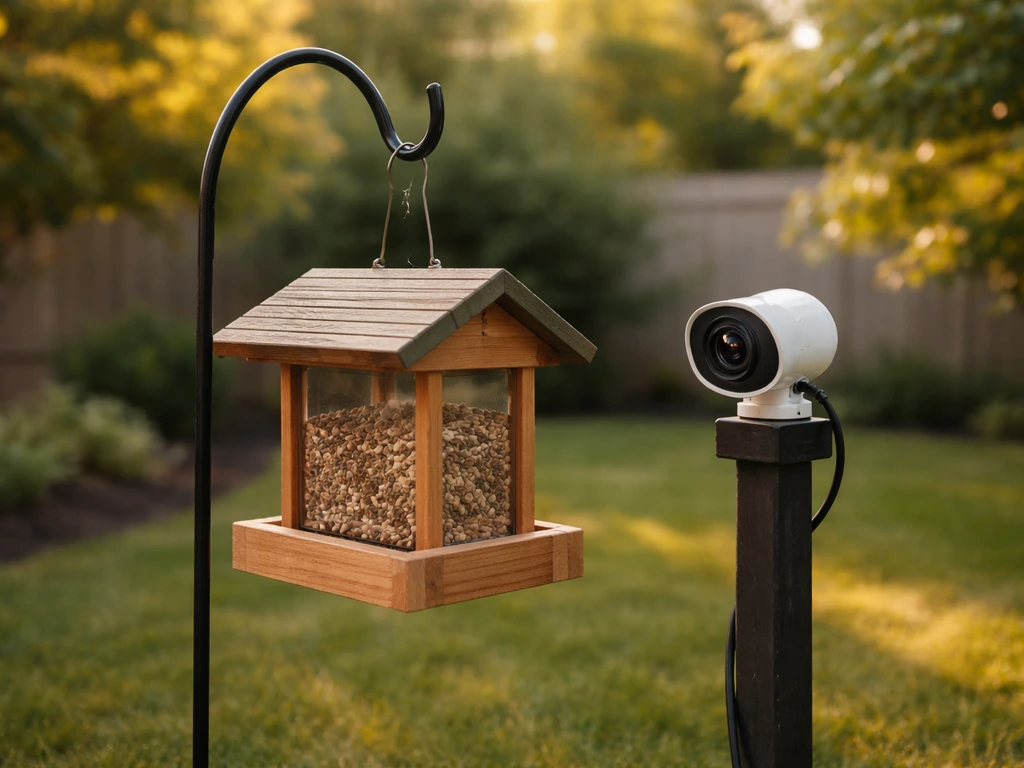
If you're building from common materials, a flat wooden tray feeder is the most camera-friendly DIY option. A piece of 12-inch cedar board, some scrap 1x2 for edge rails, a few drain holes drilled in the base, and a hook or chain for hanging gets you a feeder that's cheap, weatherproof, and gives the camera a wide, consistent view. Plastic bottle and milk jug feeders work fine for attracting birds, but the curved surface and swinging motion make them harder to film clearly. Pinecone feeders coated in peanut butter and seeds are great for beginner builds and close-up window filming, but they spin in the wind, which will frustrate your camera every time.
For the camera itself, you have three main categories: wired cameras (most reliable, need a power run), battery-powered wireless cameras (most flexible, need recharging), and solar-assisted battery cameras (best for permanent outdoor setups). The Reolink Argus Eco is a practical battery-powered option with a 5,200mAh rechargeable battery and an IP65 weatherproof rating, and the Argus Eco Ultra steps that up to IP66 with an optional solar panel for continuous power. The Wyze Cam Outdoor and similar models support microSD cards up to 256GB for local storage, which matters when you don't want to pay for cloud subscriptions. Ring's Stick Up Cam Battery is another solid weather-resistant option. All three are appropriate for backyard feeder use, and the right pick depends mainly on whether you have a nearby power outlet and how much you want to spend on cloud storage.
| Camera type | Best for | Power | Storage | Weatherproofing |
|---|---|---|---|---|
| Wired outdoor camera (e.g., Reolink PoE) | Permanent, high-reliability setups | Plug-in or PoE | NVR or NAS, local | IP66+ typical |
| Battery wireless (e.g., Reolink Argus Eco) | Flexible placement, no outlet nearby | Rechargeable battery | microSD + optional cloud | IP65 |
| Solar-assisted battery (e.g., Argus Eco Ultra) | Permanent placement without running cable | Solar + battery backup | microSD + optional cloud | IP66 |
| Smart home cam (e.g., Ring Stick Up Cam Battery) | Cloud-first workflow, app monitoring | Rechargeable battery | Cloud: 30–180 days by plan | Weather-resistant |
One quick recommendation: if you're just starting out, a battery-powered camera with a microSD card slot is the most forgiving combination. You can reposition it without running new cable, and local storage means you won't lose footage if your Wi-Fi goes down. Once you know the angle and position you like, you can convert to a wired or solar setup for less maintenance.
Mounting and hanging considerations
Stability is the single biggest factor in getting usable video. A feeder that sways every time a bird lands, or every time the wind picks up, will produce blurry, nauseating footage regardless of how good your camera is. For pole-mounted feeders, use a shepherd's hook or a dedicated feeder pole with a wide base stake, driven at least 12 inches into the ground. If you're mounting to a deck railing or fence post, add a short wooden bracket bolted through (not just screwed) so the whole assembly doesn't flex.
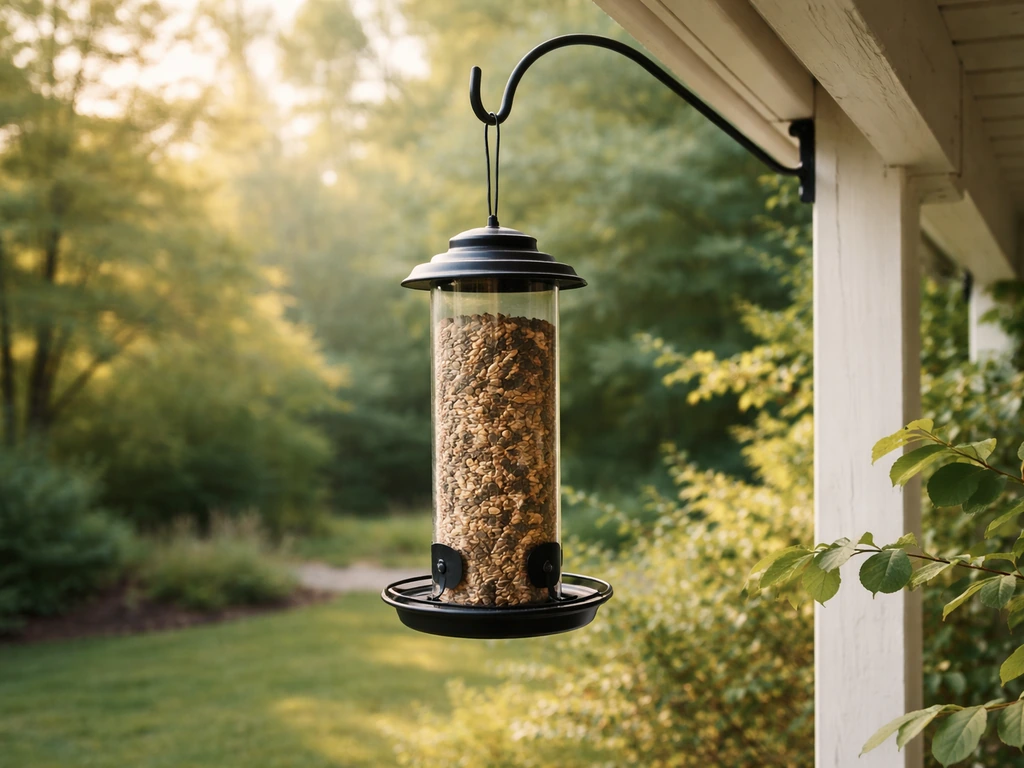
Hanging feeders are trickier for camera setups because they naturally swing. If you want to hang the feeder from a branch or overhang, run two chains or cables spaced several inches apart (a V-hang) instead of a single hook. This limits the rotational swing that ruins footage. You can also add a short length of chain with a weight at the bottom of the feeder to dampen movement. It's not elegant, but it works.
For the camera mount, the most common mistake is clamping the camera directly to the same pole or branch as the feeder. Every landing bird vibrates the whole system. Instead, mount the camera on its own separate pole, fence bracket, or deck rail mount, aimed at the feeder from a stable independent point. Keep the camera 18 to 36 inches from the feeder for close-up detail, or 3 to 5 feet away if you want context (surrounding branches, sky, multiple birds at once). A mini tripod clamped to a fence rail or a dedicated camera mount arm works well for this.
Safety matters here too, especially if you have kids or pets. Keep camera cables tucked and secured with cable clips so they don't become chew toys or trip hazards. If you're running a wired camera, route the cable along the fence line or under a deck board rather than across open ground. Check the feeder mounting hardware every few weeks during spring and summer since heat cycles loosen screws faster than you'd expect.
Selecting feeder placement for consistent footage
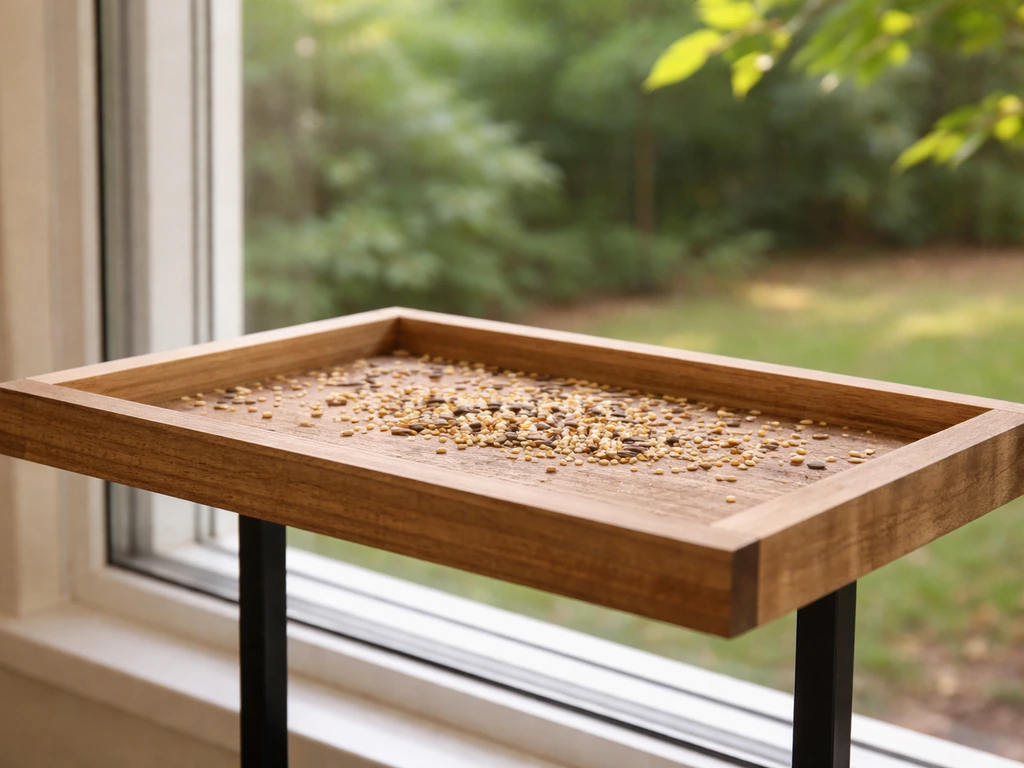
Placement is where bird safety and camera quality intersect, and you have to get both right. The most well-established guidance for avoiding window collisions: put feeders within 3 feet of a window, or more than 30 feet away. The logic is straightforward. Closer than 3 feet, birds haven't built enough speed on takeoff to injure themselves if they hit the glass. Beyond 30 feet, they have room to veer away before reaching the building. blank" rel="noopener noreferrer">The danger zone is the 4 to 30 foot range where birds have speed but not time to react. Cornell's guidance echoes this, and the Bird Conservancy of the Front Range uses the same rule. For camera setups near a window or sliding door, the under-3-foot zone is actually ideal: you get a close view, the feeder is easy to monitor from indoors, and you reduce collision risk at the same time.
For camera angle and lighting, north-facing placements work well in the Northern Hemisphere because they avoid direct sun glare in the lens without leaving birds in deep shadow. South-facing works if the feeder has natural diffusion from nearby leaves or a roof overhang. Avoid east or west orientations if the camera faces directly into morning or afternoon sun. Those golden-hour light conditions look beautiful in photos but wash out video feeds and confuse auto-exposure systems constantly.
Cover matters as much as sun angle. Birds want a clear escape route and nearby perches to land on before approaching the feeder. A spot within 10 to 15 feet of a shrub or tree (but not directly underneath, where cats can hide) will attract more consistent activity than an open exposed pole in the middle of the lawn. More consistent activity means more useful footage. Plan the camera angle so that cover is in the background rather than blocking the frame.
If you're filming for species documentation rather than casual viewing, think about species-specific height preferences. Ground-feeding birds like juncos and doves prefer low platform feeders set 12 to 18 inches off the ground. Chickadees, nuthatches, and finches prefer feeders at 5 to 6 feet. Orioles and grosbeaks tend to favor taller placements with an open surrounding. Matching your feeder height to your target species increases the odds of regular visitors, which means the camera records something worth watching.
Power, connectivity, and storage planning
Plan this before you mount anything, because retrofitting power after the camera is installed is miserable. Start by answering three questions: Do you have a GFCI outdoor outlet within 50 feet of the feeder location? Is your home Wi-Fi signal strong enough at that spot, or will you need a range extender? And do you want local storage, cloud storage, or both?
For wired cameras, a GFCI outdoor outlet is your power anchor. Use an outdoor-rated extension cord or, better, run weatherproof conduit along the fence to a dedicated outlet box. This is a one-afternoon project for most setups and eliminates battery anxiety entirely. For battery cameras, check the manufacturer's rated battery life under your specific conditions. The Reolink Argus Eco's 5,200mAh battery sounds like a lot, but cold temperatures and high motion-detection frequency can drain it in a week or two. A paired solar panel solves this if you have a south-facing location with at least 4 to 6 hours of direct sun per day.
On storage: local microSD cards are the most cost-effective option. Most current Wyze cameras support cards up to 256GB, which is enough for weeks of continuous motion-event recording. For cloud storage with Ring cameras, the default storage duration is 60 days for 1080p and 2K devices, or 30 days for 4K devices, and you can extend that up to 180 days through Ring's paid Protect plan. Note that Ring's storage clock starts from when recordings are made, not when you watch them, so clips you miss will still be saved for the full duration. If you want both local redundancy and cloud backup, the Wyze plus microSD combination is hard to beat on cost.
Wi-Fi connectivity is often the weak link for backyard cameras. Most home routers struggle past 50 to 75 feet through walls and fences. Before buying any camera, take your phone to the exact feeder location and run a speed test. If you're getting below 5 Mbps upload, add a mesh Wi-Fi node or a Wi-Fi range extender before you start the camera setup. Cameras that support 2.4GHz are more range-tolerant than 5GHz-only models, so favor 2.4GHz or dual-band cameras for outdoor feeder placements.
Testing, setup tuning, and troubleshooting common issues
Once everything is mounted, do a full test run before you load the feeder with seed. Check the camera's live feed from your phone and physically bump the feeder pole, the camera mount, and the feeder itself separately. If the camera image shakes on any of those bumps, tighten the mount or move the camera to its own independent support. This test catches most footage-quality problems before birds are in the frame.
The most common issues people run into, and how to fix them:
- Shaky or blurry footage: Camera is mounted on the same structure as the feeder. Move it to an independent mount and add a stabilizing weight to the feeder if it swings.
- Birds not visiting yet: This is almost always a patience and seed issue. Load the feeder, then leave the area alone for 2 to 5 days. Birds are more cautious near new objects. Temporarily reduce camera infrared LEDs or indicator lights if they're visible during the day, since blinking lights spook birds.
- Poor lighting or washed-out image: Camera is facing into direct sun. Rotate the setup 90 to 180 degrees or add a small shade awning above the camera lens using a bent piece of aluminum flashing.
- Wrong angle or missed birds: Adjust the camera in small increments (5 to 10 degrees at a time) and check the live feed from your phone after each adjustment. Don't try to eyeball the angle from the ground.
- Motion detection not triggering: Increase sensitivity in the app settings and confirm the detection zone covers the feeder platform, not just the area in front of it. Many cameras default to a wide zone that misses close-up perch activity.
- Camera going offline repeatedly: Almost always a Wi-Fi signal issue. Add a range extender or move the camera 10 to 20 feet closer to the router to confirm signal is the cause before assuming a hardware problem.
- Storage filling too fast: Switch from continuous recording to motion-event-only recording. On a 256GB card with motion-triggered recording, most feeder setups will store several weeks of clips without filling up.
- Cloud clips not saving (Ring): Check that your Ring Protect subscription is active and that the video storage time setting hasn't been adjusted recently. Ring applies new storage-time settings only to recordings made after the change, so existing clips follow the old setting.
Give the full setup at least a week before making major changes. Bird activity builds gradually as local birds learn the feeder is there, and camera performance issues often resolve themselves once you dial in sensitivity and angle settings over a few days of real-world footage.
Pest-proofing and bird-friendly maintenance for camera setups
Squirrels are the classic problem, and the solution is the same whether or not you have a camera: a pole-mounted baffle. Mount the baffle at 4 to 5 feet above the ground on the feeder pole, and make sure the pole is at least 8 to 10 feet away from any structure a squirrel can launch from, including fences, deck railings, tree branches, and AC units. This distance requirement catches most people off guard. A baffle mounted on a pole that's only 5 feet from a fence is basically decoration. The camera actually helps here because you can watch the footage and see exactly where squirrels are approaching from, then adjust the pole location accordingly.
One thing that changes with a camera setup: you need to keep the camera lens clean. Peanut butter feeders, suet cakes, and seed hulls create oils and debris that drift in the air and coat anything nearby. Wipe the lens weekly with a microfiber cloth. Check the camera housing for spider webs and insect nests monthly, especially in summer. A web across the lens at night will ruin every infrared shot until you find it.
Window collision risk is worth revisiting if your camera setup has you placing the feeder near the house for easier monitoring. Stick with the under-3-feet or over-30-feet rule described earlier. If the feeder is in the 3-to-30-foot window (no pun intended), add window collision tape or decals to any glass in the flight path. These break up the reflection that birds mistake for open sky. This is especially important on the sides of the house that the camera cable runs toward, since that often pulls you into the danger zone distance-wise.
Keep the feeder itself clean on a regular schedule. Rinse plastic or wooden feeders every 1 to 2 weeks with a 9:1 water-to-bleach solution, rinse thoroughly, and let them dry completely before refilling. Moldy or wet seed causes illness in birds and also generates foul smells that can attract rodents, which in turn attract larger predators that will stop smaller birds from visiting. Clean feeder equals consistent visitors equals better footage.
Finally, think about what the camera captures beyond birds. Raccoons, opossums, and deer will visit feeders at night and can knock your camera mount out of alignment or tip the feeder entirely. If you're seeing overnight disturbances in your footage, add a second ground-level baffle or move to a heavier pole setup. A camera is one of the best diagnostic tools for figuring out exactly which pest is causing problems, so use that footage actively rather than just for bird watching.
A well-planned bird feeder camera setup comes together faster than most people expect. If you want to build on this overview with a step-by-step bird feeder tutorial, the backyard bird feeder setup guides on this site (related to how to structure a camera-ready build) can help you pick the right feeder and placement. Nail the placement distance from the window, get the camera on its own independent mount, sort out your power and storage before you hang anything, and give the birds a few days to discover the new food source. After that first week, you'll have enough footage to fine-tune angles, sensitivity, and positioning into something you'll actually enjoy watching. If you want to go deeper on species-specific feeder design or step-by-step feeder builds from recycled materials, the backyard bird feeder setup and bird feeder tutorial guides on this site cover those angles in detail. If you're also wondering how to draw birds to a bird feeder, the right food choice, placement, and timing make a big difference.
FAQ
How should I aim the camera if I have both close-up birds and a wider scene I want to capture?
Choose one primary framing first. Set the camera so the feeder fills about 30 to 60% of the frame, then adjust height and angle to keep landing perches visible. If you try to capture everything from day one, auto-exposure and motion detection will swing more, producing missed events or constant re-focusing. After you confirm which species are actually visiting, you can refine to either closer detail or broader context.
What feeder height should I use if I do not know which bird species will show up?
Start at a mid-range height (around 3 to 4 feet for many backyard conditions). This often supports a broad mix of perching and platform-feeding birds, and it makes it easier to keep the camera lens aimed without constantly re-mounting. Once you see the first week of visitors, adjust toward 12 to 18 inches for ground-feeders or 5 to 6 feet for smaller perching birds.
Do I need to use IR night vision, and how do I prevent night footage from looking washed out?
IR night vision helps, but it can reflect off seed hulls, wet feeder surfaces, and nearby cover. Keep the camera lens relatively clean, aim so the feeder and immediate background are not glossy, and avoid mounting right next to shiny surfaces. If your camera has an option to reduce IR intensity or switch to a dim mode, test it during a night run before leaving it on default.
How often should I test and adjust sensitivity and motion detection settings?
Re-test after the first 24 to 72 hours, then again at day 7. Early on, birds are still learning patterns, and wind movement or nearby plants can cause false triggers. If you see lots of short clips when no birds are present, reduce motion sensitivity or increase the camera’s event trigger threshold. If birds arrive but events are missed, the opposite adjustment is usually needed.
What can I do if squirrels or larger animals trigger the camera but birds never arrive?
Treat it as a placement problem, not just a hardware problem. Move the feeder location at least several feet away from easy launch points (fences, railings, branches), then add a pole baffle if you are using a pole mount. Use your footage to identify the exact approach path, then change the feeder position to break that line of access.
How can I stop a hanging feeder from swinging, without making it complicated?
Use a V-hang approach, two support lines spaced several inches apart, so the feeder’s swing is mostly rotational rather than full pendulum motion. Also keep the feeder centered under the supports and avoid long, flexible segments above the feeder. After mounting, perform a “manual swing” test, bump the feeder and watch for blur in a few seconds of video.
Should the camera be mounted at the same pole as the feeder, and what’s the downside if it is?
Avoid clamping the camera to the same support as the feeder. Every landing vibrates the feeder and also moves the camera, which causes blur and makes stabilization harder to compensate for. Mount the camera on an independent pole or bracket, then aim from a fixed point so you can fine-tune the angle once and leave it.
Why is my Wi-Fi signal failing even though my router is close by?
Many backyard spots have higher interference and lower upload speed, not just lower signal bars. Do a speed test at the exact feeder location with your phone, and pay attention to upload, not download. If upload is under about 5 Mbps, add a mesh node or range extender before relying on cloud features, otherwise you will see delayed or missing events.
What microSD setup should I use to avoid losing footage?
Use a reputable, high-endurance card rated for continuous or surveillance recording if possible, and format the card in the camera before first use. If the camera supports configurable bitrate or event clip length, use the highest “reliable event” mode that your card can handle. Also check that the camera is set to record locally for motion events, because some devices require a specific toggle for local recording.
How do I handle power if I cannot reach an outdoor outlet within 50 feet?
If extending power is not realistic, battery with local storage is usually the most practical starting point. Plan for seasonal battery drain, cold weather reduces capacity, and high motion sensitivity increases usage. If you have south-facing sun, choose a solar-assisted battery camera so you can avoid frequent recharging, but confirm your typical sun hours in winter, not just summer.
What’s the safest way to route cables so they do not get damaged or become a hazard?
Route cables along existing hard surfaces, fence lines, or under deck boards, and secure them with clips so there is no slack that a pet or squirrel can grab. Avoid crossing open ground where they are more likely to be chewed or pulled. For exposed runs, use outdoor-rated cable and weatherproof connectors.
How do I keep the feeder and camera clean without making maintenance a chore?
Set a simple schedule based on what causes fouling for your feeder type. Wipe the camera lens weekly with a microfiber cloth, and remove spider webs monthly. For feeders, rinse every 1 to 2 weeks, then fully dry before refilling to prevent mold and foul odors that attract rodents.
What should I do if I consistently get footage of animals at night but no birds?
Use the camera as a diagnostic tool. If raccoons, opossums, or deer are dominating, add a second ground-level baffle or switch to a heavier pole setup to reduce knockovers. Also consider moving the feeder farther from places where predators can hide, like dense cover near the feeder landing zone.
How to Make a Tube Bird Feeder Step by Step
Step-by-step how to make a tube bird feeder with materials, safe mounting, maintenance, and fixes for leaks and clogs.