You can build a working LEGO bird feeder using standard bricks, a sloped interior floor to move seed toward the access openings, and LEGO fence pieces across the front to let birds reach the seed without it all tumbling out. It takes about an hour, holds a small supply of black-oil sunflower or hulled sunflower seed, and with a few tweaks it will genuinely attract birds rather than just sitting in the garden looking like a toy.
How to Make a LEGO Bird Feeder Step by Step

Marcus Brennan
6 Jun 2026
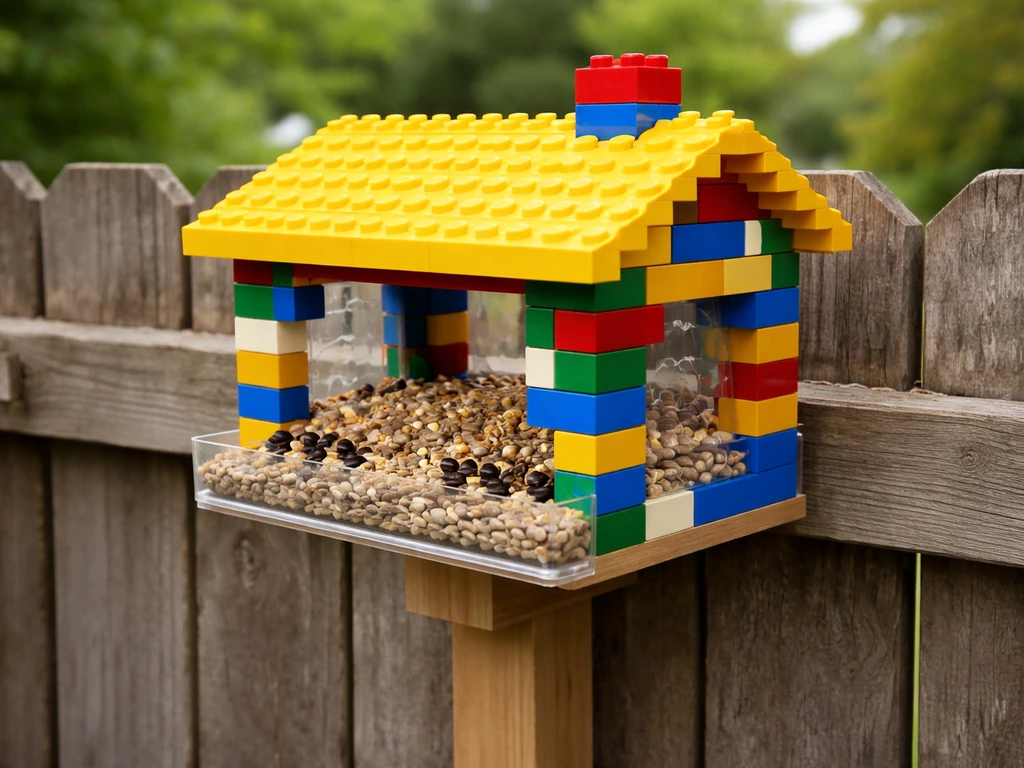
This is not just a display model. The build described here creates a hollow internal cavity, a slight forward slope so seed naturally migrates toward the feeding openings, and a removable or hinged top so you can refill and clean it without dismantling the whole thing. It is beginner-friendly, but there are real design decisions involved, and getting them right is the difference between birds visiting and seed going moldy untouched.
What to gather before you build
Pull together your LEGO pieces first, then pick up a couple of non-LEGO supplies that make the outdoor version actually weatherproof and hangable.
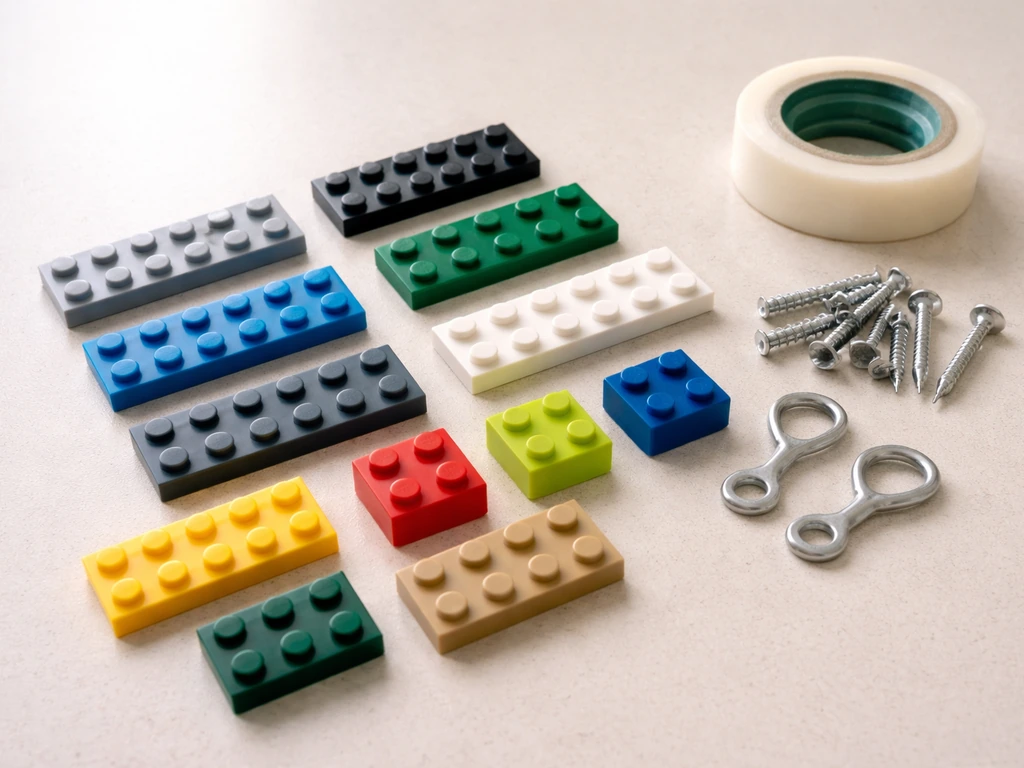
LEGO pieces you need
- A good supply of 2x4, 2x6, and 2x8 flat plates and standard bricks in any color (around 150 to 200 pieces total for a small platform-style feeder)
- Several 4x1 bricks or beams (at least four) to create the internal slope
- Two or three LEGO fence pieces, or any perforated/lattice element with small holes (these form the seed-access openings on the front face)
- A flat 8x8 or 6x8 base plate to build from
- LEGO Technic axle pins or standard Technic connector pins if you want to add a roof hinge or reinforce the hanging anchor point
- A flat roof plate (removable, not permanently stud-locked, so you can lift it off for refilling and cleaning)
Non-LEGO supplies
- Clear RTV silicone sealant (such as Permatex clear silicone) for sealing the outer seams against rain ingress
- About 18 inches of sturdy garden wire, paracord, or a thin S-hook rated for outdoor use, for hanging
- A small eyelet screw or cup hook if you plan to pole-mount rather than hang
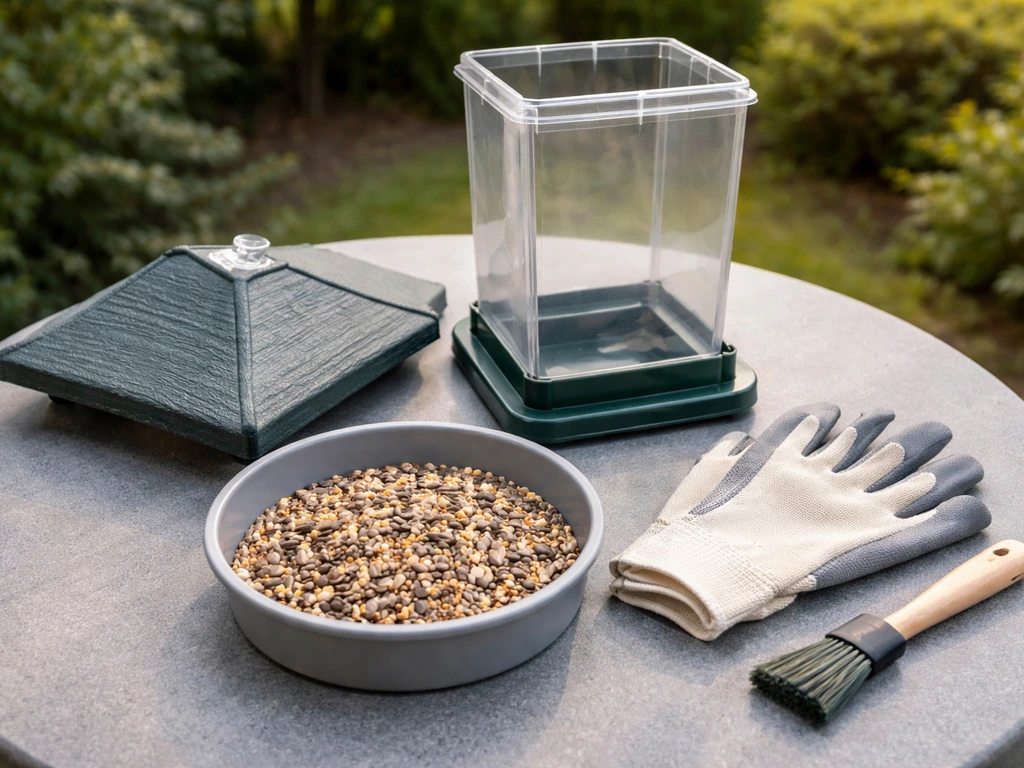
- Black-oil sunflower seed or hulled sunflower seed to fill it (hulled sunflower is ideal for small birds like chickadees and finches since they do not have to crack a shell)
- A soft-bristle brush and mild dish soap for cleaning
You do not need an expensive or rare LEGO set. Sorted bulk LEGO from a thrift store, BrickLink, or an old set works fine. Color does not matter structurally, though lighter colors absorb less heat in summer, which is worth thinking about if your feeder will be in direct sun.
Pick a design that actually holds seed
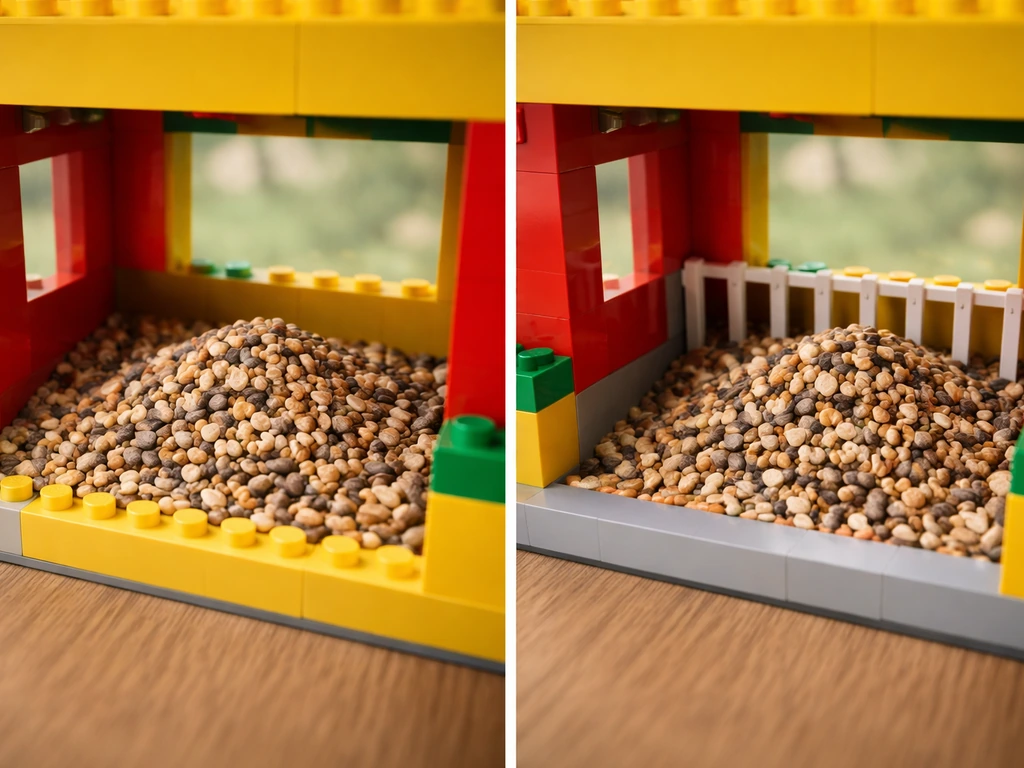
The core challenge with LEGO feeders is that standard bricks create a boxy, flat-floored cavity. Without a slope, seed piles up in the center and birds cannot reach the back of the pile through a front-facing opening. The Instructables LEGO bird feeder design solves this by running a 4x1 brick along one interior edge, creating a gentle tilt so seed rolls forward toward the access face. That is the single most important design decision in this whole build.
For the access openings, LEGO fence elements are your best friend. They have small rectangular gaps (roughly half an inch or slightly less) that are just right for seeds to be reachable but not so open that seed pours out. This approximates the half-inch diameter holes recommended for tube-style feeders dispensing sunflower or safflower seed. The fence piece sits on the front wall and lets a small bird's beak poke through while keeping the seed contained.
Stick to a platform-hopper hybrid design for your first build: an enclosed box with a slightly sloped floor, a front wall made mostly of fence pieces, and a removable flat plate on top. blank" rel="noopener noreferrer">Avoid trying to replicate a tube feeder with LEGO bricks. Nature’s Way’s bird seed guide differentiates feeder and seed pairing, noting that black-oil sunflower seed works well with many feeder types while safflower is better suited to particular feeders such as tube-style options blank" rel="noopener noreferrer">Avoid trying to replicate a tube feeder with LEGO bricks.. The geometry does not translate cleanly, and you will spend twice as long for a worse result. The enclosed box is simple, forgiving, and actually works.
How to build it: step-by-step assembly
Set aside about 45 to 60 minutes. The build has six stages and is straightforward even if you have not done a custom LEGO build before.
- Start with the base plate. Lay your 8x8 or 6x8 base plate flat. This is the floor of the feeder. Build one layer of 2x4 or 2x6 bricks around the perimeter of the base, leaving the interior open. This first ring becomes the outer walls at ground level.
- Create the slope on layer two. On the back interior edge of the base (the wall opposite where your fence/access opening will go), press a 4x1 brick flat along the inside of the back wall. This raises the back of the interior floor by one brick height, which is enough to create the slight forward slope that pushes seed toward the front opening. The front interior stays at base-plate height.
- Build up the walls. Stack three to four more layers of bricks around the perimeter, continuing to keep the interior hollow. On each layer, leave a 4x1 gap in the inside corners where you can so seed does not get trapped in dead corners. Keep the side walls solid for weather protection.
- Install the front access wall. On the front face (the low side of the slope), instead of a solid brick layer, snap in your LEGO fence pieces. These perforated elements let birds push their beaks through to reach seed without the seed free-falling out. Use two fence pieces side by side if your feeder is 8 studs wide. If you do not have fence pieces, look for any LEGO grill or lattice tile with gaps around 4 to 6 mm wide.
- Add a perch ledge. Attach a 1x6 or 1x8 flat plate extending outward from the base of the front fence wall. This gives small birds a place to land and stabilize while feeding. It only needs to extend two to three studs outward.
- Fit the roof. Place a flat plate across the top that covers the opening completely but is not stud-locked to the walls. You want it to lift off cleanly for refilling and cleaning. If you have Technic axle pins, you can create a simple hinge on one side so the roof flips rather than lifts, but a loose lift-off plate is fine for most people.
- Seal the exterior seams. Run a thin bead of clear RTV silicone along the exterior joints between brick layers on the sides and back walls. Do not seal the interior or the front fence face. Let the sealant cure for at least two hours before adding seed or placing outside.
- Add a hanging anchor. At the center of the top roof plate, attach a small Technic pin through a hole in the plate, then loop your garden wire or paracord through it and tie it off securely. Alternatively, attach a cup hook to a wooden backing board if you prefer pole-mounting. Test the anchor by lifting the whole feeder and shaking it gently before you hang it outdoors.
Once assembled, add a small amount of seed (a tablespoon or two) and tip the feeder to watch how the seed moves toward the front access wall. If seed sits flat and does not migrate forward, add a second 4x1 brick on the interior back edge to increase the slope slightly.
Where and how to hang it
Placement matters more than most people expect. Get this wrong and you will either see no birds or cause window strikes.
Height and location
If you are pole-mounting, aim for about 5 feet off the ground. That height keeps the feeder visible to birds, accessible to you for refilling, and high enough to make squirrel access harder. If you add a cone-shaped baffle below the feeder (at least 17 inches in diameter), squirrels will struggle to get past it, which is important because a small LEGO feeder is not heavy enough to resist a squirrel pulling or knocking it down.
For hanging from a tree branch or hook, the same 5-foot target works well, but make sure the branch is sturdy enough that the feeder does not swing violently in wind. A LEGO feeder is lighter than a wooden one, so it will move around more. A short hanging cord (6 to 8 inches) reduces swinging compared to a long one.
Window strike safety
Place the feeder either within 3 feet of a window or more than 10 feet away. That sounds counterintuitive, but it works: feeders very close to glass mean birds cannot build up enough speed to injure themselves if they veer toward the window, while feeders farther than 10 feet give birds enough visual separation to avoid the glass entirely. The danger zone is that 3-to-10-foot gap where birds are flying fast enough to be hurt but close enough to glass to hit it.
Choosing shelter vs. open space
Pick a spot near a shrub or small tree within about 10 feet. Birds want a quick escape route, and a feeder hung in the middle of open lawn with nothing nearby gets fewer visitors. At the same time, do not press it against dense branches where cats can hide and ambush. A few feet of clear space around the feeder gives birds the sight lines they prefer.
What seed to use and why it matters for your design
| Seed type | Best bird visitors | Works for LEGO feeder? | Notes |
|---|---|---|---|
| Black-oil sunflower | Chickadees, finches, nuthatches, cardinals | Yes | Small seed, flows well through fence-gap openings |
| Hulled sunflower | Chickadees, finches, sparrows | Yes (best choice) | No shell mess, easier for small birds, less waste below feeder |
| Safflower | Cardinals, doves | Yes | Slightly larger, still fits standard fence gaps; squirrels tend to avoid it |
| White millet | Sparrows, juncos, doves | Marginal | Very small, may sift through gaps too easily; mix with sunflower to slow flow |
| Thistle/nyjer | Finches | No | Too fine for this feeder type; needs a dedicated mesh tube feeder |
Start with hulled sunflower seed. It is favored by smaller birds like chickadees and finches, it leaves no shell debris under the feeder, and the seed size works perfectly with LEGO fence-gap openings. Safflower is a solid secondary choice that has the bonus of deterring squirrels and some less-wanted birds due to its slightly bitter taste.
Refilling, cleaning, and keeping it functional
A dirty feeder makes birds sick. Moldy seed and accumulated droppings can spread disease through a local bird population, so a maintenance schedule is not optional. The good news is that a LEGO feeder is actually easier to clean than most wooden ones because you can pull it apart.
Refilling schedule
Check the feeder every two to three days, especially in summer when heat accelerates spoiling. Fill it no more than halfway so seed turns over before it sits long enough to go stale or clump. A small LEGO feeder holds roughly a quarter cup of seed, which a few small birds will eat in a day or two once they discover it.
Cleaning routine
Clean the feeder at least once a month. In winter or wet weather, bump that to every one to two weeks, since moisture gets into seed faster and mold grows more quickly in cold, damp conditions. Here is the process:
- Remove the roof and empty out all remaining seed. Discard any clumped or discolored seed, do not put it back in.
- Disassemble the feeder as much as practical. At minimum, pull off the roof, perch plate, and front fence pieces.
- Wash all pieces with warm water and mild dish soap using a soft brush to clear seed residue from between studs and inside cavities.
- For disinfection, mix a 10 percent bleach solution (two ounces of bleach per gallon of water, or no more than one part bleach to nine parts water) and soak the pieces for two to three minutes.
- Rinse thoroughly with clean water until there is no bleach smell.
- Let all pieces air dry completely before reassembling and refilling. Putting seed into a damp feeder is the fastest way to grow mold.
Also clean up spilled seed and droppings on the ground below the feeder regularly. A patch of rotting seed and droppings on the soil below is a disease vector that undercuts all the effort you put into cleaning the feeder itself.
Troubleshooting common problems
Seed spilling or not reaching the opening
If seed piles in the back and does not reach the front fence wall, your slope is not steep enough. Add another 4x1 brick on the interior back edge to increase the angle. If seed is pouring out too freely, your fence-gap openings are too wide. Try adding a second fence piece stacked inside the first one to halve the effective gap size, or fill alternate gaps with a flat 1x1 tile pressed into the fence holes.
The feeder shifts or spins in wind
LEGO feeders are light, so wind is a genuine issue. Shorten your hanging cord to reduce the pendulum effect. You can also add weight to the base by pressing several extra layers of bricks on the underside of the base plate (they will not show and they lower the center of gravity). If it spins, add a second anchor cord tied to a nearby branch to act as a stabilizer.
Water getting into the seed
Re-check the RTV silicone seals on the exterior walls. Look for any gaps between the roof plate and the top wall layer. You can add a slight overhang by extending the roof plate one stud beyond the front wall on all sides, like an eave, which sheds rain away from the access openings. Do not try to permanently seal the roof, since you need to open it for refilling.
Squirrels raiding or knocking it down
A LEGO feeder is not squirrel-proof on its own. If you are hanging it, keep it at least 10 feet horizontally from any surface a squirrel can jump from. If it is pole-mounted, use that 17-inch baffle cone below the feeder. Switching to safflower seed helps too, since squirrels find it less appealing than sunflower. Starlings and house sparrows also tend to visit less with safflower, which keeps the feeder available for smaller songbirds.
Bricks separating after outdoor exposure
Standard LEGO plastic holds up well in UV light for months but studs can loosen slightly with repeated temperature swings. If you notice the walls separating, reinforce key seams with a tiny dot of clear RTV silicone on the exterior only. Avoid any adhesive on interior faces or areas that contact seed. If you want the feeder to last an entire season without reassembly, silicone the exterior wall seams completely before the first hang, just as you would on any outdoor plastic joint.
No birds visiting after two weeks
Give it at least two weeks before worrying. Birds in a new location take time to find a feeder. If nothing is visiting after that, try moving the feeder closer to a shrub or tree edge, check that the seed is fresh (stale seed has no smell and birds rely partly on scent and familiarity), and consider sprinkling a small amount of seed on the ground directly below the feeder to act as a visual cue for passing birds.
Your next steps
Start by sorting your LEGO pieces and confirming you have fence elements or a suitable perforated substitute. If you want an easier, variation-based project, search for a bird feeder build by Liyala Tuckfield and adapt the same access and slope ideas to your materials. Build the base box first to get a feel for the scale, then add the slope before closing up the walls.
Hang it at 5 feet, fill it with hulled sunflower seed, and give it two weeks. After your first cleaning session you will have a good sense of how the design performs and where to tweak it. If you enjoy the build-from-scratch approach, other fun material options like tin cans, popsicle sticks, and yogurt pots follow similar logic of designing a seed cavity with a controlled access opening, and each has its own trade-offs worth exploring.
If you are open to a bigger, repurposed project, you can also learn tire bird feeder how to make options that use the same basic idea of controlled access to seed. If you want to try a yogurt-pot version instead, the same idea applies: create a seed cavity with a controlled access opening and keep it weatherproof yogurt pots.
If you want a different materials approach, you can also learn how to make bird feeder with tetra pack using the same idea of a seed cavity with controlled access openings. If you are working with popsicle sticks instead of LEGO, these same feeder basics translate well into popsicle stick bird feeder instructions.
If you want an even simpler version, you can also try a tin can bird feeder DIY that uses the same idea of a seed cavity and controlled access for the birds.
FAQ
Can I use any bird seed to make a LEGO bird feeder work?
No, you generally should not fill it with mixed birdseed. LEGO fence gaps are sized for sunflower-type kernels, mixed seed often includes smaller particles that sift through the gaps and attracts more “messy” visitors, plus it can clog if softer hulls swell in wet weather.
What should I do if the feeder gets rained on and the seed clumps or smells?
If the seed gets wet and sits, it can mold even with good weatherproofing. Use hulled sunflower to reduce shell debris, fill only halfway, and empty out leftover seed after a few days of heavy rain, then let the feeder dry before refilling.
How do I deep-clean a LEGO feeder without leaving moisture trapped?
Yes, but you need a dedicated cleaning method. Since you will refill through a hinged or removable top, aim to hose off only the exterior and rinse the cavity quickly, then fully dry it before closing, do not seal wet seed inside.
How can I tell before hanging whether my interior slope is correct?
Try to test the slope in “dry run” mode before hanging it. Add a small amount of seed, tip it at the intended angle by hand, and confirm kernels consistently roll toward the front fence wall, if they only shift a little, add the extra 4x1 brick on the back edge.
My feeder is finished, but birds still ignore it, what are the most likely causes?
If birds are not using it, first check that the fence openings are actually accessible, then verify seed type and freshness. Also confirm placement in the safe range, not 3-to-10 feet from glass, and adjust within about 10 feet of shrub cover so birds have an escape route.
What’s the best fix if seed pours out immediately through the front?
If the seed leaks out, the gap size is usually too large or misaligned. Stack an extra fence piece on the inside to halve the effective opening, or block alternate fence gaps with a 1x1 tile so only every other opening is active.
Will the LEGO feeder fall apart outdoors over time, and how do I maintain the structure?
Yes. Warm-weather loosening can happen as plastics expand and contract, so routinely check exterior seams and the top fit after temperature swings. If you reinforced previously, look for any new separation at studs, then add a tiny exterior dot of clear RTV only if needed.
How do I reduce wind wobble if my LEGO feeder keeps swinging or spinning?
You can, but keep in mind the feeder is light. In wind, shorten the hanging cord, and if it swings, add a second anchor line to a nearby branch, also confirm your branch hook point is stable since “flimsy” attachment points often cause the spinning.
Should I completely silicone-seal the roof so it is fully waterproof?
No, not permanently. A sealed roof can trap humidity and slow drying, so use an overhang style extension (eave effect) for rain shedding, keep the top removable for refilling, and re-check exterior silicone seams for small gaps instead of glueing the top shut.
How much seed should I add so it stays fresh?
About halfway is a practical maximum because it improves turnover. If you fill higher, seed sits longer, especially under the top edge, and you increase spoilage risk before birds consume it.
How often should I clean it in different seasons?
For cleaning frequency, a good rule is “more often when it is warm or wet.” Check every two to three days in summer, monthly minimum otherwise, and in winter or damp periods move to every one to two weeks so moisture does not stay against kernels and droppings.
How do I discourage squirrels and larger birds without abandoning the LEGO feeder idea?
Use safflower as a first-line swap if you want fewer squirrel or larger-bird visits. The feeder can also be made safer by placement, keep it at least 10 feet from jump-up surfaces when hanging, and if pole-mounted add the cone baffle below.