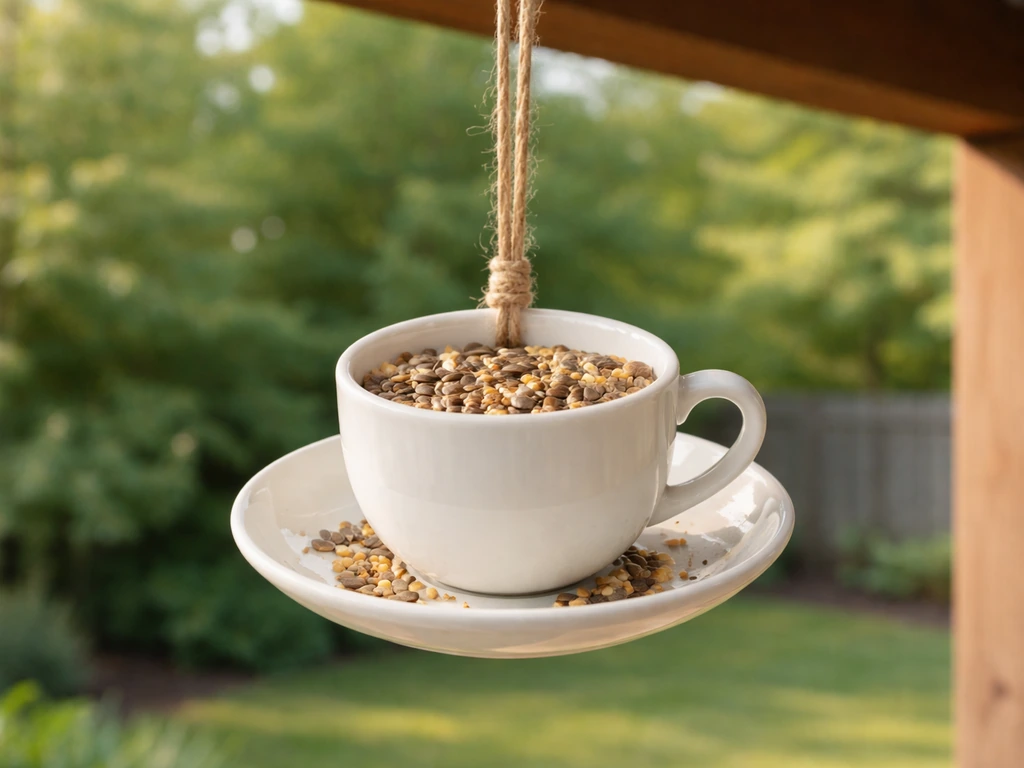
You can make a teacup bird feeder in about an hour using a thrifted teacup and saucer, a drill with a diamond-tipped bit, some wire or a threaded rod, and a bead of waterproof silicone. The result is a charming, functional feeder that holds seed, hangs from a branch or hook, and lasts through a full season without falling apart, as long as you drill carefully and seal every joint before the rain hits.
How to Make a Teacup Bird Feeder Step by Step

Marcus Brennan
23 Apr 2026
Materials and tools you'll need
Most of what you need costs under $10, especially if you grab your cup and saucer from a thrift store. Here's what to gather before you start:
- One teacup and matching saucer (or a teapot, depending on your build)
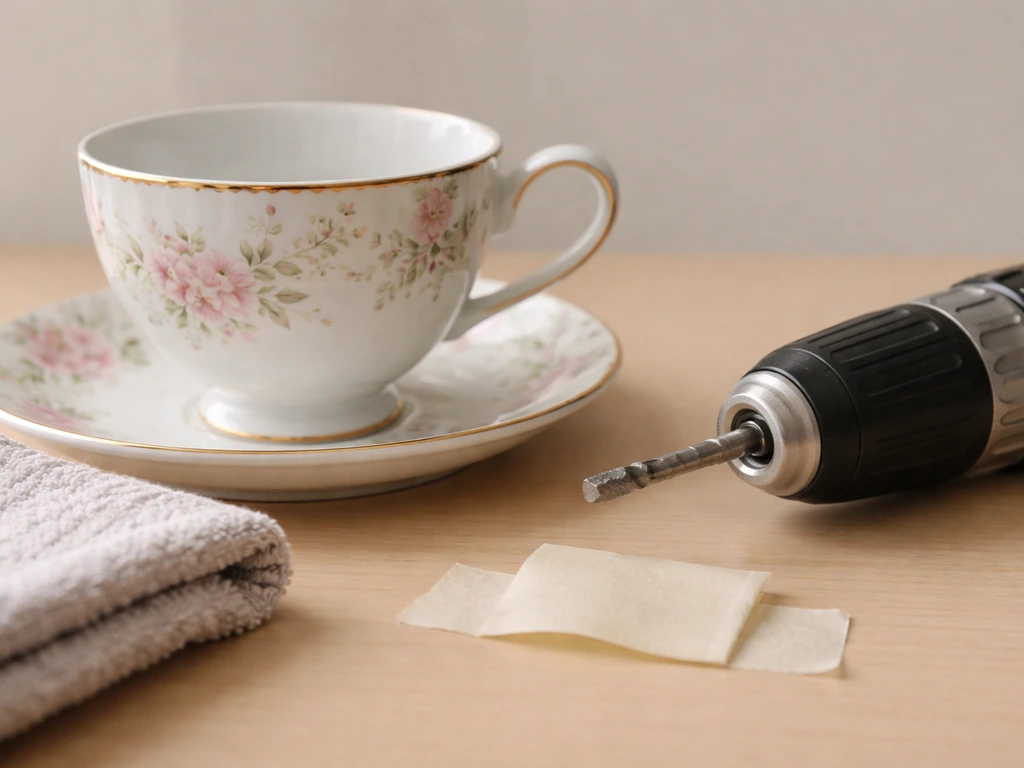
- Drill with a 1/8" diamond-tipped drill bit (standard twist bits crack ceramic — don't skip the diamond bit)
- Water in a shallow tray or spray bottle for lubrication while drilling
- Jewelry wire, 16–18 gauge, or a 1/4" threaded metal rod with matching nuts and washers
- 100% RTV silicone sealant (Permatex flowable glass sealer or any 100% RTV product works well)
- Masking tape
- Strong outdoor-rated epoxy or waterproof adhesive if you want to glue the cup to the saucer
- A sturdy S-hook and at least 12 inches of chain or heavy wire for hanging
- Needle-nose pliers
- Eye protection and work gloves
Skip any silicone labeled 'indoor use only' or 'paintable.' You want pure 100% RTV silicone, which is tack-free in about 30 minutes but reaches a workable strength in 24 to 48 hours and full cure in about seven days. Don't rush this part, premature exposure to rain before the silicone cures is the number one reason these feeders fail early.
Choosing the right teacup or teapot for this project
Not all vintage china is equal for this job. Thick, sturdy ceramic handles drilling better than thin bone china, which tends to crack the moment a drill bit wanders. Here's how the main options compare:
| Design | Seed capacity | Assembly complexity | Best for |
|---|---|---|---|
| Teacup alone | Small (1–2 oz) | Easiest | Tiny birds, nyjer or millet seed, tight spaces |
| Teacup + saucer | Medium (saucer holds extra seed) | Moderate | Most backyard setups, charming display feeders |
| Teapot | Large (spout can act as perch or seed port) | Moderate | Larger seed mixes, statement garden pieces |
A teacup alone is the fastest build, but the saucer version is genuinely more useful because birds can stand on the saucer rim and pick seed that spills over. Teapots work beautifully too, you fill through the top opening, and birds access seed from both the lid hole and the spout. If you want to put a teacup feeder on a pole rather than hanging it, that's a slightly different build covered in a related guide on mounting teacup feeders to poles. If you want the full step-by-step, this guide also covers how to make teacup bird feeder on a pole teacup feeder on a pole.
How to make a teacup bird feeder (with or without saucer)
Drilling the ceramic safely
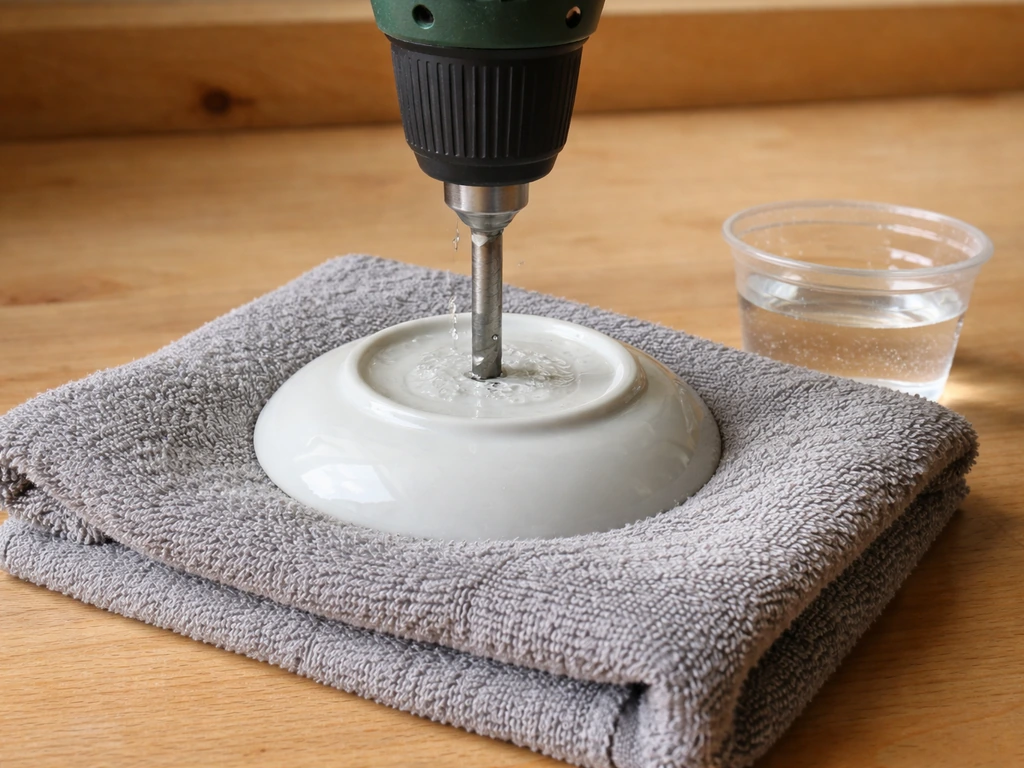
Heat is what cracks ceramic and glass while drilling, so your only job during this step is to keep the bit cool. Place the cup or saucer on a folded towel to stop it from sliding. Put a small ring of plumber's putty or masking tape around your drill point to create a tiny well, then fill that well with water. Drill slowly at low speed, no more than 500 RPM, applying light, steady pressure.
Let the water do the cooling work. If you don't have a putty dam, keep a spray bottle nearby and squirt water onto the bit every 10 seconds. A 1/8" hole is the right starting size for wire-based builds. If you're using a threaded rod, size your bit to match the rod diameter.
Teacup-only hanging feeder
- Drill one hole through the bottom of the teacup using the method above.
- Cut a length of 16–18 gauge jewelry wire about 18 inches long.
- Feed the wire up through the hole from the outside of the cup bottom.
- Bend a small loop or twist the wire inside the cup base so it can't pull back through — this acts as your anchor.
- Gather the wire above the cup into a single strand and form a hanging loop at the top.
- Run a thin bead of 100% RTV silicone around the wire where it exits the cup bottom, sealing the hole completely.
- Let the silicone cure for at least 24 hours before exposing the feeder to rain.
- Fill the cup about halfway with seed and hang it.
Step-by-step: teacup and saucer hanging feeder
This is the version most people picture when they search for teacup feeders, and it's worth the extra fifteen minutes over the cup-only build. You have three solid assembly methods to choose from.
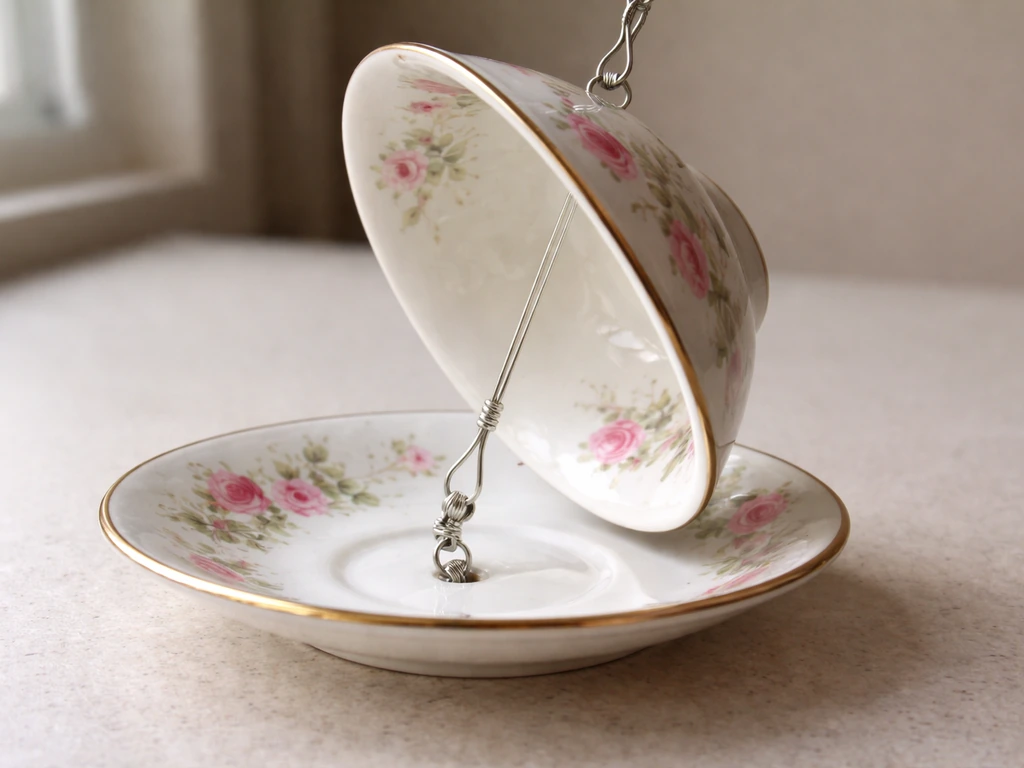
Method 1: jewelry wire assembly
- Drill one hole through the center of the saucer and one through the bottom of the teacup.
- Cut about 24 inches of 16–18 gauge jewelry wire.
- Push the wire up through the saucer hole from underneath, leaving a 3-inch tail below.
- Thread the wire up through the teacup hole so it exits inside the cup.
- Twist the wire tail under the saucer tightly against the ceramic to anchor it.
- Inside the cup, bend the wire into a flat coil or loop so it won't pull through.
- Bring the remaining wire up and twist it into a hanging loop above the cup.
- Apply a dab of outdoor epoxy or waterproof adhesive between the cup base and the saucer surface to lock the angle.
- Seal both drill holes with 100% RTV silicone and let cure 24–48 hours.
Method 2: screw assembly
- Drill a 1/8" hole through the saucer center and the cup bottom.
- Place the saucer face-up, then set the cup on top in your preferred tilted or upright position.
- Insert a short machine screw from inside the cup down through both holes.
- Secure with a washer and nut underneath the saucer, tightening snugly but not so hard that you crack the ceramic.
- Thread a hanging wire or chain through the cup handle or create a wire loop around the cup body.
- Seal both sides of the drilled holes with RTV silicone.
Method 3: threaded rod assembly
- Drill holes through the saucer and cup bottom sized to your threaded metal rod diameter.
- Thread a nut and washer onto the rod and position them about 2 inches up from one end.
- Push the rod through the saucer from below so the nut and washer sit flush under the saucer.
- Add another washer and nut on top of the saucer to clamp it in place.
- Slide the teacup onto the rod so it rests on the saucer, then add a washer and nut inside the cup to hold it.
- The rod extending above the cup becomes your hanging point — form a loop or attach a chain.
- Seal all ceramic contact points with RTV silicone and allow full cure time before filling.
Any of these three methods produces a stable feeder. The threaded rod is the most rigid and works well if you want zero wobble. The wire method gives you a slight natural sway that some birds actually seem to prefer. The screw method is the fastest if you already have hardware on hand.
Step-by-step: teapot bird feeder
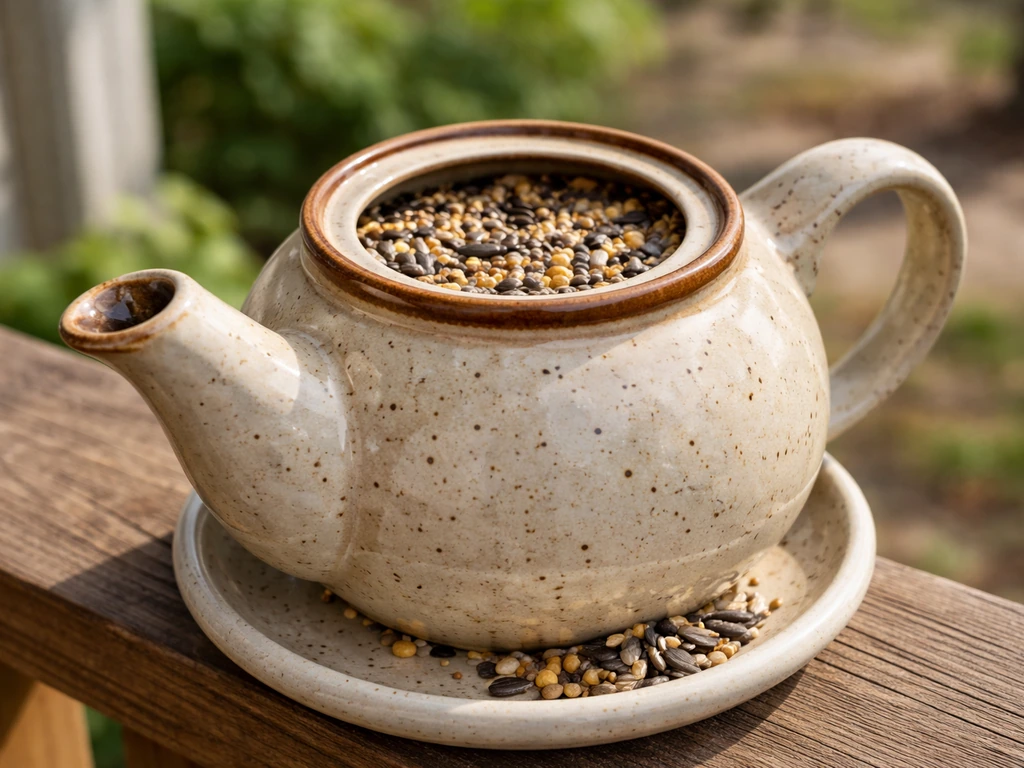
Teapots make surprisingly practical feeders. The existing lid hole or open top becomes your fill port, and you can tilt the pot so seed slowly rolls toward the spout for birds to access. Here's how to build one.
- Choose a ceramic or porcelain teapot with a wide enough spout opening for seed — about 1/2 inch or more works for sunflower chips or nyjer.
- Drill two small holes (1/8") on opposite sides near the top of the teapot body, just below the lid rim. These are your hanging wire anchor points.
- Thread a length of 16–18 gauge wire through both holes, forming a wide U-shape across the top of the pot. Twist each end securely against the ceramic exterior.
- Gather both wire ends above the pot and twist them together into a single hanging loop. Make sure the loop is centered so the pot hangs level or with a slight forward tilt toward the spout.
- If you want the teapot to hang at an angle (so seed feeds toward the spout naturally), adjust the wire loop point slightly toward the back of the lid.
- Remove the lid entirely or drill a few drainage holes in the base if rain pooling is a concern.
- Seal all drilled holes with 100% RTV silicone. If the lid is removable and you plan to use it, there's no need to seal around it.
- Fill the pot through the top opening with a small seed like nyjer, millet, or finely cracked sunflower. Sunflower hearts work well because they don't have shells to clog the spout.
- Hang and test the angle — you want a slight tilt so seed is visible and accessible at the spout opening.
One honest heads-up on teapot feeders: the spout can clog after rain or with larger seed. Check it every few days and clear it with a chopstick or pipe cleaner. If clogging is constant, switch to a finer seed or just use the top opening as the main feeding port and skip the spout angle entirely.
Hanging and placing your teacup feeder
Where you put this feeder matters almost as much as how you built it. Get placement wrong and you'll either have no birds or constant squirrel raids within the first week.
Height and distance from launch points
Hang the feeder at least 4 to 5 feet off the ground. This isn't just about squirrels, it also puts the feeder at a comfortable eye level for you to enjoy and refill. For squirrel-proofing, the magic numbers to remember are often called the 5-7-9 rule: aim for 5 feet off the ground, 7 feet from any structure a squirrel can jump from (fences, decks, railings), and 9 feet from any overhanging branch. Squirrels are capable jumpers, so 10 feet from the nearest tree or fence post is an even safer target if your yard allows it.
Hanging hardware and stability
Use a metal S-hook rated for outdoor use, cheap zinc ones corrode fast. A shepherd's hook stake in the ground works perfectly for teacup feeders, especially the cup-and-saucer style, since it keeps everything stable and visible. If you're hanging from a tree branch, use a chain rather than rope. Rope frays and can send your whole build crashing down after one wet season. Keep at least 12 inches of chain between the branch and the feeder so it swings freely rather than banging against bark.
If squirrels are a serious problem in your yard, add a dome baffle above the feeder on the hanging chain. Mount any pole-based baffle at least 4 feet off the ground, and keep the pole itself at least 8 to 10 feet from any structure or branch they could leap from. No baffle works if a squirrel can simply jump directly onto the feeder from a nearby fence.
Sealing, safety, and keeping the feeder going long-term
Waterproofing and safe materials

Every drilled hole is a potential water infiltration point that leads to cracks, rust, and eventually a failed feeder. Seal every hole and every hardware contact point with 100% RTV silicone. This stuff is safe once cured and holds up to UV exposure and temperature swings. The product is tack-free in about 30 minutes but give it a full 24 to 48 hours before any water contact, and technically it reaches maximum strength after seven days. I usually build on a Friday and hang the feeder the following weekend, that's the most reliable approach.
Avoid standard craft glues, hot glue, or wood glue for any part of this build that will be exposed to rain. They fail quickly. Epoxy rated for outdoor ceramic-to-ceramic bonding is the right adhesive for securing the cup to the saucer, and even that should be backed up by the mechanical connection (wire, rod, or screw) rather than relied on alone.
Cleaning routine
Bird feeders can harbor mold and bacteria that make birds sick, so cleaning matters. All About Birds recommends cleaning feeders regularly and suggests using a dilute bleach solution, no more than 1 part bleach to 9 parts water cleaning matters.
For a teacup feeder, a monthly clean is usually enough in dry weather, bump that to every two weeks in humid summer months. Mix 1 part household bleach to 9 parts water.
Disassemble what you can, soak the pieces for 10 to 15 minutes, scrub with a stiff brush, then rinse thoroughly with clean water until there's no bleach smell left. In the r/birdfeeding thread, commenters recommend soaking feeders in bleach water at a 1:9 ratio for a few minutes, then rinsing and drying thoroughly.
Let everything air-dry completely before refilling. A damp feeder refilled with seed is an invitation for mold within days. If you'd rather avoid bleach, a diluted white vinegar solution works for routine cleaning but is less effective against stubborn mold or disease organisms.
Common problems and quick fixes
- Seed gets wet and clumps: Add a small hole in the lowest point of the saucer or cup base for drainage. Even a 1/8" hole helps enormously.
- Cup spins or rocks on the saucer: Add a second dab of epoxy between cup and saucer once you're happy with the position, then let it cure before hanging.
- Squirrels keep reaching the feeder: Check your distance from launch points first. If placement is already correct, add a dome baffle above the feeder on the hanging chain.
- Wire stretches and the cup tilts over time: Use heavier 16-gauge wire or switch to the threaded rod method for a more permanent build.
- Ceramic cracks during drilling: You drilled too fast or without enough water cooling. Replace the piece and go slower — there's no fix for a cracked cup, but the build is cheap enough to restart.
- Birds ignore the feeder: Try a different seed. Nyjer and sunflower hearts attract the widest range of small birds. Location matters too — if it's too close to a busy window or door, birds may not feel safe approaching.
If you enjoy upcycled feeder builds, this same core approach, drilling, sealing, and hanging with wire or rod, translates well to other repurposed containers. Plastic bottle feeders and milk jug feeders follow similar logic for drilling and placement, and wine bottle feeders use an almost identical rod-mounting method to what's described here for teapots. A milk jug feeder is a great alternative if you want something larger and even cheaper to make.
If you want a quick plastic bottle option, the same drilling and sealing approach works, and you can shape the bottle into a simple feeding cup with a hanger Plastic bottle feeders. For a plastic bottle build, you can use the same drilling and sealing approach to create a durable feeding cup with a hanger plastic bottle bird feeder. The teacup version just happens to be the most visually rewarding, and once you've nailed the drilling technique, the whole build genuinely takes less than an hour.
FAQ
Can I make a teacup bird feeder from any thrifted china set, or does the type matter?
Yes, but only if the material is actually drillable and the finish is compatible with silicone. Many glazed ceramics are fine, but heavily coated bone china can chip, and some porcelain glazes hide thin spots. If you are unsure, practice drilling a small test hole on an extra thrift piece, or choose a sturdier cup set. Also, seal every contact area, not just the drilled hole, since moisture can creep under hardware.
What should I do if my drilled hole is too big or the ceramic starts to crack?
If you accidentally drill a hole that is slightly too large, you still have options. Try a tighter fit first by using a thicker wire gauge, a larger diameter threaded rod, or washers that spread load. If the gap is too big to seal reliably, you can build up around the penetration with extra RTV silicone, but the feeder may wobble unless the mechanical connection still bites securely. For best results, remake with a properly sized bit.
What kind of bird seed works best in a teacup feeder so it does not clog or build up?
For seed, choose types that birds can grip and that do not swell or clog quickly. Small tube feeders like this usually do best with fine mixed seed, sunflower chips, or small seed blends rather than very large chunks. If you notice frequent buildup in the spout (teapot style) or around the rim (cup-and-saucer), switch to a finer mix and keep an eye on weather, since damp seed clumps faster than dry seed.
How long should I wait before hanging the finished teacup feeder outside?
Do not handle the feeder outdoors until the silicone is fully cured. Even if RTV feels tack-free in about 30 minutes, rain exposure during the 24 to 48 hour workable window can weaken the seal at the edges. A practical workflow is to build when you have at least two dry days, then hang it after a full cure window, which is especially important if you live in a humid area.
What kind of hanger hardware is safest for long-term outdoor use?
Use only metal that is truly outdoor-rated. Zinc hardware can corrode quickly, and regular indoor hooks may fail at the exact stress points that hold the feeder. If you are in a wet climate, prefer stainless hardware or powder-coated outdoor steel, and inspect the hook or chain monthly for rust or loosening.
Will this feeder work in heavy rain, and how can I prevent water pooling?
Yes, but the key is to prevent standing water inside the cup or on the saucer surface. Slight drainage improvement comes from keeping the holes sealed and setting the angle so rain runs off rather than puddles. Also make sure the silicone is continuous at the edges, since water trapped in crevices can undermine the joint over time even when cured.
Can I paint, stain, or add a protective coating to the teacup feeder for extra weatherproofing?
You can, but the feeder must still drain and stay clean. As a general rule, if you add an exterior water-resistant layer, keep it away from the areas where birds feed and away from silicone seams, since any coating over silicone can prevent proper adhesion or cleaning. Stick to the silicone sealing approach and only add protective measures to the outside surfaces that do not touch food or sit directly in rain streams.
My feeder has been up for a week, but no birds are coming. What should I adjust first?
If birds are not visiting, start with placement and refill behavior. Make sure it is at the recommended height and distance from jump access points, then try a low-stakes seed mix for a few days. Also check for a “no perch” problem, if you used a teacup only, birds may prefer the saucer rim. Squirrels and dominant birds can also scare off smaller species, so consider using a baffle if you see repeated squirrel attempts.
How do I handle moldy seed or a musty smell from the feeder?
If you see mold or a strong smell, clean immediately and stop refilling until everything dries fully. A common mistake is refilling while parts are still damp, which accelerates mold growth and can harm birds. In humid summers, shorten the cleaning interval and rinse thoroughly until no disinfectant smell remains, then dry completely before adding fresh seed.
Should I change my cleaning routine by season, especially in winter or after storms?
If you plan to keep it up year-round, rotate cleaning frequency by season and weather. Dry weather usually needs monthly cleaning, humid summer needs about every two weeks, and after heavy storms or long wet spells you may need an extra quick inspection and rinse. In winter, keep an eye on ice formation around holes, since trapped meltwater can loosen hardware or stress silicone seams.
Does adding a dome baffle always stop squirrels, or can it fail?
Yes, baffle use can be effective even if you are not perfect with placement. Install the baffle so squirrels cannot step onto the feeder from a nearby vertical surface or branch, and position the assembly so the gap prevents a direct jump line. If squirrels can still leap straight to the cup, the baffle will not solve it, you will need to increase distance to trees, fences, or overhanging branches.