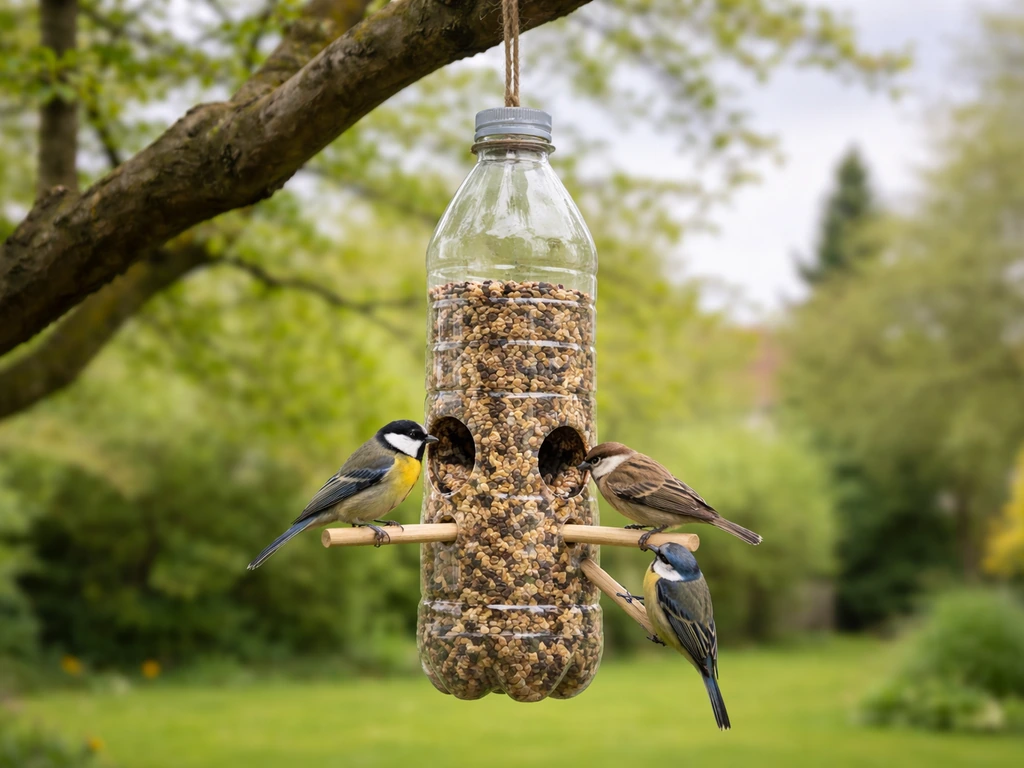
Yes, you can absolutely make a solid, functional bird feeder from a plastic bottle today, using stuff you already have at home. A two-liter soda bottle is the most common choice and works great for seed feeders, but honestly almost any size bottle works depending on what you want to build.
How to Make a Bird Feeder Out of a Plastic Bottle

Marcus Brennan
19 Apr 2026
This guide walks you through picking the right bottle, cutting it safely, adding perches and feeding ports, hanging it properly, and keeping it clean so birds actually use it long term. If you also want a teacup option, the same basic ideas about drainage, perches, and keeping food dry carry over to a teacup bird feeder make teacup bird feeder.
When you’re done with the basic build, follow these same steps for your teacup bird feeder so it stays clean and birds keep visiting how to make teacup bird feeder.
Choosing the right plastic bottle and setup design
Two-liter soda bottles are the go-to for a reason: they hold enough seed to be worth the effort, they're rigid enough to hold their shape outside, and the narrow neck makes hanging straightforward. That said, a 1-liter bottle works fine if you want something smaller that you'll refill more often, and a large 3-liter or gallon jug gives you a bigger reservoir if you're feeding a lot of birds.
Before you build, decide on one of three basic designs. The first is a classic seed feeder with small feeding holes and dowel perches, which works for finches, sparrows, and chickadees. The second is a wider-opening tray-style feeder where you cut a large window opening and let seed pool at the bottom of the bottle, which attracts a wider variety of birds. The third is a simple birdhouse-style shelter where you cut a single round entry hole (about 1.
5 inches across) and skip the perches, giving small birds a place to roost in a pinch, though a plastic bottle isn't ideal for nesting compared to wood. Most people building a plastic bottle feeder want the seed feeder version, so that's the main focus here, with notes on the other styles along the way.
Materials and tools you'll need
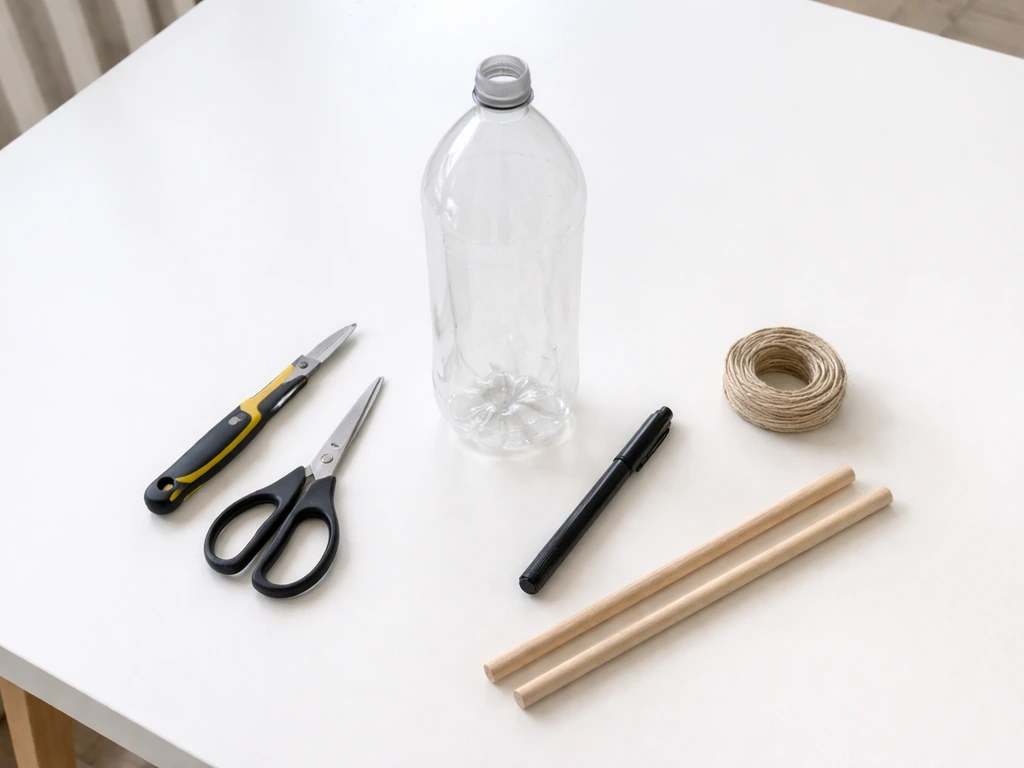
Keep it simple. You don't need to buy much, and a lot of this is probably already in your junk drawer.
- One clean plastic bottle (2-liter soda bottle is ideal)
- A sharp craft knife or box cutter, plus scissors for trimming
- A marker or pen for marking cut lines
- Two wooden dowels, unsharpened pencils, chopsticks, or sturdy twigs for perches (around 12 inches long each works well)
- Strong twine, wire, or paracord for hanging
- A drill or heated nail/skewer to make starter holes (a heated skewer pushed through plastic is the easiest low-tool method)
- Birdseed (black oil sunflower seeds are the most universally liked)
- Optional: a small eye hook or carabiner clip for the hanging point
- Optional: waterproof outdoor sealant or clear tape to reinforce cut edges
That's really it. Total cost is close to zero if you're using a recycled bottle and sticks from the yard. The only thing worth buying if you don't have it is a bag of black oil sunflower seeds, which will attract far more species than a mixed cheap seed bag.
Step-by-step build instructions
Classic seed feeder (the easiest and most popular version)
- Clean the bottle thoroughly with soap and warm water, then rinse and dry it completely. Any residue from whatever was in it before can contaminate seed.
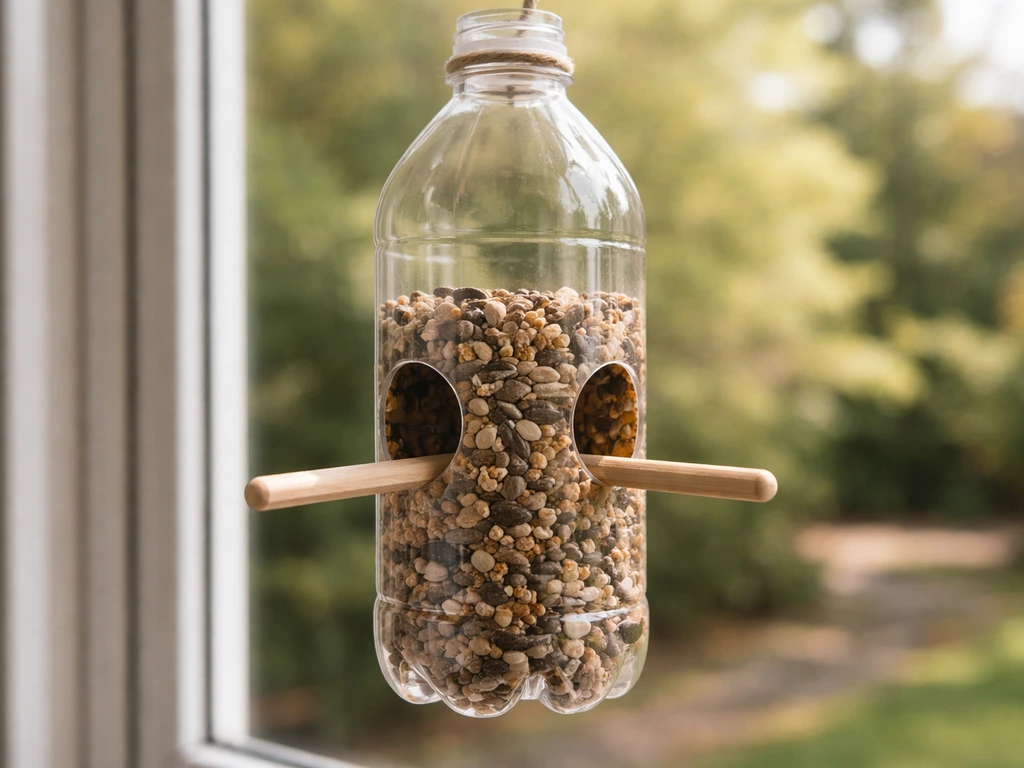
- Mark two feeding hole locations on opposite sides of the bottle, about a third of the way up from the bottom. Each hole should be roughly the size of a 5p coin (about 18mm or just under an inch). That size lets seed flow out without creating a gaping hole that dumps everything at once.
- Use a heated skewer or the tip of your craft knife to punch a starter hole, then cut or widen it carefully. Cut slightly smaller than you want, test the seed flow, and enlarge if needed. It's much easier to make a hole bigger than to fix one that's too large.
- Poke a smaller hole about half an inch directly below each feeding hole, sized just slightly smaller than the width of your perch material. This snug fit keeps the perch from sliding.
- Push your first perch (dowel, pencil, or twig) through both small holes on opposite sides so it extends about 5 centimeters (roughly 2 inches) out from each side of the bottle. This overhang gives birds somewhere to grip.
- Rotate the bottle 90 degrees and repeat: cut two more feeding holes and poke two more perch holes, then thread a second perch through. Now you have four feeding stations and two crossed perches.
- Punch or drill a small hole through the bottle cap or through the base of the neck, thread your hanging wire or twine through it, and tie a secure knot. The cap-threading method is especially useful for ant control (more on that below).
- Fill the bottle about halfway with seed through the open top before putting the cap back on (for the cap-hung version), or funnel seed in through one of the feeding holes if the cap is permanently attached to your hanging wire.
- Screw the cap back on tightly and hang it up.
Window-style tray feeder (wider opening, attracts more species)
For this version, use a large bottle or a gallon jug laid on its side. Cut a large rectangular window opening on one side, leaving at least 1 inch of plastic at the bottom of the cut to act as a ledge that holds seed in. Position the opening away from the base of the bottle so seed doesn't just spill out. You can add perch dowels through the sides below the opening, the same way as the classic version. This style works especially well for sparrows and juncos that prefer feeding from a flat surface rather than clinging to a small hole.
Shelter or birdhouse-style bottle (minimal build)
If you want a birdhouse feel rather than a seed feeder, cut a single entry hole about 1.5 inches in diameter near the top of the bottle's side. Remove any sharp edges by sanding or covering them with tape. Skip the perches and seed entirely, and instead add a few small drainage holes at the bottom in case moisture gets in. Hang it under an overhang or in a sheltered spot. This isn't going to replace a proper wood birdhouse for nesting, but it can provide a quick roost spot for small birds in bad weather. If a full wood feeder build interests you, that's a different project entirely with its own set of steps.
Feeding ports, perches, and keeping food from clogging
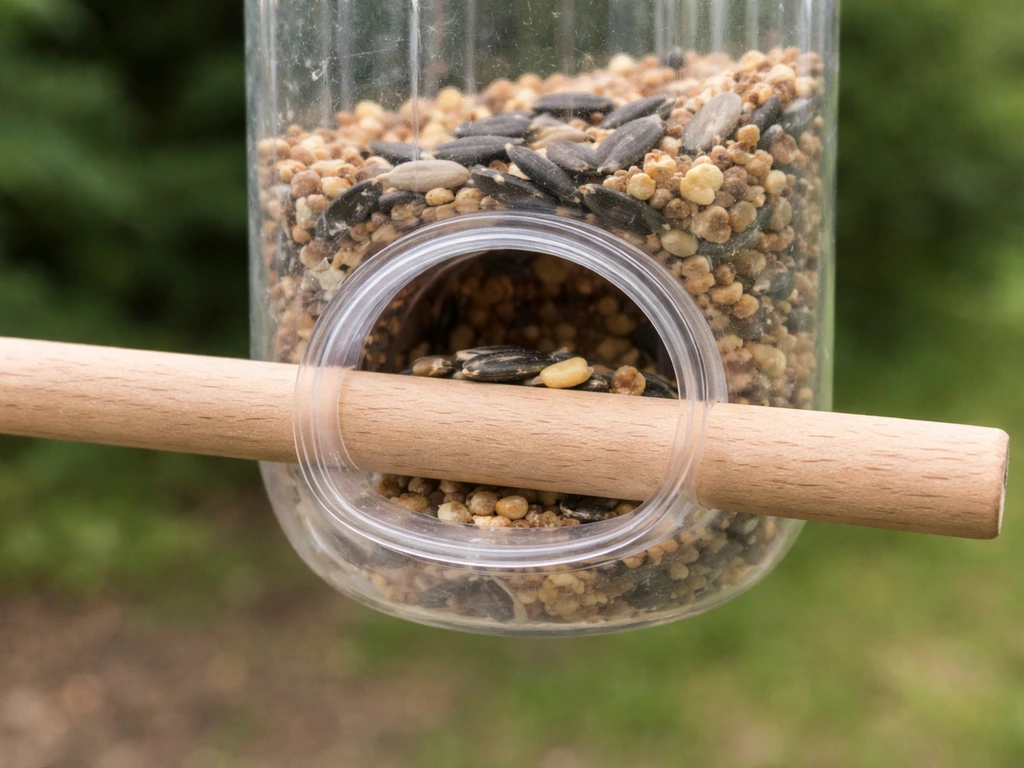
The size of your feeding holes matters more than people realize. Too small and seeds won't flow out at all; too large and the whole bottle empties in one rainstorm. For black oil sunflower seeds, aim for a hole roughly the size of a 5p coin as a starting point. Millet and nyjer (thistle) seed are smaller, so you can go a bit smaller for those. If you're using mixed seed with larger pieces, size up slightly.
Perch material is flexible. Wooden dowels are ideal because they're the right diameter and birds grip them well, but unsharpened pencils, bamboo chopsticks, and sturdy twigs all work. The key is making the perch holes snug so the perches don't rattle or slide out in wind. If a perch feels loose, wrap the end with a bit of electrical tape to thicken it before inserting.
Clogging is the most common frustration with bottle feeders. It usually happens because moisture gets into the seed and causes it to clump and bridge over the feeding hole. A few things help: angle the bottle very slightly with the cap end up so moisture drains toward the cap rather than pooling at the feeding holes, use dry seed and store it in a sealed container between refills, and cut the holes so they face slightly downward (angled about 10 to 15 degrees toward the ground) so gravity helps pull seed toward the opening rather than letting it pack against the bottle wall. If you see bridging happening, just tap the side of the bottle sharply to break the clump.
Hanging your plastic bottle feeder safely
Location matters as much as the build itself. Hang the feeder in a spot that gets some shade during the hottest part of the day, ideally near natural cover like shrubs or trees so birds feel safe approaching. At the same time, keep it at least 10 feet away from dense vegetation where cats can crouch and ambush. A height of 5 to 6 feet off the ground is the sweet spot: low enough for you to refill easily, high enough to deter ground-level predators.
For the hanging method, a sturdy branch hook or a shepherd's crook stake works well. Thread your twine or wire through the cap (as described in step 7 above) and use a double or triple knot, then add a small carabiner or S-hook so you can easily remove the feeder for cleaning without re-tying every time. Make sure the hanging point is stable: plastic bottles are light but they swing in wind, and a feeder that spins constantly will make birds nervous.
If you're mounting on a pole, use a mount that lets you angle the feeder so it doesn't collect standing water. If you want a different look, see the teacup option for how to make teacup bird feeder on a pole instead. A slight tilt also helps with seed flow. Avoid locations directly over a deck or patio if you're fussy about cleanup, because seed shells will pile up underneath.
Cleaning, maintenance, and replacing parts
Plastic bottle feeders need cleaning at least every two weeks, and more often in humid or rainy conditions. Old seed that gets wet can grow mold quickly, and moldy seed is genuinely harmful to birds. Don't skip this part.
The cleaning process is simple. Empty out any remaining seed (don't just pour fresh seed on top of old), then wash the bottle inside and out with hot soapy water. For disinfecting, soak the bottle in a dilute bleach solution of no more than 1 part bleach to 9 parts water for about 10 minutes. Rinse it extremely thoroughly after that, because bleach residue left on the feeder is harmful to birds. Let it dry completely before refilling. A bottle brush helps you reach the interior; a long chopstick wrapped with a sponge piece works as a DIY version if you don't have one.
Perches are easy to swap out. If a twig perch starts to rot or a dowel gets slippery with algae, just pull it out and replace it. The bottle itself typically lasts one full season outdoors before UV degradation makes it brittle and worth replacing with a fresh bottle, which costs you nothing if you're recycling. Check the plastic periodically for cracks around the feeding holes, since that's where stress fractures tend to start.
Troubleshooting pests and common setup problems
Squirrels
Squirrels will absolutely get into a plastic bottle feeder if they can reach it. A bottle hanging from a thin wire is harder for them than a feeder on a post, but not impossible. The most effective deterrent is placement: hang the feeder at least 5 feet away from any branch, ledge, or surface a squirrel can jump from. A baffle (a dome-shaped guard) above the feeder on the hanging wire helps a lot. If squirrels are persistent, switching to nyjer or safflower seed is a partial fix since squirrels are less interested in those than in sunflower seeds.
Wasps and bees
Wasps and bees are attracted to the same sweet smells birds are, especially if you ever use any sugar solution near the feeder or if seed ferments. To reduce the problem, rinse the outside of the bottle and the feeding ports before hanging to remove any sticky residue. Bee guards (small mesh or tube attachments over feeding holes) can help if wasps become a serious issue. Keeping the feeder dry and seed fresh is the best prevention.
Ants
Ants march up the hanging wire and straight into the feeder. The fix is an ant moat: a small water-filled cup that ants can't cross, placed on the hanging wire above the feeder. You can buy simple ant moats cheaply, or make one from a bottle cap with a hole drilled through the center, threaded onto the wire and filled with water. The cap-threading method described in step 7 of the build instructions is designed specifically for this: the cap acts as a built-in cup that you fill with water to block ant access.
Birds aren't coming to the feeder
This is the most common frustration and it almost always comes down to one of three things. First, location: if the feeder is too exposed or too far from cover, birds won't feel safe landing there. Move it closer to a shrub or tree. Second, seed quality: cheap mixed seed bags often contain filler seeds most birds don't want, and they just throw it on the ground to dig for what they like.
Upgrade to black oil sunflower seeds and you'll see a difference quickly. Third, patience: new feeders can take one to three weeks before birds discover them, especially if you're setting up a feeder for the first time in that yard. Put it up, leave it alone, and check back.
Seed gets wet and clumps every time it rains
If your feeding holes face upward or the feeder is hanging perfectly level, rain will pour straight into the openings. Angle the feeder so holes face slightly downward, or hang it under a natural overhang or a wide baffle that acts as a rain shield. You can also cut the feeding holes at a slight downward angle rather than perfectly horizontal so water drips away from the opening instead of into it.
A quick comparison: plastic bottle vs. other DIY feeder materials
| Material | Cost | Durability | Ease of Build | Ease of Cleaning | Best For |
|---|---|---|---|---|---|
| Plastic bottle (2-liter) | Free (recycled) | One season (UV degrades) | Very easy | Easy, but narrow neck can be awkward | Quick builds, beginners, seed feeders |
| Milk jug (gallon) | Free (recycled) | Similar to soda bottle | Easy | Easier (wider opening) | Larger seed capacity, window-style feeders |
| Wood (pine or cedar) | Low to moderate | Several years with maintenance | Moderate to advanced | Moderate (scrub and rinse) | Long-term setups, larger birds, nesting boxes |
| Wine bottle | Free (recycled glass) | Very durable, no UV issue | Moderate (requires drilling) | Easy (glass rinses clean) | Decorative setups, liquid feeders |
If you want something quick and free right now, the plastic bottle is the right call. If you want something that lasts multiple years without being replaced, wood is worth the extra effort. Milk jugs are a close cousin to plastic bottles and follow a very similar build process, with the advantage of a bigger opening that's easier to fill and clean.
Glass bottle builds like wine bottle feeders look great but require drilling, which adds a tool and a bit of skill. If you want to try the glass option later, learn how to make wine bottle bird feeder builds that use drilling and careful mounting for safety wine bottle feeders. For a first project today, stick with the plastic bottle and upgrade later once you know where you want permanent feeders.
FAQ
What plastic bottle type is best, and are any bottles unsafe to use for a feeder?
Clear or opaque 1 to 2 liter soda bottles and gallon jugs work best because they are rigid and easy to cut. Avoid bottles that held chemicals, motor oil, pesticides, or anything non-food-grade, and rinse food bottles thoroughly before building (smell and residue should be gone).
How do I cut feeding holes without cracking the plastic or leaving dangerous edges?
Start with a hot knife, box cutter, or scissors, and cut slowly, supporting the bottle from behind to reduce flexing. After cutting, sand all edges smooth and check both sides of every opening, then cover sharp spots with tape until fully sanded and clean.
How far apart should I place perch holes so birds can actually use them?
Place perch holes just below the feeding opening so birds can land, grab the ledge or opening area, and feed without dangling. Keep the perch holes level on opposite sides and test with a perch before finishing the cutout, so the perch does not force birds to reach awkwardly.
Can I use bottle feeders for hummingbirds or only for seed-eating birds?
This bottle design is mainly for seed, not nectar. Hummingbirds need a nectar feeder with tiny access ports and frequent cleaning to prevent fermentation, so use seed varieties in this build and keep nectar away from the general feeder area.
Which seeds are best to start with, especially if I want the feeder to be discovered quickly?
Black oil sunflower seeds are the most reliable choice for attracting a range of common backyard birds. If you want a backup when clogging or pests are an issue, nyjer or safflower can work better, but nyjer usually needs smaller holes to prevent waste.
Why do birds sometimes ignore my feeder even though it looks finished?
New feeders often take 1 to 3 weeks to draw consistent visits, especially in a yard with limited bird traffic. Also check that you used dry seed, cleaned the ports well, and placed the feeder near cover, since birds avoid exposed areas even if food is present.
What should I do if the feeder keeps clogging after I already adjusted the hole size and angled the bottle?
Switch to drier seed and store it sealed between refills, then increase the slight downward angle so gravity pulls seed toward the openings. If you see clumps forming, tap the sides to clear bridges, then empty, wash, and fully dry before refilling to reset moisture issues.
Is it okay to fill the feeder completely, or should I leave some empty space?
Leave the bottle at least partially unfilled so you can shake out and clean during refills, and so rain or humidity does not trap wet seed against the ports. Full fills also waste seed if you need to adjust hole size, because you cannot easily remove only the problematic portion.
How do I prevent mold and keep the feeder safe in humid weather?
In humid or rainy conditions, shorten the cleaning interval to weekly, and only refill with seed that is dry. After cleaning, let the bottle dry completely, because trapped moisture behind the feeding holes accelerates mold growth.
Can I use the same feeder for different seed types, like millet one week and sunflower the next?
You can, but empty and thoroughly wash between seed types. Different seeds have different sizes and flow behavior, and leftover kernels can change how future seeds bridge or pour out.
What is the best height and orientation for the feeder near pets or safety-sensitive areas?
Position it 5 to 6 feet high as a baseline, and keep it at least 10 feet from dense cover where cats can ambush. If it is near windows, consider additional placement or a window-safe location strategy to reduce collisions, since birds may fly into glass while trying to land.
How can I stop squirrels effectively if they are persistent?
Move the feeder far from launch points, place it away from branches ledges and jump paths, and consider adding a baffle above it on the hanging wire. If squirrels still get in, switch from sunflower to safflower or nyjer, because these tend to be less attractive and reduce repeat visits.
How do I keep wasps, bees, or ants from taking over the feeder?
For wasps and bees, keep the feeder dry, rinse sticky residue off the outside and ports, and avoid using any sugar solutions nearby. For ants, use an ant moat on the hanging wire or a water-filled cap barrier, and keep grass or climbing paths away from the hanging line.
Do I need a drain hole or ventilation if the feeder design is just a seed bottle?
For the classic seed style, drainage holes are usually not required if you keep holes angled downward and ensure the bottle is not level. For the birdhouse-style roost build, add small drainage holes at the bottom, and keep it under shelter so moisture does not pool inside.
How long should a plastic bottle feeder last before replacing it?
Expect about one outdoor season, UV exposure makes plastic brittle over time. During routine checks, focus on cracks around feeding holes and stress points near any cuts, since those areas fail first.
What should I do if birds are landing but not feeding from the opening?
Check that hole size matches the seed type, and confirm the opening is oriented slightly downward so seed reaches the edge. Also ensure perches are stable and not too far from the opening, because birds may hover or perch but not commit if they cannot access the seed easily.