You can build a functional hanging bird feeder in an afternoon using wood scraps, a plastic bottle, or even a pine cone, and hang it safely with rope and a simple hook. The key decisions are: what style suits the birds you want to attract, what materials you already have, and where exactly to hang it so birds feel safe and squirrels stay frustrated. This guide walks you through all of it, from picking a feeder type to the first time you see a bird land on something you built yourself.
How to Make a Hanging Bird Feeder: Step by Step

Marcus Brennan
5 May 2026
Pick the right type of hanging feeder first
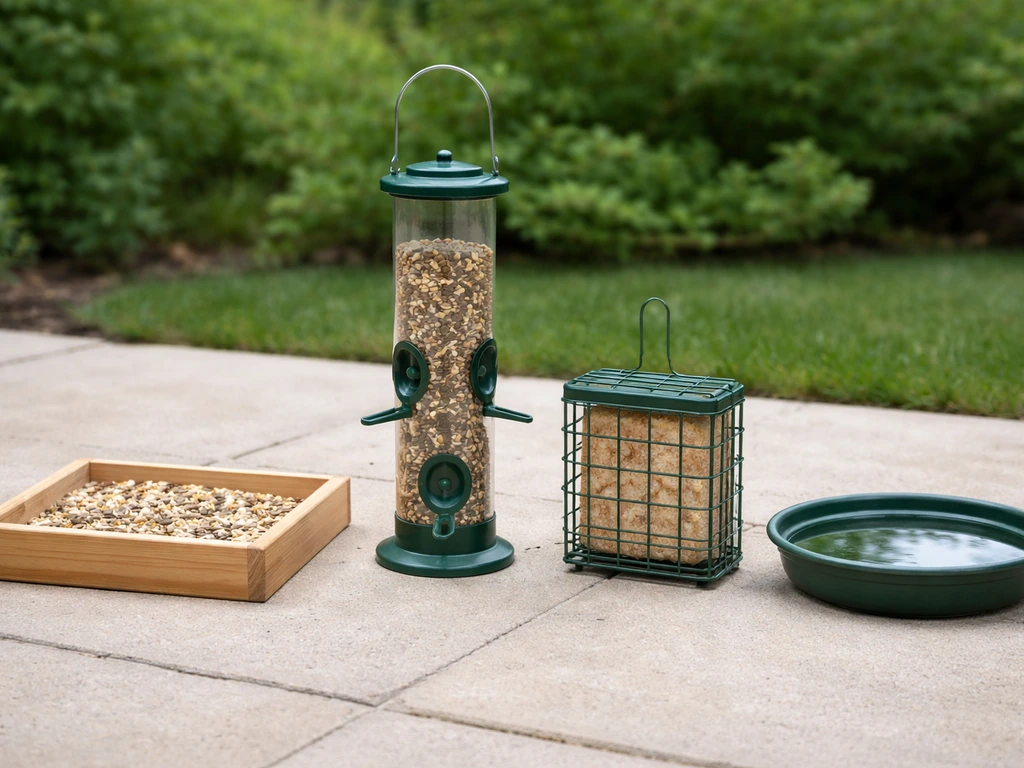
Getting the feeder type right before you start building saves a lot of backtracking. There are four main styles worth knowing: platform/tray feeders, tube or seed feeders, suet feeders, and water feeders. Each attracts different birds and has different build requirements.
| Feeder Type | Best For | Birds Attracted | Main Challenge |
|---|---|---|---|
| Platform / Tray | Widest variety of seeds, easy DIY build | Cardinals, jays, sparrows, finches | Exposed to rain and squirrels |
| Tube / Seed | Sunflower seeds, mixed feeder seed | Finches, chickadees, nuthatches | Needs ports and perches; harder to DIY from scratch |
| Suet Cage | High-energy fat cakes, especially in winter | Woodpeckers, starlings, wrens | Wire mesh required for safety |
| Water / Dripper | Drinking and bathing water | Almost any backyard bird | Must be refreshed daily; algae buildup |
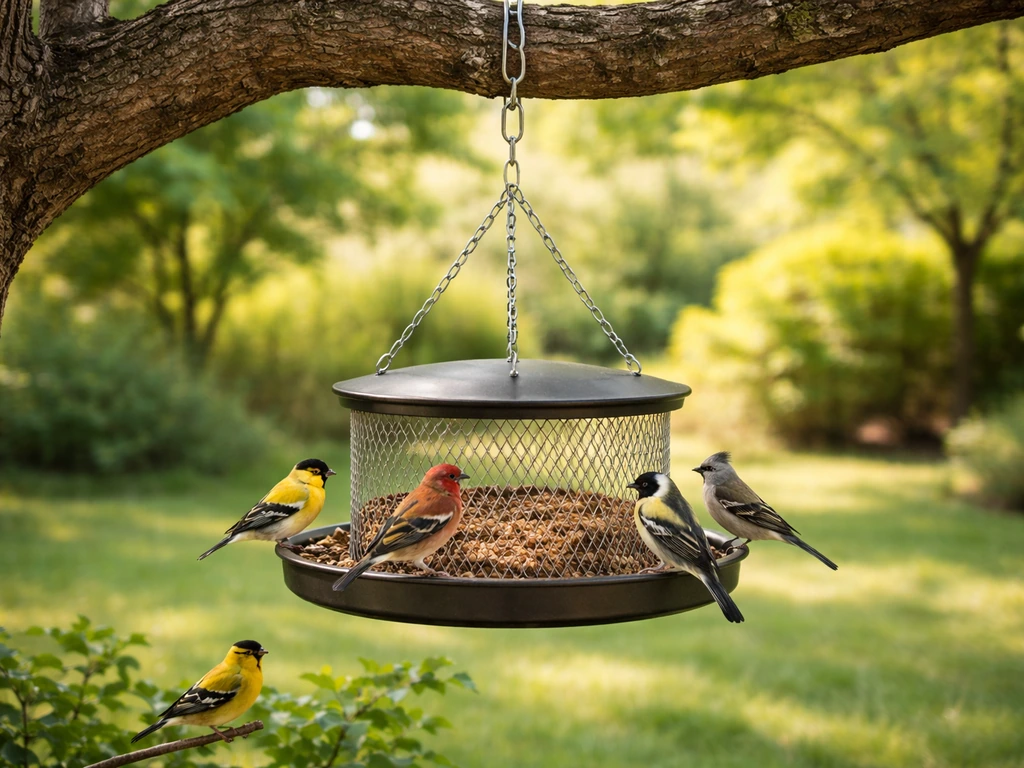
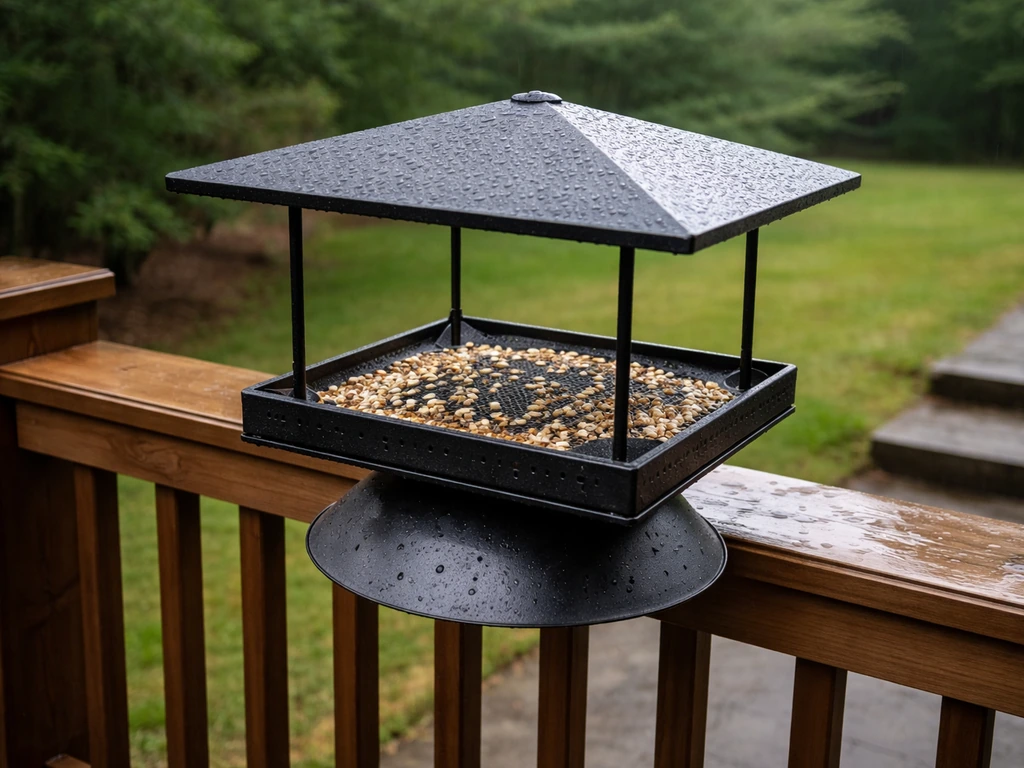
For a first build, a hanging platform or tray feeder is the smartest choice. Audubon and the RSPB both point to platform designs as the most practical, and they genuinely attract the widest range of seed-eating birds. The RSPB puts it plainly: a basic platform with edges and drainage is 'by far the best.' The tradeoff is that open trays are the most vulnerable to squirrels and rain, so the build details below account for both. If you want to offer water alongside seed, the hanging water feeder section covers a quick and easy parallel build.
Materials and tools you probably already have
The goal here is to use what you have or what you can pick up cheaply. Cedar and redwood are ideal because they resist rot naturally, but any exterior-grade plywood or untreated pine works fine if you seal it. Avoid pressure-treated lumber, since the preservatives can be toxic to birds.
- One piece of wood roughly 12 x 12 inches (tray base), at least 3/4 inch thick; cedar, exterior plywood, or pine all work
- Four wooden strips about 1 inch wide and 1 inch tall for the tray edges (optional but helpful for keeping seed in)
- Waterproof exterior wood glue and a handful of 1-inch exterior screws
- Sandpaper (medium grit, around 120) to smooth all edges so there are no splinters
- Exterior waterproof varnish or a coat of linseed oil to weatherproof the wood
- A drill with a small bit (3mm or 1/8 inch) for drainage holes and a slightly larger bit for the hanging points
- Four screw-in eye hooks (stainless steel or galvanized so they won't rust)
- About 6 feet of natural rope, paracord, or galvanized wire rated for outdoor use
- An S-hook or swivel hook for connecting to your hanging point
- Safety gear: gloves, safety glasses when drilling or sanding
If you want to repurpose something instead of buying wood, a plastic cutting board, a wooden chopping board, or even a sturdy plant saucer can serve as the tray base. For the water feeder version, a shallow terracotta saucer or a plastic plant tray is perfect and needs almost no modification.
Build a hanging seed tray feeder: step by step
This build takes about 60 to 90 minutes including drying time for glue. The finished feeder will hold sunflower seeds, mixed seed, or peanuts, and can be adapted later with a simple roof if you want to keep rain off. A mason jar bird feeder is a great way to swap in a clear, easy-to-refill container while still using a sturdy hanger.
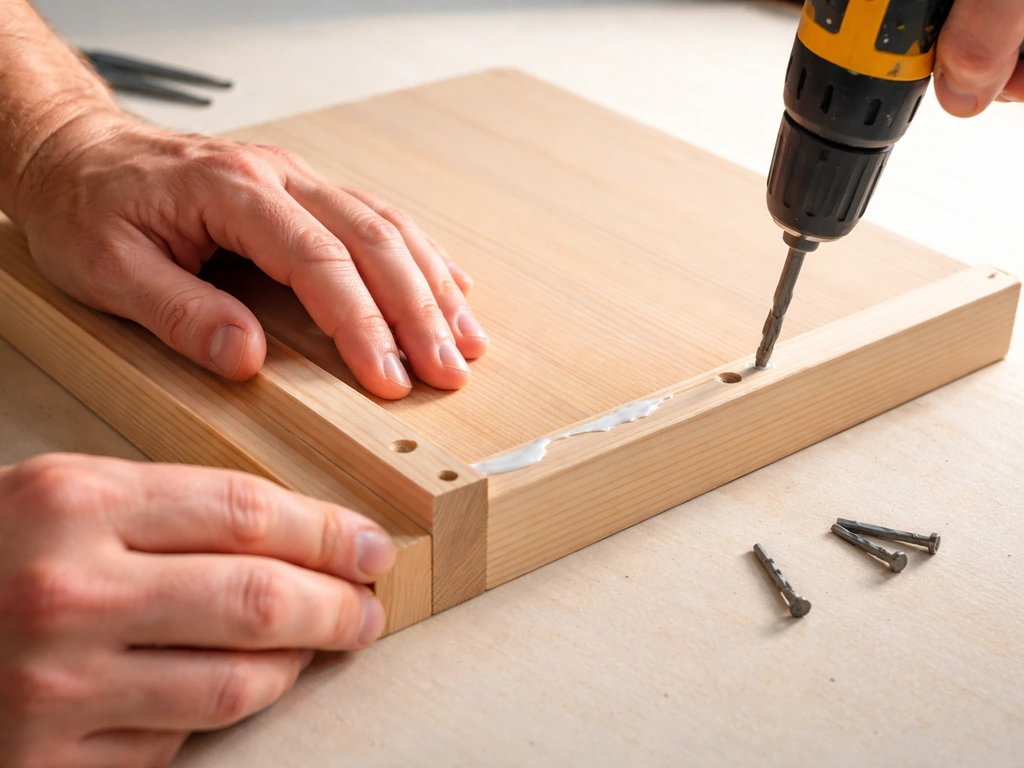
- Cut or trim your base board to roughly 12 x 12 inches if it isn't already. Sand every edge and surface thoroughly, paying special attention to corners. The RSPB specifically warns against sharp edges that could injure a bird's feet, so round off corners with sandpaper until they feel smooth to the touch.
- Drill 6 to 8 small drainage holes (about 3mm wide) across the base, evenly spaced. This is non-negotiable: seed that sits in pooled water goes moldy fast, and moldy seed makes birds sick.
- Glue and screw your edge strips along all four sides of the base, flush with the surface. Leave the corners slightly open (a small 1cm gap at each corner) to allow extra drainage. Use exterior waterproof wood glue and one or two 1-inch screws per strip.
- Once dry, sand the entire assembled tray again lightly, then apply two coats of exterior waterproof varnish or linseed oil to all surfaces. Let it dry completely (typically 2 to 4 hours between coats, check your product label). This step is what makes the feeder last seasons instead of weeks.
- Drill a small pilot hole in each of the four corners of the tray, about half an inch in from the edge. Screw in a galvanized or stainless eye hook at each corner. Test each hook by tugging firmly; it should not pull out easily.
- Cut four equal lengths of rope, each about 18 inches long. Tie one end of each piece to a corner eye hook using a secure knot (a bowline or double half-hitch works well). Bring the four free ends together above the feeder, even them up so the tray hangs level, and tie them together in a strong overhand knot.
- Attach an S-hook or swivel hook to the gathered rope above the knot. This is your connection point to whatever you're hanging the feeder from. The swivel is worth it if you're hanging from a branch that moves in the wind, as it stops the rope from twisting and fraying.
Once the varnish is fully cured (give it 24 hours if you can), add seed and hang it up. Start with black oil sunflower seeds, which attract the widest variety of birds. If you want to go further with hanging methods, rope techniques, or pulley systems for easy lowering and refilling, those deserve their own deep dive beyond this build.
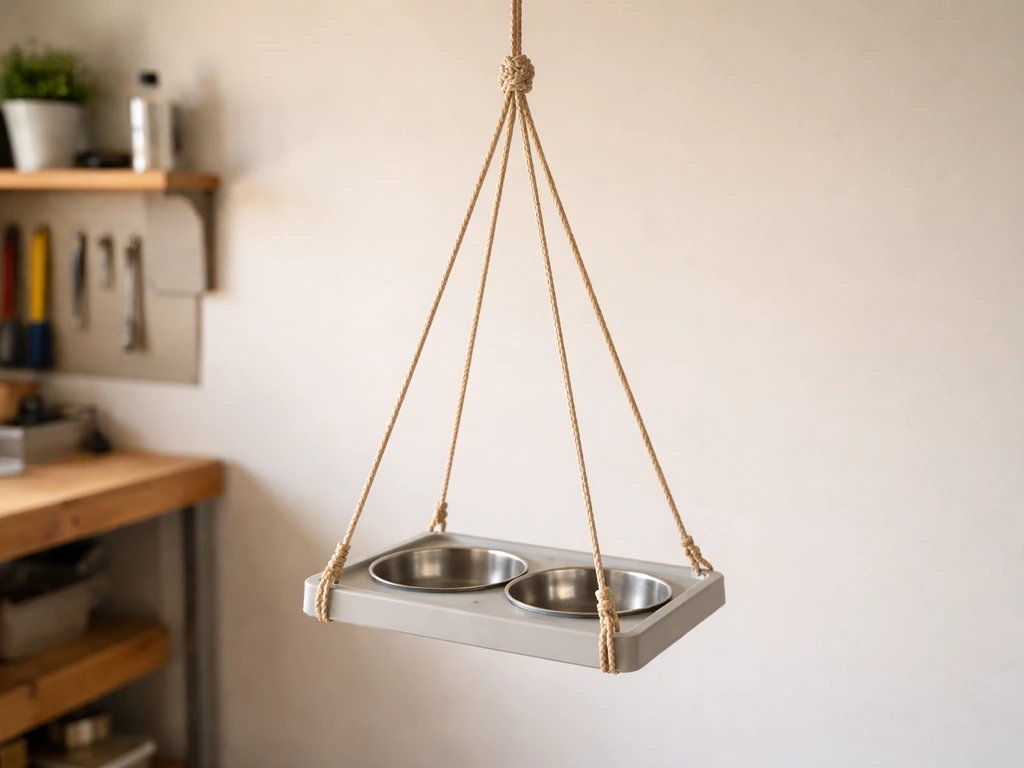
Build a hanging bird water feeder
Birds need clean water year-round, not just in summer, and a hanging water feeder keeps it off the ground and away from cats. The RSPB recommends shallow-edged containers (they literally suggest a dustbin lid or plant saucer as a model), and that guidance is spot-on for a DIY build.
- Start with a shallow terracotta or plastic saucer, about 10 to 14 inches in diameter and no more than 2 inches deep. Depth matters: birds bathe as well as drink, and deep water is dangerous for small birds.
- If using a terracotta saucer, seal the inside with an untoxic waterproof sealant (standard pond-safe sealant works). This stops water from seeping through and weakening the clay over time. Plastic saucers skip this step.
- Drill or use a hot skewer to make three small holes evenly spaced around the rim of the saucer, about half an inch in from the edge. For terracotta, use a masonry drill bit and go slowly to avoid cracking.
- Thread a short length of wire or rope through each hole and secure it with a knot underneath so it can't pull through. A washer on the underside of each hole helps distribute the load on the rim.
- Bring the three rope or wire ends together above the saucer, adjust until the saucer hangs level, and tie or twist them together. Attach a swivel hook or S-hook at the top, the same as with the seed feeder.
- Add fresh tap water to about 1 inch deep. Place a large flat stone or a few smaller ones in the center; this gives birds a stable perch for drinking without having to balance on the rim, and gives smaller birds a shallower spot.
- Hang it in a spot with some shade during the hottest part of the day to slow algae growth and keep the water cooler.
The RSPB is clear about maintenance here: replace the water every single day with fresh tap water, and disinfect the container weekly. It takes about 30 seconds to tip, rinse, and refill. If you let it go, algae and bacteria build up fast and the feeder becomes a health risk rather than a help.
How to make a sturdy bird feeder hanger
The hanger is just as important as the feeder itself. A flimsy hook or a single strand of garden twine will drop your feeder in the first storm. To hang a pine cone bird feeder, you can attach it securely using twine or a small hook and then place it at a safe height where birds can easily land. The good news is a reliable hanger takes about 10 minutes to put together.
Rope hanger (simplest option)
Use 6mm braided nylon or natural manila rope for a tray feeder up to about 2 pounds fully loaded. The four-rope corner system described in the build steps above distributes weight evenly and keeps the tray level. The weak point in any rope system is the knot at the top, so use a bowline loop rather than a simple overhand knot: a bowline doesn't slip or tighten under load, and it's easy to undo when you need to lower the feeder for cleaning.
Wire or chain hanger (more durable)
For a heavier feeder or a permanent setup, galvanized wire or a short length of chain is more durable than rope. Run the wire through the eye hooks at each corner of the tray and twist the ends together with pliers above the feeder, then hook a carabiner or S-hook at the top. Chain has the added advantage of being difficult for squirrels to chew through, which rope and thin cord are not.
Attaching to a branch, hook, or post
Screw a heavy-duty galvanized cup hook or a shepherd's hook bracket into a wooden post or the underside of a porch eave, and hang your S-hook directly from it. If you want a wall mounted bird feeder instead, use the same sturdy cup hook approach and mount it firmly into wall studs. If you're hanging from a tree branch, loop your rope over the branch and tie it off rather than relying on a single hook in bark, which can work loose. For easy refilling, a simple pulley system threaded over the branch lets you lower and raise the feeder without a stepladder every time.
Where to hang it, how high, and what to avoid
Placement is where a lot of people go wrong, even with a well-built feeder. Birds need to feel safe to land, and you need easy access for refilling and cleaning. To learn the best placement for a hanging feeder, follow this guide on how to hang bird feeders safely and effectively. Here are the numbers and principles that actually matter.
- Hang the feeder at least 5 feet off the ground. This is Audubon's baseline recommendation, and it's high enough to reduce cat ambush risk while still being reachable for most people.
- Keep it at least 8 to 10 feet horizontally from trees, fences, sheds, or any structure a squirrel could jump from. Squirrels can leap around 10 feet horizontally and up to 5 feet vertically from a standing position, so distance is your first line of defense.
- For window viewing, place the feeder either within 3 feet of a window or more than 30 feet away. The dangerous middle zone (3 to 30 feet) gives birds enough space to build up speed before a collision. Closer feeders mean any bird that startles won't be moving fast enough to be seriously injured.
- Choose a spot that's sheltered from prevailing winds but not so enclosed that a cat or hawk can wait hidden in nearby shrubs. The RSPB recommends keeping the area around the feeder reasonably open, around 6 to 10 feet of clear space.
- Make sure you can see the feeder easily from indoors so you notice when it needs refilling or if something is wrong.
- If you're adding a squirrel baffle (a cone or dome above or below the feeder), position it between 4 and 5 feet off the ground on the hanging wire or post. Too low and squirrels use it as a launch pad instead.
If you're hanging multiple feeders, space them at least 5 to 6 feet apart to reduce competition and aggression between species. Different feeder heights also help: a hanging tray at 6 feet and a lower platform closer to the ground will attract different birds without them constantly fighting over the same spot.
Cleaning, maintenance, and dealing with pests
How often to clean
Clean seed feeders at least every two weeks in dry weather, and every week in wet or humid conditions. Wet seed turns moldy within a day or two on an open tray, and sick birds spread disease to healthy ones at communal feeders. The water feeder gets refreshed daily and disinfected weekly. If you ever see a lethargic or visibly sick bird at your feeder, take the feeder down and clean it that day.
The cleaning routine
- Put on rubber gloves before you start. Bird droppings and old seed can carry bacteria and fungi.
- Dismantle the feeder as much as possible. Tip out all old seed and debris.
- Scrub every surface with hot soapy water using a stiff brush. Get into all the corners and drainage holes.
- Mix a cleaning solution of 1 part bleach to 9 parts water (a 10% bleach solution). Soak all feeder parts for 10 minutes.
- Rinse thoroughly with clean water, at least twice, until there is no bleach smell left.
- Let the feeder air dry completely before refilling and rehanging. Damp feeders seed up mold faster than almost anything else.
- While the feeder is down, rake or sweep up spilled seed and droppings from the ground below. This is where a lot of disease spreads and where rodents are attracted.
Squirrels, rain, and other problems
Squirrels are the most common frustration with platform feeders, and the honest answer is that no single fix is 100% foolproof. Combine distance (8 to 10 feet from any jumping-off point), height (at least 5 feet off the ground), and a baffle on the hanging wire or post to make it genuinely difficult. Wire or chain hangers are harder to chew than rope. If squirrels are a persistent problem and you don't want to deal with baffles, switching to a tube-style feeder with metal ports and a metal hanging wire is a significant upgrade.
Rain is the other main enemy of a tray feeder. Drainage holes in the base help a lot, but adding a simple roof (a second piece of plywood suspended a few inches above the tray on four short dowel posts, sealed and varnished the same way) keeps most rain out and makes the seed last far longer between refills. Keep the roof overhanging the tray by at least 2 inches on each side to catch wind-driven rain.
If birds aren't coming after a week or two, check these things first: is the feeder too close to a bush where a cat could hide? Is the seed old or damp? Is it in a high-traffic area where people or pets walk by constantly? Birds are creatures of habit and it takes time to find a new food source. Sprinkle a little seed on the ground directly below the feeder to help them notice it faster, and be patient. Once one bird finds it, others follow quickly.
FAQ
What seed should I start with if I am not sure which birds will visit?
Use a short trial run before committing, fill the feeder with one seed type, then watch for 2 to 3 days. Sunflower oil black attracts the most variety, but if you do not see visits, swap to mixed seed or peanuts, and remove any bird-attracting but messy leftovers (stuck, wet, or moldy seed). Keep the feeder location fixed during the test window so birds can build a routine.
How can I make refilling easier without weakening a homemade feeder?
If you are not building the jar version, add a “refill access” plan to your design. For platforms, you can leave one side of the tray slightly higher so seed is easy to pour in without spilling, or hinge a small front cover you open during refills. Avoid making openings so large that squirrels can reach in with their paws.
Can I leave a hanging platform feeder out in rain?
Yes, but adjust expectations and safety. Roofs and drainage help, yet open trays still get soaked in heavy rain and need more frequent seed changes, especially in humid weather. If your area gets frequent storms, consider switching to a tube-style feeder later, or use a roof that overhangs at least 2 inches on each side as described.
How far apart should I place multiple hanging bird feeders?
Target 5 to 6 feet minimum spacing between feeders, then add height variation so birds are not constantly sharing the same landing zone. If you have only one spot, prioritize bird safety over maximizing variety by choosing one feeder style, and keep it away from dense cover that can hide cats or predators.
What materials should I avoid, and do I need to seal everything?
Do not use pressure-treated lumber, since preservatives are not safe for birds. If you use untreated pine or exterior plywood, seal all surfaces that contact water or outdoor air, and allow full cure time before adding seed. For touch-up seasons later, re-seal worn edges so the tray does not leak and sour seed.
What is the right cleaning schedule, and what if birds look sick?
Clean seed feeders at least every two weeks in dry weather, every week in wet or humid conditions. If you see lethargic or visibly sick birds, take the feeder down the same day, wash it thoroughly, and let it dry before re-filling. Do not “spot clean” only the seed area, bacteria can spread through residue on the tray and corners.
Can I use the same homemade hanging setup for water and how do I prevent algae?
Yes, but only if the water setup prevents contamination. Choose shallow containers that are easy to tip, rinse, and refill, and refresh daily. Disinfect weekly, and scrub away any slime or algae you see, then fully dry before returning it to the hang point.
My rope knot keeps slipping, what is the best fix?
Use hangers that match feeder weight and conditions. Rope works for lighter loads, but knots are often the weak point, a bowline loop is harder for the knot to slip under load. For heavier or year-round setups, wire or chain is more durable and less chewable than thin rope.
If birds do not return after a week, what should I troubleshoot first?
A feeder that is too high or too exposed often takes longer to attract birds. Aim for a safe landing area, then ensure there is nearby cover that birds can escape to without making the spot feel like ambush territory. If birds disappear after the first week, re-check old or damp seed and look at nearby human or pet traffic patterns.
What actually reduces squirrel damage beyond “hang it higher”?
Squirrels can still get a foothold, even with good design. The most practical upgrades are increasing distance from jumping-off points (8 to 10 feet), keeping the feeder at least 5 feet off the ground, and using a baffle on the hanging wire or post. If you want a stronger long-term solution, tube-style feeders with metal ports and metal hangers are typically less vulnerable than open trays.
What are safe ways to mount or hang it depending on the location?
If you hang from a tree branch, tie off the rope so the feeder is not dependent on bark-grip alone, and check the tension after wind. For permanent mounting, secure a cup hook or bracket into structural members, like a post or wall studs, not just trim. Give the hanger a gentle load test before your first fill.