You can <build and install a solid DIY bird feeder pole> in a single afternoon using materials from a hardware store or even scavenged from your yard. in a single afternoon using materials from a hardware store or even scavenged from your yard. The short answer: a 1-inch galvanized steel conduit pipe or a treated 4x4 wooden post works great, costs under $20, and will last years if you set it right. Below I'll walk you through every step, from picking your design to hanging the feeder and fixing the issues that usually pop up a week later.
Do It Yourself Bird Feeder Pole: Build and Install Today
Marcus Brennan
23 Mar 2026
DIY bird feeder pole basics and choosing the right design
Before you dig anything, decide what you're building. The two most practical DIY options are a metal conduit pole and a wooden post pole. Each has a clear use case, and mixing up the two is where most people waste time and money.
| Feature | Metal Conduit Pole | Wooden Post Pole |
|---|---|---|
| Best for | Quick single-feeder setups, renter-friendly installs | Multiple feeders, permanent setups, heavier loads |
| Typical height | 5–8 ft above ground | 6–10 ft above ground (easy to cut to size) |
| Cost | $8–$15 for conduit + fittings | $10–$25 for treated lumber + hardware |
| Tools needed | Hacksaw or pipe cutter, mallet or driver | Circular saw, drill, post-hole digger or concrete |
| Squirrel resistance | High (add a baffle easily) | Moderate (requires a larger baffle or wrap) |
| Durability | 20+ years galvanized | 10–15 years pressure-treated |
| DIY difficulty | Beginner | Beginner to intermediate |
My recommendation: if you want something fast and you're only hanging one or two feeders, go with 1-inch EMT electrical conduit. It's lightweight, slick enough to slow squirrels, and you can drive it into the ground without concrete. If you want a taller pole (over 7 feet), plan to hang multiple feeders, or want something that looks more like a garden feature, build a wooden post instead.
A third option that works surprisingly well for lighter feeders: a shepherd's hook-style pole made from rebar with a bent top. It costs almost nothing if you have scrap rebar, but it's not great for heavier feeders and tends to lean over time. I'd treat it as a temporary fix, not a permanent setup.
Tools, materials, and safety for DIY pole builds
Here's everything you'll need. I've split it by pole type so you're not buying stuff you don't need.
For a metal conduit pole
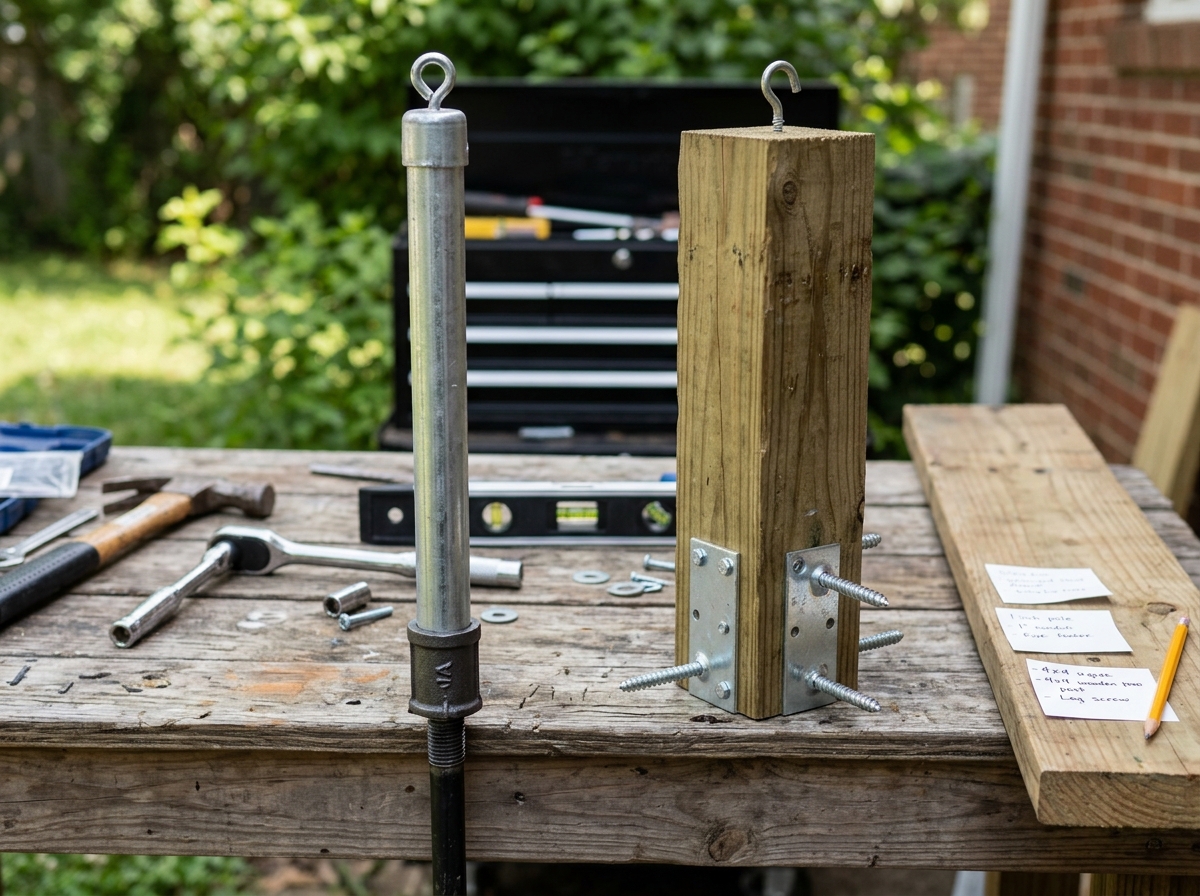
- One 10-foot length of 1-inch EMT electrical conduit (cut to desired height, usually 8 ft total so 5–6 ft above ground after burial)
- Ground anchor spike or conduit-to-ground stake (sold as 'conduit ground stakes' at hardware stores, around $5–$8)
- Pipe cutter or hacksaw
- Hook attachment: a threaded hook insert that fits inside the conduit top, or a small crossbar arm (T-connector) for multiple feeders
- Rubber mallet or a scrap block of wood to protect the conduit top while driving
- Level
- Work gloves (conduit edges are sharp after cutting)
For a wooden post pole
- One 4x4 pressure-treated post, 8–12 ft long depending on your target height
- Post-hole digger or digging bar
- Fast-setting concrete mix (one 50 lb bag per post is usually enough)
- Drill and 3/8-inch bit
- Exterior-grade wood screws (2.5 inch and 3 inch)
- Screw-in eye hooks or a wooden crossbar arm for hanging feeders
- Sandpaper (80-grit) to smooth the top and any cut edges
- Exterior wood sealer or paint (optional, but extends life significantly)
- Level
- Work gloves and safety glasses
Safety note: call 811 (in the US) before you dig anything deeper than 6 inches. It's free, takes two minutes, and prevents you from hitting a buried utility line. I know it feels like overkill for a bird feeder pole, but it's genuinely worth it.
Step-by-step: how to build a bird feeder pole
These steps apply to both pole types. I'll flag where the process splits between metal and wood.
- Call 811 to have utilities marked if you're digging more than 6 inches. Wait the required time (usually 2–3 business days) before proceeding.
- Choose your location using the placement guidelines below (near a tree or shrub for bird cover, correct window distance). Mark the spot with a stake.
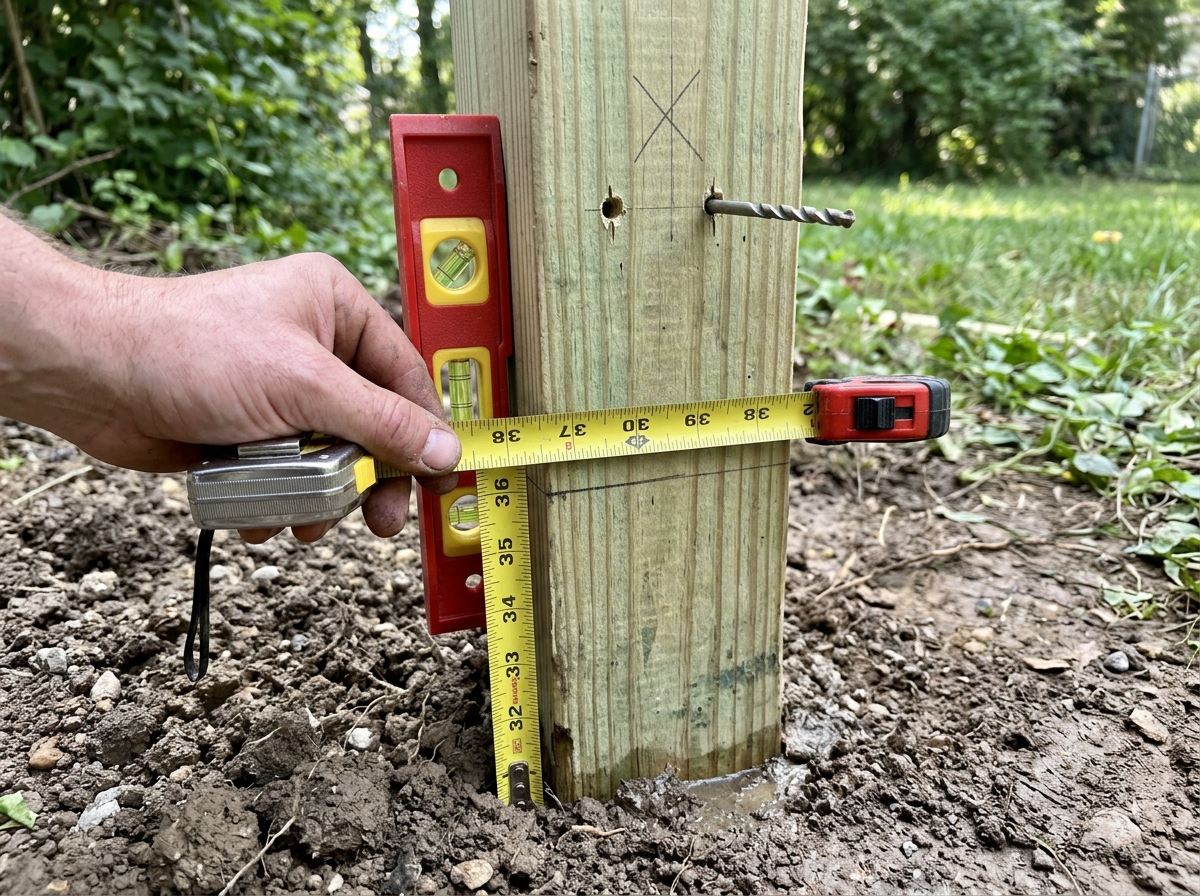
- For metal conduit: cut your conduit to length with a pipe cutter or hacksaw. A standard setup is 8 ft total, with 18–24 inches going into the ground, leaving about 6 ft above grade. Smooth the cut end with a file or sandpaper. For wooden post: cut your 4x4 to length. Plan for at least 24 inches in the ground for a stable set, more for tall poles (see below).
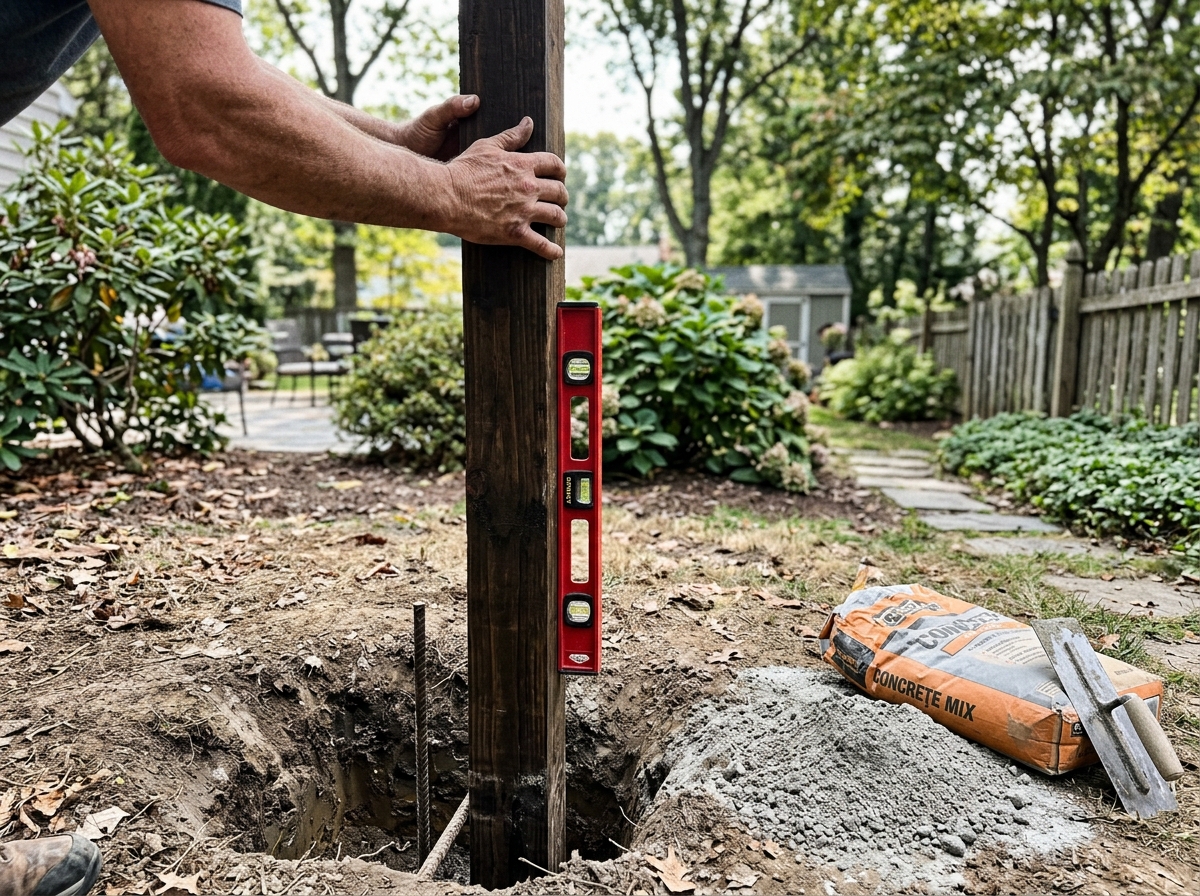
- For metal conduit: drive the ground anchor stake into the soil with a rubber mallet until it's fully seated, then slide the conduit over it and tighten the set screw. Alternatively, drive the conduit directly using a driving cap. For wooden post: dig your hole to the required depth (at least 1/3 of the total post length underground), drop the post in, check for plumb with a level on two adjacent sides, brace it temporarily, then pour fast-setting concrete dry into the hole and add water per the bag instructions. Let it cure at least 4 hours before loading the pole.
- Attach your hook, arm, or mounting hardware to the top of the pole before it's too hard to reach. For conduit, thread in a screw hook or attach a T-bar arm. For wood, pre-drill and screw in eye hooks or attach a horizontal crossbar arm.
- Add a squirrel baffle now, before the feeder goes on. A cone baffle mounted 4–5 feet above ground on the pole shaft is far easier to install at this stage than after the feeder is hanging.
Wooden pole builds and making a tall pole
Wooden poles deserve a dedicated section because they open up options that metal conduit can't easily match, especially when you want to go tall or hang multiple feeders from a single structure.
For a basic single-feeder wooden pole, a 4x4 at 8–10 feet total (with 24 inches buried) is plenty. Sand the top face smooth so water runs off rather than pooling, and seal all cut ends with exterior wood sealer. A rounded or angled top cap (easy to cut on a table saw or router) looks nice and sheds rain better than a flat top.
For a tall wooden pole, say 10 feet or more above ground, you need to go deeper and use concrete. The general rule is to bury at least 1/3 of the total pole length. So a 14-foot pole (10 ft above grade plus 4 ft underground) needs a hole about 4 feet deep and 8–12 inches wide. Use two 50 lb bags of fast-setting concrete and pack the top of the hole slightly mounded so water drains away from the post base. Tall poles also benefit from a horizontal arm or T-bar at the top so the extra height is actually useful for hanging feeders at a comfortable viewing height from your yard.
A popular variation is a simple T-bar design: mount a 36-inch horizontal 2x4 or 1x4 arm to the top of your 4x4 post using a halved lap joint (notch both pieces and bolt together) or just two long bolts through a sandwiched bracket. Hang feeders from screw hooks at each end. This single structure can support 2–4 feeders easily, and it looks intentional rather than cobbled together.
If you want to go even bigger, like a full multi-arm feeding station, you can add a second horizontal arm about 18 inches below the first, rotated 90 degrees. Pre-drill everything before assembly so the wood doesn't split, and use stainless or hot-dipped galvanized hardware only. Regular zinc screws rust out fast outdoors.
Installing and positioning the pole in your yard
Where you put the pole matters as much as how you build it. Get this wrong and you'll either never see the birds (because the feeder is too exposed or too far from cover) or you'll lose birds to window strikes.
The window distance rule
Audubon's guidance is clear on this and backed by research: place your feeder either within 3 feet of a window or more than 30 feet away. The logic is simple. If a bird is startled and flies toward the window from 3 feet away, it can't build up enough speed to fatally injure itself. If it's 30-plus feet away, it has enough time to recognize the glass and veer off. The danger zone is everything in between, roughly 4 to 29 feet, where birds get moving fast but don't have time to course-correct. Most people instinctively place feeders right in that middle zone. Don't do it.
Cover and exposure
Birds feel safer feeding when there's a tree, shrub, or dense hedge within about 10 feet. They'll use it as a staging perch before approaching and as a quick escape when spooked. That said, don't put the feeder inside the shrub or directly under a tree canopy, both locations make squirrel access trivially easy and give cats a hiding spot. A good position is 8–10 feet from a medium shrub in a spot that gets morning sun. Morning sun keeps the seed drier and tends to be when bird activity peaks.
Ground clearance and pole height
The feeder itself should hang at least 5 feet off the ground to deter cats and keep seed out of reach of ground-feeding pests. The squirrel baffle (if you're using one, and you should) needs to be at least 4 feet off the ground and at least 18 inches below the feeder. That means your pole top needs to be at least 6–7 feet above grade for the math to work out. Plan accordingly before you cut.
Attaching and hanging the bird feeder on the pole
Once the pole is set and cured, mounting the feeder is the easy part, but a few details make a real difference in stability and access.
Hook and hanger options
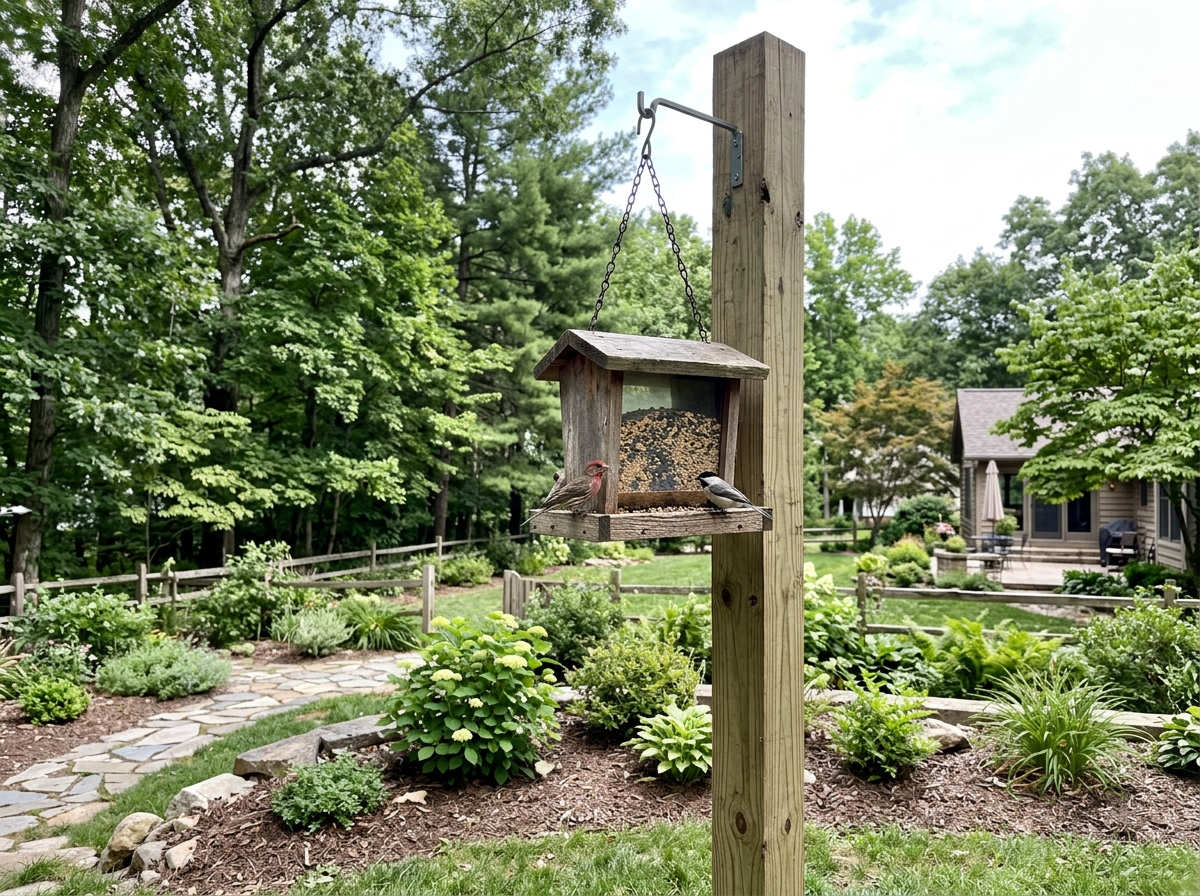
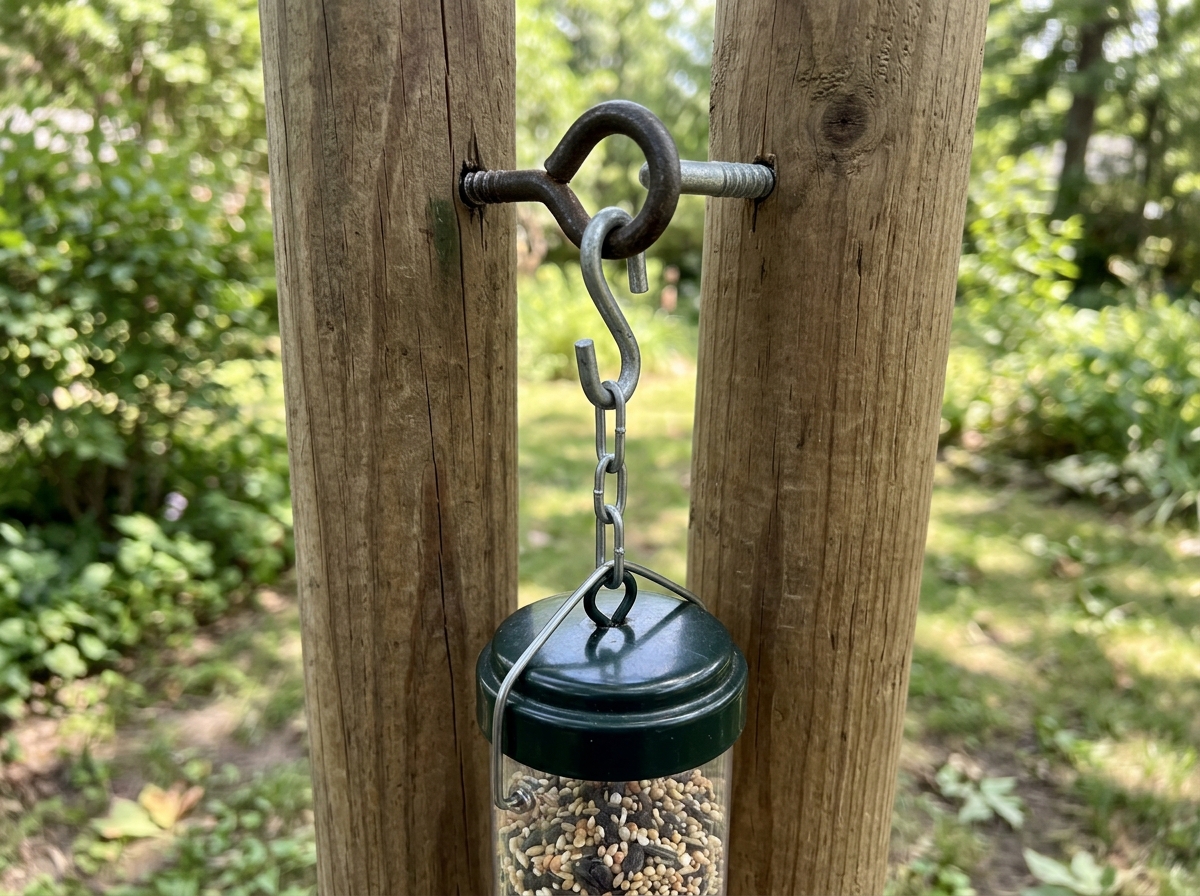
The simplest attachment is a screw-in eye hook at the pole top with an S-hook connecting to the feeder's hanging loop. Use a locking or twist-close S-hook rather than a plain open S-hook. Open S-hooks let feeders swing off in wind or when a squirrel goes at them aggressively. A locking S-hook costs about $1 more and solves the problem entirely.
For a crossbar arm setup, hang the feeder using a length of chain (at least 3 links, so you can adjust height) between the eye hook on the arm and the feeder top. This lets you raise or lower the feeder without re-drilling anything, which is handy when you want to clean it or swap to a different feeder type.
Stabilizing feeders in wind
Tube and hopper feeders swing around a lot in wind and spill seed. Two fixes: first, use a shorter hanger (8–12 inches of chain instead of 18+) to reduce the pendulum swing. Second, if your feeder has a bottom perch ring, thread a second small S-hook from the perch ring down to a lightweight anchor point on the pole (like a small eye hook on the side of the arm). It still lets you remove the feeder easily but stops the wild swinging.
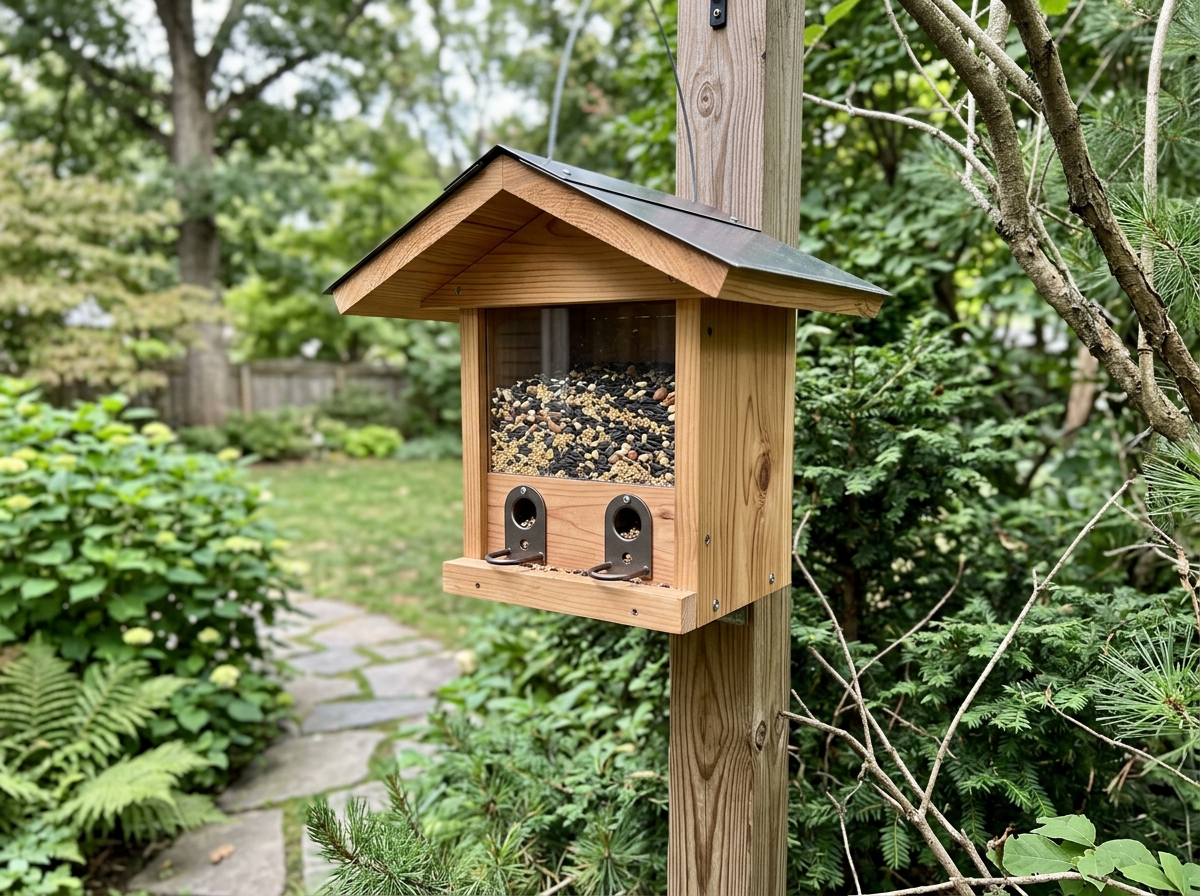
Making a pole bird feeder (feeder and pole as one unit)
If you want the feeder itself to be integrated with the pole rather than hung from it, a simple platform feeder works perfectly. Cut a 12x12 inch square of 3/4-inch exterior plywood, drill 1/4-inch drainage holes across the bottom, and attach a 1-inch lip around the perimeter using small wood strips. Then center and bolt this tray directly onto the flat top of your 4x4 post using two 3-inch lag bolts up through the tray bottom. You now have a post-mounted platform feeder that's dead simple to fill and clean, and it's one solid unit with no hanging hardware to fail.
Common setup problems and maintenance tweaks
Most of the issues people run into show up in the first two weeks. Here's what goes wrong and how to fix it without starting over.
The pole leans
If a metal conduit pole leans, the ground anchor wasn't driven deep enough or the soil is too soft. Pull it out, drive the anchor 4–6 inches deeper, or pour a small concrete collar around the base. For a wooden post that's leaning, the concrete probably didn't cure fully or the hole was too narrow. If it's a minor lean (less than 5 degrees), pack dry concrete mix around the base and add water, then brace it for 24 hours. A significant lean means digging it out and resetting, which is annoying but not hard.
Squirrels are still getting to the feeder
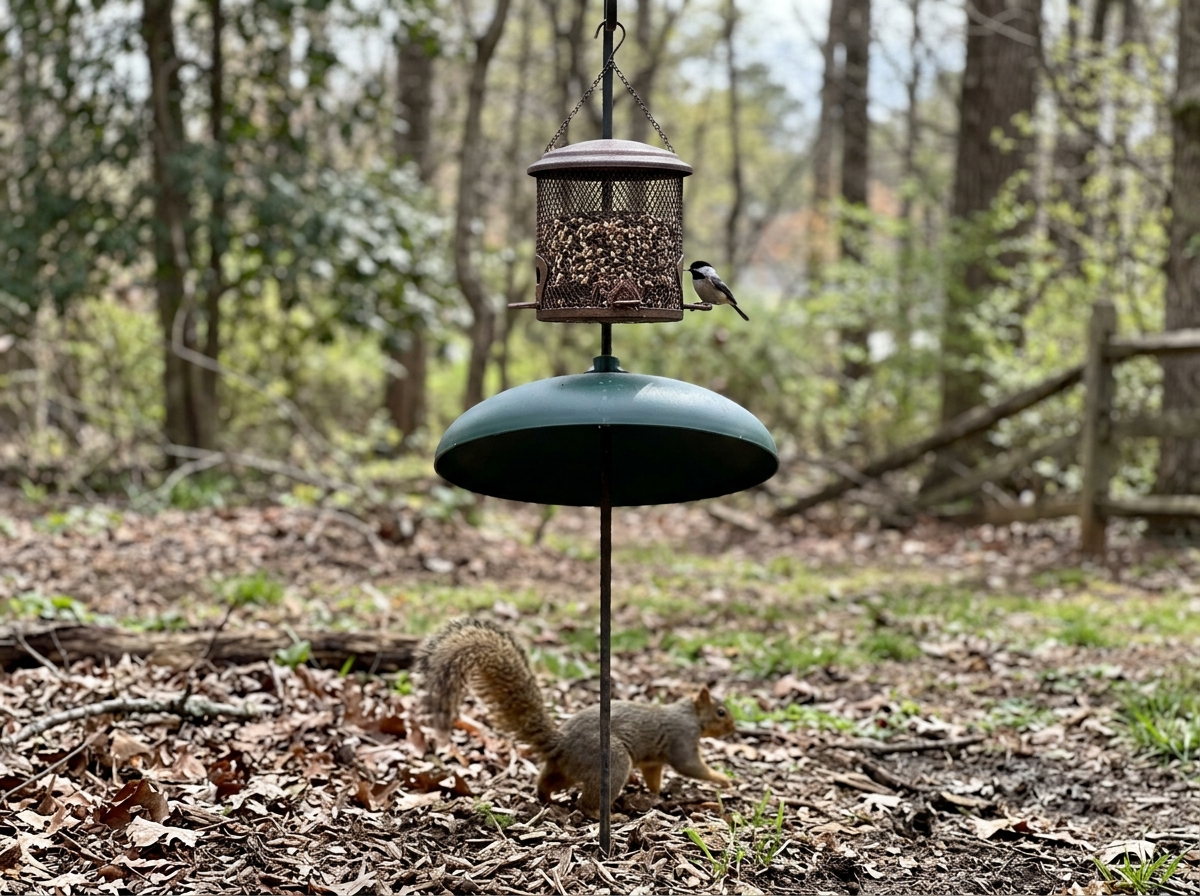
Check three things: the baffle is at least 4 feet off the ground, the feeder is at least 18 inches above the baffle, and there's nothing within 8–10 feet horizontally that a squirrel can jump from (fences, trees, deck railings). Squirrels can leap about 10 feet horizontally from a fixed point and drop from up to 10 feet above. If the pole location is clear of launch points and the baffle is correctly positioned, squirrels will stop within a day or two after failing repeatedly.
Seed is getting wet and clumping
This usually means the feeder doesn't have enough roof overhang or the drainage holes are clogged. Clean the holes with a skewer or drill bit, and consider moving the feeder 6–12 inches lower on the pole (or using a longer chain) if it's in an exposed position. Tube feeders with drain ports at the base are better in wet climates than open platform feeders.
Cleaning the feeder regularly
Cornell Lab's Project FeederWatch recommends cleaning seed feeders about once every two weeks under normal conditions, and more often during warm or damp weather when mold and bacteria grow faster. For routine cleaning, scrub with hot soapy water, rinse well, and let the feeder dry completely before refilling. For a deeper clean (especially if you see any sick birds at the feeder), soak in a diluted bleach solution, roughly 1 part bleach to 9 parts water, scrub thoroughly, rinse multiple times, and dry fully. A wet feeder packed with fresh seed is the fastest way to spread disease among your birds, so the drying step is not optional.
Birds aren't coming
Give it time first, usually 1–2 weeks for birds to discover a new feeder, especially in late winter or early spring when existing food sources are still available. If there's no activity after two weeks, check that you're using the right seed for your region (black-oil sunflower seed attracts the widest variety of birds almost anywhere in North America), the feeder isn't in constant deep shade, and there's some nearby cover. Sometimes just moving the feeder 10–15 feet closer to a shrub is enough to trigger activity.
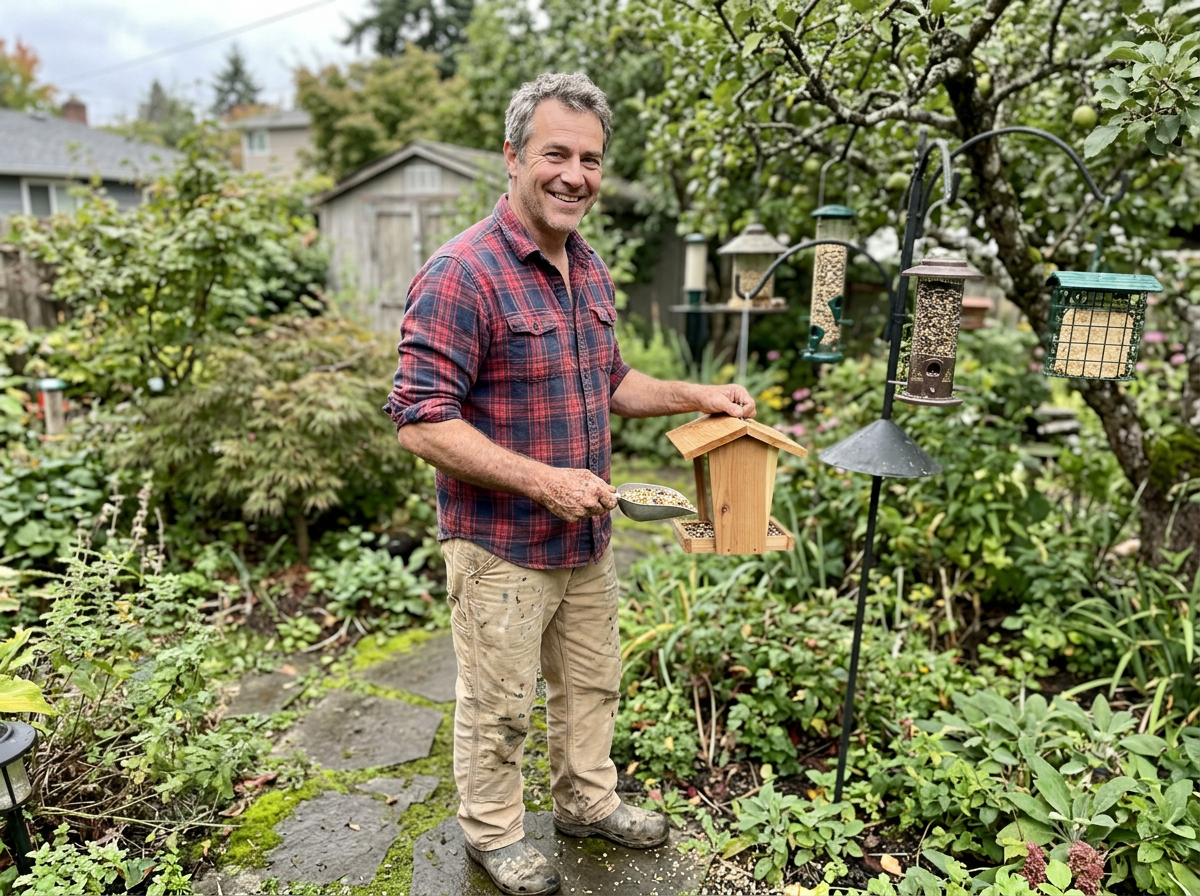
Once you've got the pole up, the feeder on, and the first birds visiting, the whole setup pretty much runs itself between your biweekly cleanings. If you're already thinking about adding a second feeder or building the feeder itself from scratch, there are full guides on how do you make bird feeders there are full guides on how do you make bird feeders and putting together DIY bird feeder kits elsewhere on the site. do it yourself bird feeder kits But honestly, get the pole sorted first. Everything else is easier once you've got a solid, well-placed mount to work from. how to make heart shaped bird feeders
FAQ
Can I use the do it yourself bird feeder pole on a balcony or patio where I cannot dig a hole?
Yes, but you still need to size the pole so it does not wobble under load. For EMT conduit, plan for a straight run into the ground plus a secure ground anchor, then keep the hanging point close to the pole (shorter chain, minimal swing). If you want more stability, use a thicker conduit size like 1.25 inch or add a brace or short vertical post beside it.
How do I stop my hanging feeder from swinging too much in wind on a do it yourself bird feeder pole?
If your area has frequent strong winds, prioritize a shorter hanger and a tighter mount. Use locking S-hooks, keep chain length roughly 8 to 12 inches for hanging feeders, and avoid hanging heavy tube feeders from long links. Also consider a platform feeder mounted directly to the post top if wind makes seed splash too common.
What’s the best way to make a wooden do it yourself bird feeder pole last outdoors for years?
Use wood sealer on all cut ends, then add a top cap that sheds water, and pre-drill to prevent splitting. If you are building a tall 4x4 with concrete, keep the buried portion sealed and slightly mounded at the base so water drains away, not into the end grain.
How tall should my do it yourself bird feeder pole be if I plan to use a squirrel baffle?
A practical rule is to choose the pole height based on the baffle and feeder clearances first, then back-calculate the top height. Since your baffle needs at least 4 feet off the ground and the feeder at least 18 inches above it, you typically need around 6 to 7 feet of pole above grade before you even account for the feeder hook hardware.
Is “at least 5 feet off the ground” enough, or should I change feeder height on my do it yourself bird feeder pole?
Mounting height affects more than cat deterrence. Aim for at least 5 feet to discourage ground-feeding pests, then verify you still have room for the baffle clearance and that nothing nearby gives squirrels a launch point. If your pole location is constrained, adjust feeder height with chain length rather than ignoring the baffle spacing.
Are locking S-hooks really necessary for feeders on a do it yourself bird feeder pole?
Do not rely on open S-hooks for heavy or wind-prone feeders. Swap to locking or twist-close S-hooks so the feeder cannot unseat during a squirrel hit. For chain hanging, use at least 3 links so you can fine-tune height without drilling again.
What should I troubleshoot if my do it yourself bird feeder pole has birds one week and none the next?
If your birds suddenly stop showing up, check for three quick causes: the feeder may be too deep in shade, the seed may not match local preferences, or the nearest cover distance has changed due to foliage or yard changes. Try moving the feeder 10 to 15 feet toward a shrub and verify the window distance rule remains safe.
My feeder keeps getting wet and messy. What’s the fix for do it yourself bird feeder pole setups?
If you see frequent wet seed or mold, first clean and unclog the drainage holes, then reduce how much rain hits the feeder by adding or improving roof overhang or lowering the feeder slightly if it is exposed. Tube feeders with drain ports generally hold up better in damp climates than open platform designs.
What’s the difference between a fixable lean and when I should rebuild the base for a do it yourself bird feeder pole?
For minor pole lean, you can often correct without a full reset: drive the anchor deeper for metal, or pack and re-brace the base for wood if it is within a small angle. If the pole is leaning more than a small amount, or the base is clearly failing, plan to dig and reset because repeated leaning usually means the soil or concrete pour was not stable.
Can I add a second feeder later to my do it yourself bird feeder pole without breaking the setup?
If you want to add a second feeder, the safest approach is to keep everything under the same structural arm and use hardware that will not loosen. Pre-drill, use stainless or hot-dipped galvanized fasteners, and add the second arm lower on the post so you spread the load while keeping feeder and baffle clearances intact.
Are platform feeders a good idea for a do it yourself bird feeder pole, and what should I watch out for?
For platform feeders, you can reduce mess by using drainage holes, a slightly raised lip, and a rigid mounting pattern (bolted from below). Make sure the platform is centered and securely lagged so it does not rack in wind, and clear any stuck seed regularly so mold does not start under the tray.
How often should I clean my feeder on a do it yourself bird feeder pole during hot or rainy weather?
Cleaning frequency is a common edge case. In warm or humid periods, shorten the interval and remove wet or clumped seed immediately. Dry the feeder completely before refilling, and if you suspect disease, do the deeper clean with a diluted bleach soak and multiple rinse steps before drying.
Next Article
Do It Yourself Bird Feeder Kits: Build a Wood Feeder Today
Step-by-step guide to build do it yourself wood bird feeder kits, customize, mount safely, and troubleshoot pests and sp