A pulley system is one of the smartest ways to hang a bird feeder. You get full control over height, you can lower the feeder to ground level for refilling and cleaning without dragging out a ladder, and a well-built setup keeps the feeder stable even in wind. This guide walks you through planning the spot, picking the right hardware, building the system, and troubleshooting the problems that actually come up, see also how to hang a mason jar bird feeder. Whether this is your first feeder or you're upgrading from a simple hook, you can get this done in an afternoon. how to make pinecone bird feeder. how to hang a bird feeder with rope. how to make a hanging bird feeder. how to hang pine cone bird feeder
How to Hang a Bird Feeder With a Pulley System
Marcus Brennan
23 Mar 2026
Plan your pulley setup first (location, height, and access)
Before you buy a single piece of hardware, get your location right. The spot you choose determines everything else: how long your rope needs to be, where you mount the pulley, and whether the setup is actually useful day to day.
Height is the first thing to sort out. Audubon recommends keeping feeders at least 5 feet off the ground. In practice, 6 to 8 feet works well for most setups. It puts the feeder out of easy reach of cats and keeps it visible, but low enough that you're not fighting with an extremely long rope. Speaking of cats, try to position the feeder at least 12 feet away from tall grass or shrubs where cats can crouch and wait. Squirrels are the other concern. They can jump about 3.5 feet straight up, so if you're adding a squirrel baffle to the post or line (which I'd recommend), the top of that baffle needs to be at least 4 feet off the ground to do anything useful.
Windows are a real hazard for birds. The rule that works: place the feeder either within 3 feet of a window or more than 30 feet away. Anything in between is a collision zone. If you're mounting the pulley from a tree or post that puts the feeder in that danger zone, shift the location. That 30-foot distance also means you'll need a longer rope run, so factor that into your materials list.
Think carefully about where you'll stand when you lower the feeder to refill it. You want clear, flat ground with no tripping hazards, and the free end of the rope needs to reach somewhere you can comfortably cleat it off. A tree branch, a post, a fence rail, or even a wall-mounted cleat all work. Sketch it out roughly before committing to a spot. The cleating point (where you tie off the rope when the feeder is at height) is just as important as the pulley anchor.
What parts and materials you actually need
You don't need fancy gear for this. The list is short, and most of it is available at any hardware store or online for under $30 total.
Choosing the right pulley
For a single bird feeder, a simple single-sheave (one-wheel) fixed pulley is all you need. Look for a stainless steel or galvanized pulley rated for at least 50 pounds. That's far more than any feeder will weigh, and the extra rating means less wear over time. Avoid cheap zinc or uncoated pulleys, which rust out within a single winter. A decent stainless pulley with a swivel hook runs about $8 to $15. Swivel hooks are worth the extra dollar or two because they let the pulley rotate freely and prevent the rope from twisting.
Rope or cable: which one to use
| Option | Best For | Pros | Cons | Rough Cost |
|---|---|---|---|---|
| Braided nylon rope (3/8 in) | Most backyard setups | Easy to knot, soft on hands, weather-resistant | Stretches slightly under load | $0.30–$0.50/ft |
| Polyester rope (3/8 in) | Long runs and heavy feeders | Low stretch, UV-resistant, holds knots well | Slightly stiffer than nylon | $0.40–$0.60/ft |
| Galvanized wire cable (3/32 in) | Permanent, high-load setups | Zero stretch, very durable | Hard on hands, needs cable clamps, overkill for most feeders | $0.50–$0.80/ft |
| Cotton clothesline rope | Temporary or budget setups | Cheap, easy to find | Rots, weakens in UV, not recommended long-term | $0.10–$0.20/ft |
For almost every backyard feeder, 3/8-inch braided polyester rope is the right call. It handles weather well, doesn't stretch much, and is easy to work with. Measure the full rope run from your anchor point, through the pulley, and down to the cleating point, then add an extra 5 feet for knots and adjustments. It's annoying to come up short.
Hardware and fasteners
- One stainless or galvanized single-sheave pulley with swivel hook (rated 50+ lbs)
- One screw-in eye bolt (3/8 in diameter minimum) or lag eye screw for mounting the pulley to wood
- One small cleat (plastic or aluminum) for tying off the free rope end, about 4 to 6 inches long
- Two to four stainless deck screws for mounting the cleat
- One S-hook or locking snap hook for attaching the feeder to the rope end
- Optional: one squirrel baffle to slide onto the rope above the feeder
How to build the pulley system
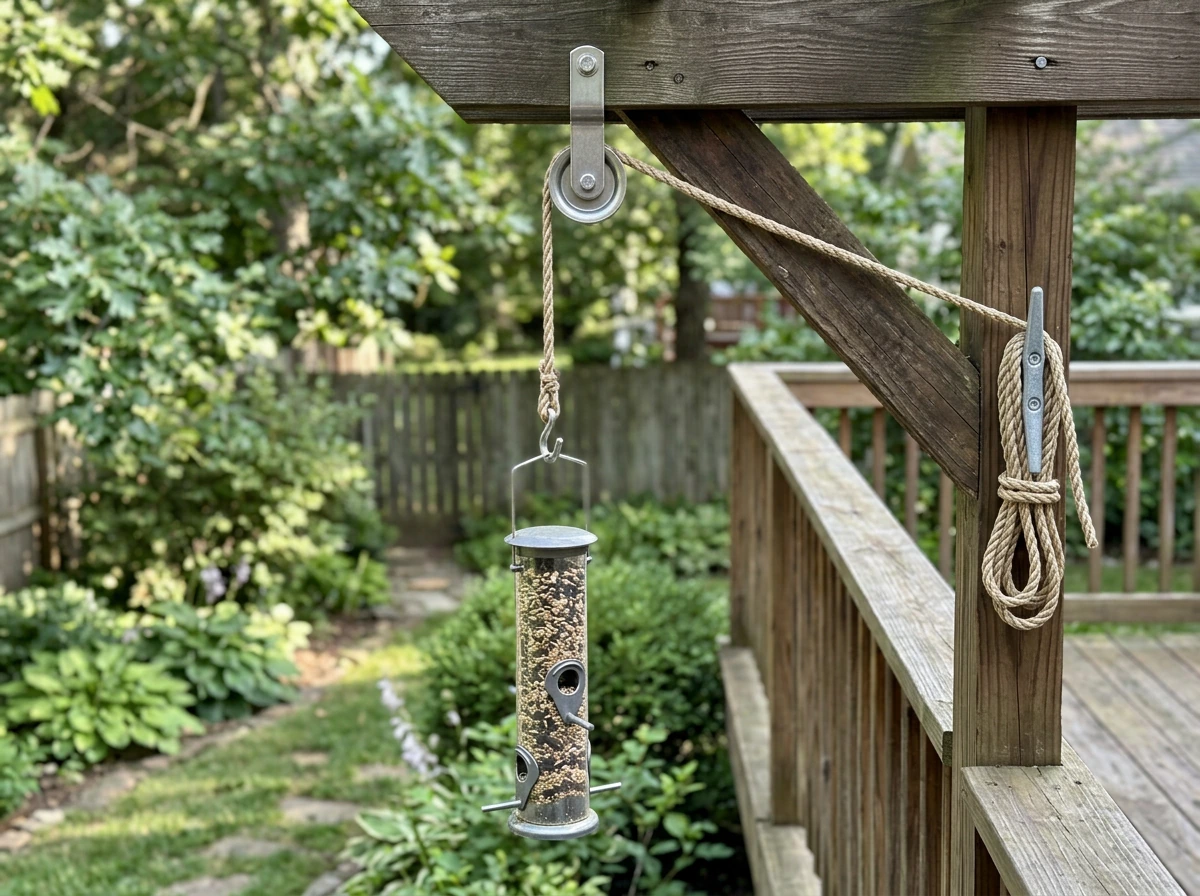
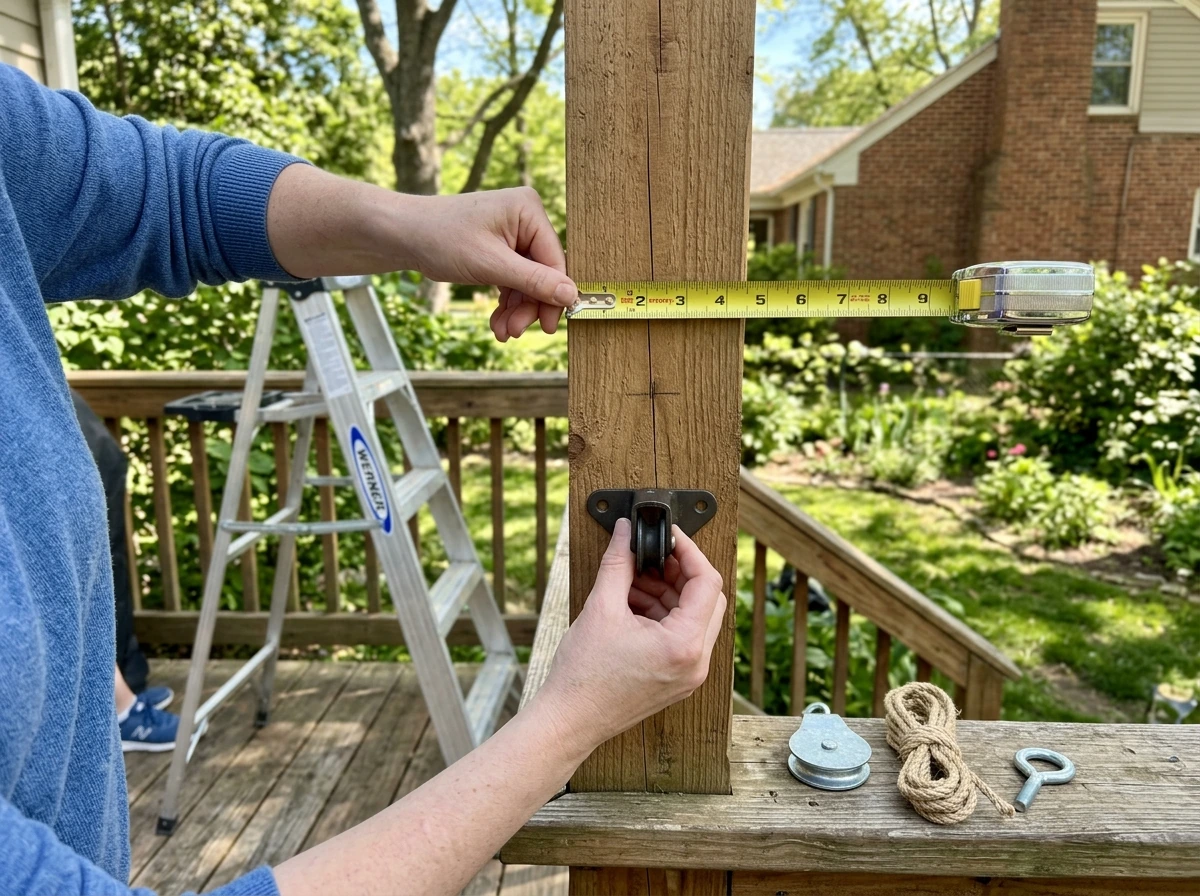
Step 1: Mount the pulley anchor point
The pulley needs a fixed anchor point directly above where you want the feeder to hang. A tree branch at least 2 inches in diameter, a wooden post, a deck beam, or a bracket screwed into a fence post all work. Drill a pilot hole slightly smaller than your eye bolt's shank, then screw the eye bolt in all the way so the threads are fully engaged and only the eye is exposed. If you're mounting to a metal surface, use a U-bolt or a drilled-and-tapped eye bolt with a backing nut on the other side. The pulley's swivel hook clips directly into the eye bolt.
Step 2: Mount the cleat
Pick a cleat location that's comfortable to reach from standing height, roughly 4 to 5 feet off the ground. A fence post, deck post, or the same tree trunk all work. Screw the cleat in with at least two stainless screws. Make sure there's nothing in the way when you lower the rope to cleat it off. This is the step people skip, and then they end up tying the rope around a post in a hurried knot every time they refill. A cleat takes two minutes to install and saves time on every single refill after that.
Step 3: Route the rope
- Tie one end of your rope to the feeder's hanging hook or ring using a bowline knot. A bowline doesn't slip or jam, and it's easy to untie even after months of tension.
- Run the rope up through the pulley wheel (thread it through the groove, not just over the hook).
- Pull the rope back down on the far side of the pulley so the free end hangs down near your cleat.
- Raise the feeder to your target height by pulling the free end of the rope down.
- Cleat off the free end using a figure-eight wrap around the cleat horns.
Make sure the rope is seated in the pulley's groove before loading any weight. If it's riding on the edge of the wheel, it will fray faster and the pulley will be much louder in use.
Attaching and balancing the feeder
How you attach the feeder to the rope matters more than most people expect. A loose or off-center connection makes the feeder swing constantly in any breeze, which discourages birds and can eventually work the knot loose.
Use an S-hook or a locking snap hook between the rope end and the feeder's hanging hardware. A snap hook is better if you plan to swap feeders or switch feeder styles seasonally. Clip it through the feeder's top ring or bail, then close the latch. Check that the feeder hangs level. If it tilts, the internal weight distribution is uneven (common with tube feeders that have more seed on one side). Just redistribute the seed or temporarily tape a small weight to the light side until it's balanced.
To prevent swinging, run a second thin line from the bottom of the feeder down to a stake in the ground or a low hook on a nearby post. Use just enough tension to stabilize it without pulling the feeder sideways. This lower tether is optional but makes a real difference on windy days and keeps heavier feeders from spinning. If you're hanging a suet feeder (which tends to be boxier and catches more wind), this tether is especially worth adding.
Safe installation and your first test
Before you load any seed, run a full test of the system. This takes five minutes and will save you from a falling-feeder situation later.
- Raise and lower the feeder several times with no seed in it. The rope should move smoothly through the pulley with no grinding, catching, or rubbing.
- Check every connection point: eye bolt, pulley hook, snap hook on the feeder, and cleat screws. Give each one a firm tug.
- Look for any spots where the rope could rub against bark, a fence edge, or a building corner. Friction from rope rub will fray the line fast. If there's contact, reroute the rope or add a small guide ring at the friction point.
- Load the feeder with seed and raise it to operating height. Leave it for an hour, then check that the cleat is still holding and the rope hasn't slipped.
- Do one more full lower-and-raise cycle with the loaded feeder to confirm everything moves cleanly.
Know your weight limits before you overfill. A basic 50-pound-rated pulley and 3/8-inch polyester rope can handle virtually any bird feeder, but the weak points are usually the eye bolt's thread engagement in wood and the cleat screws. If you're mounting into soft or weathered wood, use a backing washer and nut on the eye bolt, and switch to longer (2.5-inch minimum) deck screws on the cleat.
Troubleshooting the problems that actually come up
The rope keeps twisting or tangling
Twisting almost always comes from a pulley that can't rotate freely. If your pulley doesn't have a swivel, the rope builds up twist every time you raise and lower the feeder. The fix is to replace the pulley with one that has a swivel hook. If you already have a swivel and still get twisting, the rope itself is torquing, which happens with twisted-lay rope. Switch to braided rope, which has much lower natural torque.
The feeder is sagging lower than where I cleated it
This is usually rope stretch, most common with nylon rope under a heavy load. The fix is to switch to polyester rope (much lower stretch) or to re-cleat the rope with the feeder raised a few inches higher than your target, so the settled position ends up at the right height. If the cleat itself is slipping, the cleating technique is the issue. Use a proper figure-eight pattern on the cleat horns, not just a single loop.
The pulley is noisy or squeaking
A squeaky pulley usually means the wheel bearing is dry or corroded. Take the pulley down and apply a drop of light machine oil or white lithium grease to the axle. Don't use WD-40 as a long-term fix because it evaporates and leaves the metal drier than before. If the noise comes back quickly, the pulley is probably a low-quality casting with a rough axle bore, and it's worth replacing with a sealed-bearing stainless model.
The feeder swings too much in wind
Add the lower stabilizing tether described in the balancing section above. If that's not practical, shorten the rope so the feeder hangs lower (closer to the pulley anchor reduces the pendulum effect). Heavier feeders are more stable than lightweight plastic ones, so switching to a ceramic or metal feeder can also help.
I can't get the feeder to hang level
If the feeder tilts even when the attachment point is centered, the seed inside is unbalanced. With tube feeders, this is common when certain ports get heavily used and the seed level drops unevenly. Just top up the seed from the low side. If the feeder hangs from a single off-center bail and the body is asymmetrical, a short length of chain between the bail and the snap hook can help you shift the balance point without rebuilding anything.
Squirrels are still getting to the feeder
A pulley setup on a rope is easier for squirrels to reach than many people expect because they can climb or slide down the rope itself. The fix: thread a cylindrical squirrel baffle over the rope above the feeder, or place the anchor point on an isolated post rather than a tree. Also make sure the feeder is at least 10 feet away from any tree trunk, branch, or fence the squirrel can launch from, since they can clear 10 feet horizontally from a height advantage.
Keeping the system working season after season
A pulley setup is low-maintenance, but it does need a quick check every season. Here's what to build into your routine.
- Every spring: inspect the full rope length for fraying, especially near the pulley groove and at any knots. Replace the rope if you see significant wear or stiffness.
- Every spring: check the eye bolt and cleat screws for any movement. If either has loosened in the wood, remove, let dry, and re-drive with a slightly longer or thicker fastener, or fill the hole with wood epoxy first.
- Every 6 months: apply one drop of machine oil or white lithium grease to the pulley axle to keep the wheel spinning freely.
- After major storms: lower the feeder and check the full system before reloading. High winds can loosen screws, abrade the rope, and shift the pulley's mounting position.
- At least twice a year (more for tube and platform feeders): lower the feeder for full cleaning. The pulley system makes this effortless compared to a fixed-height hook, so take advantage of it.
If you're in a region with harsh winters, consider pulling the rope indoors during extended freezing weather if the feeder goes unused for a season. Rope that freezes while wet and then thaws repeatedly will degrade faster than rope stored dry. The pulley itself can stay in place as long as it's stainless or galvanized.
One last thing worth doing after you've run the system for a few weeks: lower the feeder and look at the rope where it passes through the pulley groove. That's the highest-wear spot on the whole system. If you see any flattening, fuzz, or discoloration on the rope fibers there, give yourself a reminder to replace the rope before next season. Catching rope wear early is much easier than dealing with a dropped feeder.
FAQ
How long should the rope be if I want to lower the feeder all the way for refilling?
If you want to lower the feeder without handling a ladder, keep the cleat at a comfortable standing height and plan for a rope length that lets the feeder reach the ground when the rope is fully cleated off. Measure the full path (anchor to pulley to cleat), then add about 5 feet for knots and adjustments. Also confirm the lowered rope end can be reached safely from your normal refill spot, not from the side of the yard.
Can I mount the pulley on a different surface than where the feeder hangs?
Yes, but you need a longer rope run and the pulley must be mounted high and stable enough that the vertical line stays true as the rope lowers. If the feeder placement falls into the bird-window collision zone (within 3 feet or more than 30 feet is safe, in-between is risky), the pulley should be shifted to keep the hanging path consistent at the final height, not just at setup.
What’s the safest way to attach the rope to the feeder so it doesn’t swing?
Don’t wrap rope directly around the feeder or anchor it with a basic knot unless the hardware is designed for that. Use a locking snap hook or S-hook to connect the rope end to the feeder’s top ring or bail, then check that the feeder hangs level. A straight, centered connection reduces swinging and helps keep knots from loosening over repeated lifts.
The feeder doesn’t lower evenly, what should I check first?
If the feeder rises or lowers unevenly, the rope is probably not seated fully in the pulley groove, or one side of the rope path is catching on the anchor or cleat. Retract everything and reload only after confirming the rope sits in the wheel track, and make sure the cleat holds the free end without rubbing against a post or rough edge.
What causes a bird feeder to hang tilted even with a level pulley setup?
When the feeder tilts, don’t assume the pulley is wrong. First test for balance by checking whether the connection point is centered (using the feeder’s bail/ring) and whether seed distribution is uneven. For tube feeders, re-level the seed by topping from the low side, then re-test. If the body is asymmetrical, a short chain segment between the bail and snap hook can shift the balance point.
Why does my rope keep twisting when I lift the feeder?
If you’re getting twist as you raise and lower, the most common causes are a pulley that cannot swivel and rope that naturally torques. Replace the pulley with one that has a swivel hook. If you already have a swivel and twist persists, switch from twisted-lay rope to braided rope (braided polyester reduces built-in torque).
My pulley squeaks, what’s the correct fix?
If the noise is intermittent or changes with load, lubricate the pulley axle with a small amount of light machine oil or white lithium grease. Avoid WD-40 as a long-term remedy since it evaporates and can leave metal drier than before. If the squeal returns quickly, it may be a rough or poorly machined axle, and a sealed-bearing stainless pulley is the better upgrade.
How do I prevent the cleat from slipping over time?
Periodically check for looseness at the cleat screws and the eye bolt engagement, especially after heavy wind events. A loose cleat can slip and change the feeder height, which also increases wear where rope contacts the pulley. If your cleat is slipping, re-cleat using a proper figure-eight pattern rather than a single loop.
What’s the best way to stop squirrels from using the pulley rope as a ladder?
If squirrels can access the pulley line, they can climb or slide down the rope. Use a cylindrical squirrel baffle mounted above the feeder on the rope, or choose an isolated post for the anchor so there’s no easy launch point. Also keep the feeder well away from trees, branches, and launch surfaces near enough for squirrels to jump horizontally from height.
Should I take the rope down during winter?
For harsh freezes, don’t store wet rope outdoors for the season. During extended freezing weather, remove the rope indoors if the feeder will be unused, since freeze-thaw cycles degrade rope faster. The pulley can remain in place if it’s stainless or galvanized, then resume after the rope is dry and inspected.
What’s the one spot on the rope I should inspect for early replacement?
Yes. After a few weeks of use, inspect the rope at the pulley groove, that area takes the most wear. Look for flattening, fuzzing, or discoloration in the fibers. If you see damage, replace the rope before the next season, since a weakened rope is a common cause of pulley failures.