You can build a solid, fully functional bird feeder or bird box from pallet wood in an afternoon, using mostly scraps, a saw, and a handful of screws. The key steps are: find a heat-treated (HT-stamped) pallet, break it down safely, sand it smooth, and assemble either a flat platform feeder or an enclosed box depending on what birds you want to attract. Both designs are forgiving for first-timers, cost next to nothing, and hold up through several seasons if you finish and maintain them properly.
How to Make a Bird Feeder Out of Pallets Step by Step

Marcus Brennan
6 May 2026
Planning your pallet bird feeder: size, design, and what birds you want

Before you reach for a saw, spend five minutes deciding which type of feeder you actually want. The two main builds covered here are a pallet bird table (a flat, open platform feeder) and a pallet bird box (an enclosed nesting-style box or hopper-style feeder). They serve different purposes and attract different birds.
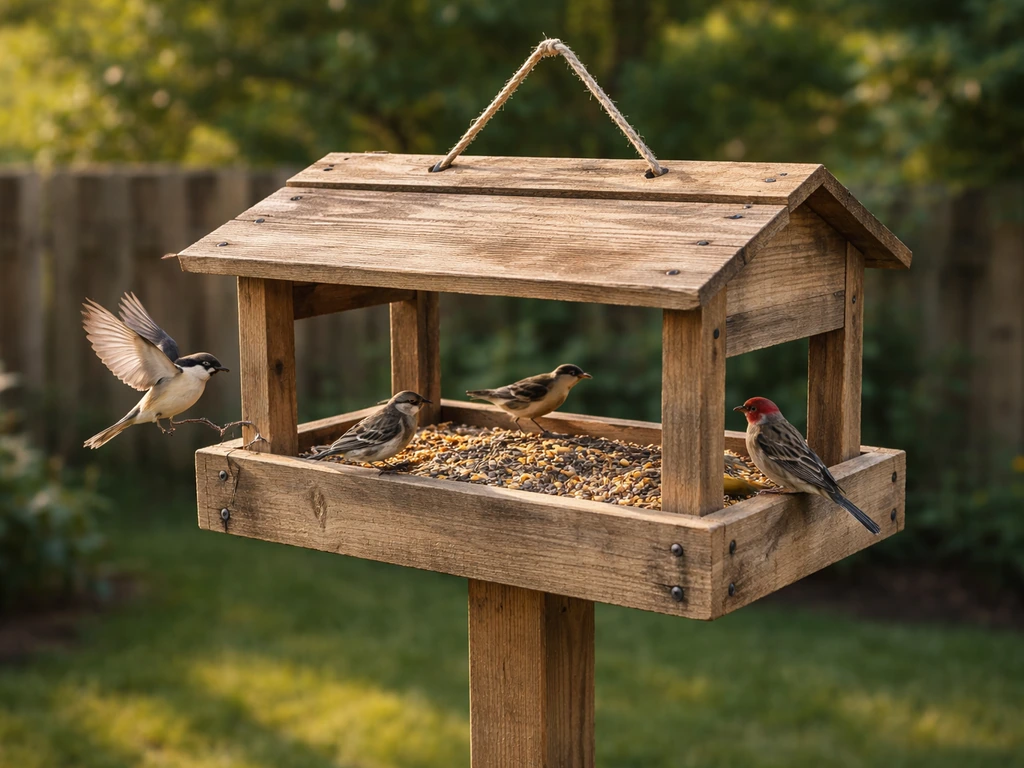
A pallet bird table is basically a raised platform with a low rim, and it attracts the widest variety of seed-eating birds. Ground feeders like juncos, mourning doves, and towhees love open platform designs, and so do cardinals, sparrows, and finches. It's the easier build and the best starting point if you're new to this. A bird box, whether you use it as an enclosed hopper feeder or a true nesting box, appeals to species that prefer covered, sheltered spaces. Wrens, chickadees, bluebirds, and nuthatches will use a well-placed nest box, and many will return year after year.
For size, a pallet bird table works well at roughly 12 to 18 inches square on the feeding surface. That's small enough to keep seed from going stale, but large enough for several birds to land at once. A nesting box needs to be sized for your target species: a wren needs an entrance hole of about 1 1/8 inches, a chickadee or nuthatch needs around 1 1/4 inches, and a bluebird needs 1 1/2 inches. A too-large hole lets in predators and competing species, so this measurement matters.
Pallet wood is slightly unpredictable in thickness, so plan for simple joinery: butt joints secured with screws, not nails. Nails work loose with seasonal wood movement. Screws hold far better, and you can re-tighten them later. If you want to save time on a standalone feeder, you can also build a pallet bird feeder stand to mount it on rather than hanging it from a tree or bracket. That's a related build worth keeping in mind once the feeder itself is done. If you want your pallet feeder to really stand out, focus on a finished look, an eye-catching feeder stand, and weather-resistant color how to make a bird feeder stand out of wood.
Choosing and preparing pallets safely
Finding the right pallet
Not every pallet is safe to use around birds. The single most important thing to check is the treatment stamp burned or stenciled into the side of the pallet stringer (the thick horizontal board). Look for the IPPC mark, which is a stylized wheat symbol, followed by a country code, an identifier number, and a treatment code. You want the code HT, which stands for heat-treated. Heat treatment kills insects and pathogens without chemical fumigants. Avoid any pallet stamped MB, which stands for methyl bromide, a toxic fumigant that penetrates the wood and cannot be sanded or washed out. If there's no stamp at all, skip that pallet entirely.
Good sources for free HT pallets: garden centers, hardware stores, small furniture retailers, and brewery or distillery loading docks. Ask nicely and most will hand them over for free. Look for pallets with thick, relatively straight deck boards and no black staining, rot, or strong chemical smell.
Breaking down the pallet
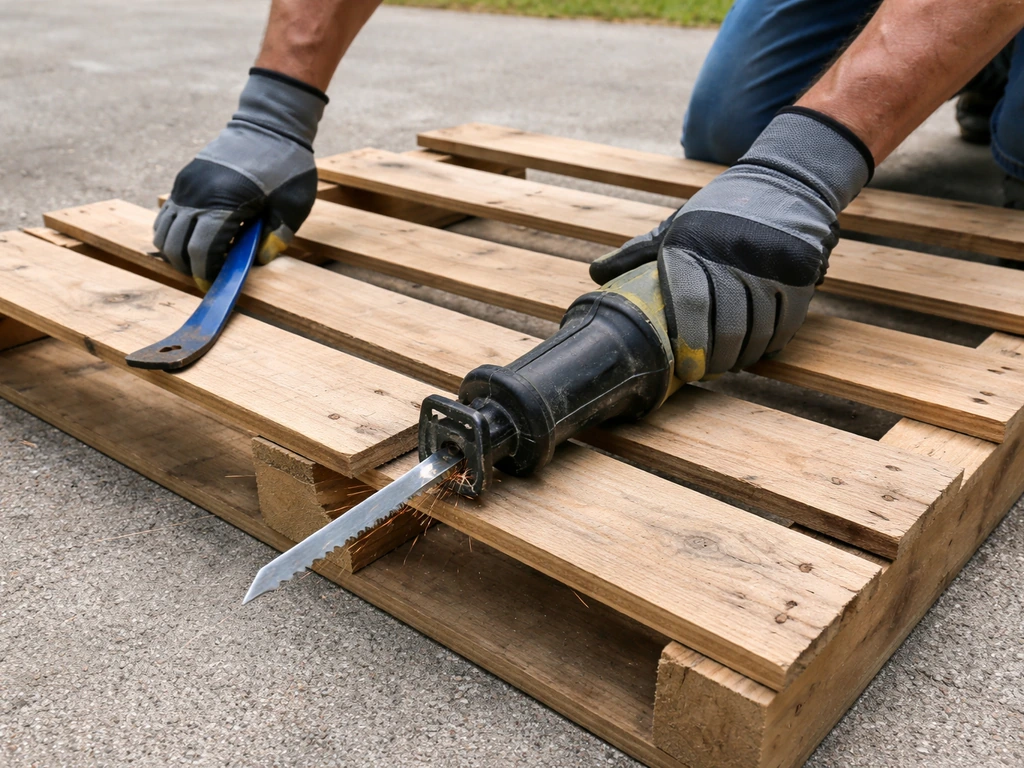
Disassembling a pallet without splitting the boards takes a little patience. A reciprocating saw (sawzall) with a metal-cutting blade run along the joint line between deck boards and stringers is the fastest method. Alternatively, use a pry bar and a rubber mallet, working slowly from both ends of each board toward the middle. Forcing boards off quickly usually splits them. The deck boards are your main material; the stringers (the thick side pieces) are useful for legs and structural framing.
Cleaning and finishing
Once the boards are loose, give them a scrub with warm soapy water and a stiff brush to remove grime, bird droppings if any, and loose debris. Let them dry fully, then sand all surfaces and edges with 80-grit sandpaper followed by 120-grit. Pay extra attention to edges and corners where splinters form. Birds will perch right on the rim of your feeder, and a splinter can injure a foot. After sanding, wipe the wood down with a damp cloth and let it dry again before assembly. If you're making an outdoor feeder that'll sit in rain, finishing with an outdoor-rated non-toxic sealant or linseed oil extends its life considerably, just make sure the product is fully cured before birds use it.
| What to check | Safe | Not safe | Notes |
|---|---|---|---|
| Treatment stamp code | HT (heat-treated) | MB (methyl bromide) | Check the stringer, not the deck board |
| Stamp present at all | Yes, IPPC mark visible | No mark at all | Skip unmarked pallets |
| Wood condition | Dry, solid, no rot | Black staining, soft spots, strong smell | Rot means structural failure later |
| Board thickness | 3/4" to 1" deck boards | Thin or cracked boards | Thicker boards hold screws better |
Step-by-step build: pallet bird table

This is the easiest and most rewarding pallet build for a first-timer. You'll end up with an open platform feeder that can hold mixed seed, sunflower hearts, or suet blocks, and it'll attract a genuinely wide variety of backyard birds.
What you need
- 6 to 8 pallet deck boards, each about 14 to 18 inches long (cut to a consistent length)
- 2 pallet stringers or thick offcuts for the frame sides
- 1.5-inch and 2-inch exterior wood screws
- Drill with bits
- Saw (handsaw, jigsaw, or circular saw)
- Sandpaper: 80-grit and 120-grit
- Small mesh hardware cloth (optional, for the base to allow drainage)
- Exterior wood glue (optional, for added joint strength)
- Screw eyes or mounting brackets (for hanging or pole-mounting)
Build steps
- Cut your deck boards to a consistent length, aiming for a final platform of roughly 14 x 16 inches. Square up the ends with a saw.
- Lay the boards side by side and attach them to two parallel crosspieces (cut from a stringer) underneath using 1.5-inch screws. Space boards with a small gap (about 1/8 inch) between them to allow water to drain.
- Cut four low rim boards, about 1 to 1.5 inches tall, from thinner deck board offcuts. Screw these to the outside edge of the platform on three sides, leaving one side open or using a shorter rim so seed doesn't pile up and decay in corners. Leave gaps at the corners for drainage.
- Drill three or four 3/8-inch drainage holes through the platform base, spread evenly, to prevent water from pooling under the seed.
- Sand all edges and surfaces smooth once assembled, especially the rim tops where birds will perch.
- If mounting to a post, screw a short section of stringer to the underside center as a mounting plate. If hanging, drill two evenly spaced holes near opposite corners and thread through wire or rope, then tie off with screw eyes for secure attachment.
- Apply a coat of non-toxic outdoor sealant or raw linseed oil to all external surfaces. Let it cure fully (at least 48 hours) before adding seed.
That's genuinely it. The whole build takes about two hours including the drying time between sanding and assembly. If a board cracks when you're screwing it, pre-drill pilot holes first. This is the most common mistake beginners make with pallet wood, which tends to split more easily than fresh-cut timber.
Step-by-step build: pallet bird box
A pallet bird box is a more involved build but still very doable in an afternoon. If you want the exact build steps for a wood feeder from scratch, focus on choosing a simple design first and then cutting and assembling the parts carefully how to build a bird feeder out of wood. You can use it as a true nesting box for cavity-nesting birds like wrens, chickadees, or bluebirds, or adapt the design into a hopper-style covered feeder that keeps seed drier than an open platform. The instructions below are for a nesting box, with notes on adapting it to a hopper feeder.
What you need
- 8 to 10 pallet deck boards, cut to length
- 2-inch exterior screws
- Drill with spade bits or hole saw (for entrance hole)
- Saw
- Sandpaper: 80-grit and 120-grit
- Measuring tape and pencil
- Hinged roof option: a piano hinge or two small strap hinges (makes cleaning easier)
- Exterior sealant or linseed oil
Build steps
- Cut the following pieces: two side panels (roughly 6 inches wide x 10 inches tall), one front panel (6 x 10 inches), one back panel (6 x 12 inches, taller to allow roof slope), one floor (6 x 6 inches), and one roof piece (7 x 8 inches, slightly oversized to provide overhang).
- On the front panel, drill the entrance hole at the correct diameter for your target species: 1 1/8 inch for wrens, 1 1/4 inch for chickadees and nuthatches, 1 1/2 inch for bluebirds. Center the hole horizontally and place it about 2 inches from the top edge of the front panel.
- Roughen the inside surface below the entrance hole with a chisel or coarse sandpaper. This lets fledglings grip the wood and climb out when it's time to leave.
- Drill four 3/8-inch drainage holes in the floor, spread toward the corners, so water that gets in can drain away instead of soaking bedding.
- Drill two or three 1/4-inch ventilation holes on each side panel, positioned just under where the roof line will sit. These prevent overheating on hot days.
- Assemble the box: screw the side panels to the back panel first, then attach the floor between the sides, then attach the front. Pre-drill all holes to avoid splitting.
- Attach the roof with a hinge along the back edge so you can open it for cleaning and monitoring. A hinged roof is one of those things that sounds optional but you'll be grateful for every cleaning season.
- Check that the entrance hole is positioned so rain won't blow straight in. A slight forward tilt of the whole box when mounted (about 5 degrees forward) helps deflect rain away from the entrance.
- Sand all exterior edges smooth, seal exterior surfaces, and let cure before mounting.
To adapt this design into a hopper-style covered feeder instead, skip the solid front panel and replace it with two slanted plexiglass or thin wood sides that funnel seed toward a narrow bottom opening. Leave the entrance hole out entirely and instead create a small gap at the base of the front for birds to reach in and pick up seed. The roof still keeps rain off the seed, which is the whole point of a hopper design.
Where to place it and how to mount it securely
Placement is where a lot of backyard setups quietly fail. Birds won't use a feeder that feels exposed, and poor placement increases window strike risk, predator access, and weather damage.
Window distance rules
Place your feeder either less than 3 feet from a window or more than 30 feet away. That sounds counterintuitive, but both positions reduce injury risk. Within 3 feet, birds can't build up enough speed to cause serious injury if they do hit the glass. Beyond 30 feet, they're less likely to be confused by window reflections in the first place. The danger zone is the middle range: 4 to 29 feet, where birds fly fast and directly toward what looks like sky in the reflection.
Cover and escape routes
Position your feeder within about 10 feet of shrubs, a hedge, or a small tree. Cornell Lab’s Project FeederWatch notes that placing feeders about 10 feet away from cover is a “good compromise” and also recommends providing escape cover near feeders about 10 feet is a “good compromise” for feeder placement. Birds need a quick escape route when a hawk appears. They won't use a feeder that's placed in the middle of an open lawn with nowhere to flee. That said, keep the feeder at least 10 feet away from dense brush that could hide a cat or provide a launch point for a squirrel jump.
Mounting options
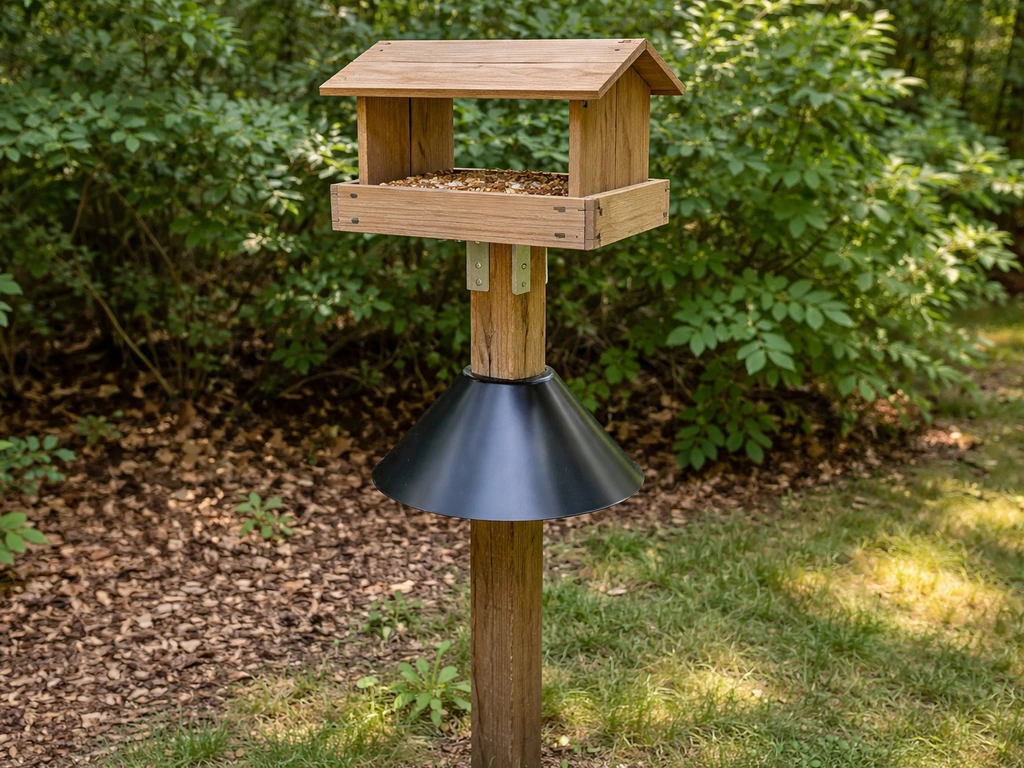
A pallet bird table works well on a wooden post at roughly 4 to 5 feet off the ground, which puts it in a comfortable viewing height and above most cat jump range. Screw a flat mounting bracket to the post top and attach the feeder base to it with screws or bolts, not just balancing it on top. For hanging, use galvanized wire or a chain rather than rope, which rots quickly outdoors. A bird box for nesting should be mounted higher, typically 5 to 15 feet depending on species, facing between north and east to avoid the hottest afternoon sun and the wettest prevailing winds.
If squirrels are already a problem in your yard, add a squirrel baffle to the post below the feeder. A simple cone-shaped baffle placed about 4 feet up the post stops most squirrels. Without a baffle, assume squirrels will find the feeder within about a week and adjust your expectations accordingly.
Keeping it working: cleaning, maintenance, and pest-proofing
Cleaning schedule
Clean your seed feeder at least every two weeks during active use, and more often in humid weather or if you notice any moldy or clumped seed. The cleaning process is straightforward: empty and scrub with warm soapy water using a stiff brush, then disinfect by soaking or washing with a 9:1 water-to-bleach solution (9 parts water, 1 part household bleach). Let the solution sit on all surfaces for 10 to 15 minutes, then rinse thoroughly. The rinsing step is critical. Bleach residue left on the wood or in crevices can harm birds, so rinse under running water and then let the feeder dry completely before refilling. A wet feeder with seed in it is a perfect environment for mold and bacterial growth, which is what makes birds sick.
Wood feeders do absorb water more readily than plastic or metal ones, which is why the drainage holes in your platform floor matter so much. If you notice seed consistently clumping or molding in one spot, check that the drainage holes aren't blocked with debris, and consider enlarging them slightly.
Seasonal maintenance
- Every spring: do a full inspection of all joints and screws. Re-tighten or replace any screws that have worked loose over winter freeze-thaw cycles.
- Check the roof overhang and any sealant coat for cracking or peeling. Re-apply linseed oil or sealant once a year to keep the wood from splitting.
- For a nesting box: clean out old nesting material after each breeding season (late summer to early autumn). Use gloves and dispose of the material in a sealed bag. Old nests carry mites and parasites that will deter future birds.
- Check the entrance hole edges for splintering each season. Re-sand as needed so the hole stays smooth.
- After heavy storms: check that mounting hardware hasn't shifted or that the feeder hasn't tilted. A tilted platform dumps seed onto one side and wastes it.
Pest-proofing basics
Squirrels, rats, and raccoons are the three most common pest problems with backyard feeders. For squirrels, a pole-mounted baffle is the most reliable solution. For rats, the fix is almost always about seed management rather than physical exclusion: only put out as much seed as birds will eat in a day or two, and clean up fallen seed from the ground regularly. A tray mounted below the platform feeder to catch fallen seed helps a lot. Raccoons tend to knock feeders over at night; if this is a problem, bring the feeder in after dusk or secure it with a locking mount rather than a simple hook.
For a nesting box, the main predator threat is from cats, snakes, and squirrels reaching inside the entrance hole. A metal entrance hole plate (a thin steel ring that reinforces the hole edge) prevents squirrels from gnawing the hole wider. A pole-mounted predator guard baffle below the box handles cats and most snakes. These two additions cost just a few dollars in hardware and genuinely make the difference between a box that gets used and one that stays empty.
Quick fixes for common setup problems
| Problem | Likely cause | Fix |
|---|---|---|
| Birds not visiting | Feeder too exposed or newly installed | Add nearby shrub cover; give it 1 to 2 weeks for birds to discover it |
| Seed going moldy quickly | No drainage or rain getting in | Enlarge drain holes; add or extend roof overhang |
| Feeder wobbling on post | Mount screws loose or post too thin | Re-fasten with larger screws or lag bolts; use at least a 2x4 post |
| Squirrels emptying feeder daily | No baffle or baffle too low | Add cone baffle at least 4 feet up the post |
| Nesting box unused | Wrong entrance hole size or bad placement | Check hole diameter for target species; try a different facing direction |
| Wood splitting at joints | Screws driven without pilot holes | Pre-drill all holes, especially near board ends |
Pallet builds are genuinely one of the most satisfying DIY feeder projects because the material is free, the mistakes are fixable, and the results hold up surprisingly well. If you want a different look, you can also make a bird feeder with twigs instead of using pallets how to make a bird feeder with twigs. If you're interested in going further, the same skills translate directly into building a standalone pallet feeder post or expanding into other wood feeder styles. To learn a different take on this project, see how to make bird feeders out of toilet paper rolls. If you want a bird feeder from waste material beyond pallets, you can use other scrap wood, containers, or repurposed items with the same safety and cleaning basics building a standalone pallet feeder post. Start with the platform table first, get birds using it, then tackle the nest box when you're ready. If you want a different look, you can also adapt the design into a paper bird feeder using simple folding and a sturdy backing platform table. That's the order that makes the most sense and gives you the fastest reward.
FAQ
Can I use a pallet that is heat-treated (HT) but looks slightly stained or smells a bit off?
Run a quick “sniff and stain” check before you build: if the pallet smells strongly chemical even after cleaning, has deep black streaking, or shows soft/crumbly rot, skip it. Even HT-stamped pallets can have mildew if stored wet, and that will keep reappearing unless you remove all affected wood and fully dry it.
What if I only have access to pressure-treated lumber, can I use it for the feeder parts?
Yes, but only if you still meet the safety rule. Pressure-treated wood often contains preservatives that are not meant for bird contact, so the safer approach is to keep the feeder made from HT pallets and use the treated wood only as a structural stand or mounting post (not as the bird-contact surfaces).
How can I make the pallet bird table squirrel-resistant if baffles are not enough?
Squirrels usually have the fastest success on open platforms with easy access. A practical fix is to limit the overhang and reduce landing space: keep the rim low, add a slightly slanted top on the platform support, and consider a seed tray that can’t be easily “raided” from underneath. If squirrels are persistent, switch from an open table to the covered hopper style you described.
Why are no birds coming to my feeder, even though I used the right seeds?
Use your feeder type as a “bird ID filter.” Open platforms tend to pull in ground-feeding seed-eaters, while enclosed boxes mainly attract cavity-nesting birds. If you want wrens or chickadees, focus on the correct entrance hole size, mount height, and a quiet, sheltered location facing north to east for better use.
What is the best way to confirm my pallet is smooth enough for bird feet?
After sanding, do a “hand test” at the edges: run your bare fingers along every perch surface and rim, including inside corners. If you feel any catch, re-sand that spot with 120-grit again. This helps prevent foot injuries, which is especially important for boxed feeders where birds spend time gripping the entrance area.
Can I fill a pallet hopper-style feeder with mixed seed, or should I use one type?
Mixing seed is fine for open tables, but for covered hopper setups it can create clumping if you choose sticky or high-oil blends. Start with sunflower hearts and a small portion of mixed seed, and if you see mold after a week, switch to drier seed and confirm drainage openings are not clogged.
How should cleaning change during nesting season?
For nesting boxes, you should avoid disturbing them once birds start inspecting. If you must clean, do it in late fall or winter before breeding activity, and do not disinfect aggressively during active nesting. For boxes and platform feeders used year-round, you can increase cleanings in humid weather but keep any chemicals fully rinsed and cured.
What else can I do to prevent window strikes if my feeder placement is limited?
Window strike prevention is mostly about spacing, but you can add one more layer: if your feeder must be in a “danger zone” for your yard layout, use a baffle and add visual breaks like decals on the glass. However, the placement rule you already have (under 3 feet or over 30 feet) is still the most effective.
How do I know my sealant or oil is safe and fully cured before adding seed?
If the feeder is outdoors, confirm your finish is fully cured, then place it empty for a day or two and check for any lingering odor or tackiness. Also ensure your drainage holes are open and not sealed by finish. A feeder that stays wet at the bottom will mold even if the wood looks “sealed.”
What screw and pilot-hole tips reduce the chance of splitting pallet boards?
A good rule is to use pilot holes any time a board is cracked-prone or close to an end grain edge. Pre-drilling should be slightly smaller than your screw diameter, and keep screws at least a little away from board edges to prevent splitting along the grain.
What are the most common predator-related reasons a nesting box sits empty?
For nesting boxes, add two hardware checks: a metal entrance hole plate to limit gnawing and a predator guard baffle beneath the box mounted securely to a post. Then confirm the box opening is not directly over a path where cats can reach the entrance from a higher vantage point, like a fence top.
Can I put suet on a pallet bird table, and how do I avoid mess and mold?
Yes, you can offer suet, but place it so it drains and does not pool. On a platform table, use suet holders that allow runoff and prevent birds from getting stuck. If you see blackened, wet residue beneath the feeder, switch to a holder that elevates the suet and increases airflow.
Next Article
How to Make Bird Feeders Out of Toilet Paper Rolls
Step-by-step guide to make toilet paper roll bird feeders, including lard mix safety, setup, troubleshooting, and mainte