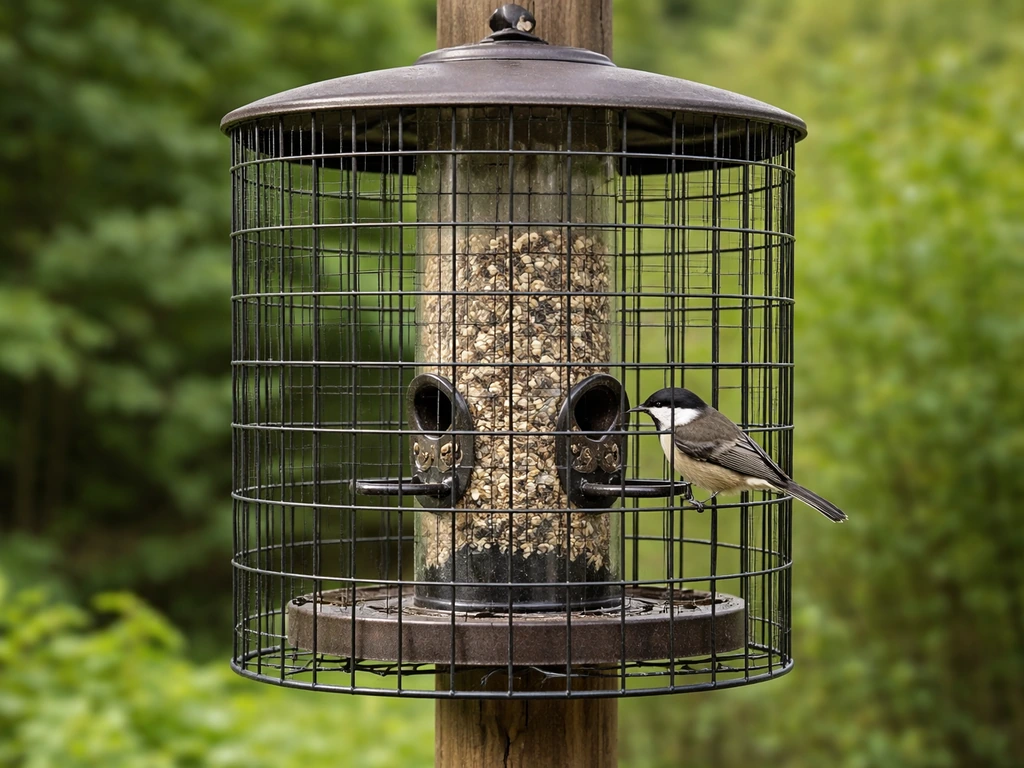
Building a cage around a bird feeder means wrapping or framing it with wire mesh so squirrels, raccoons, and large pest birds can't reach the seed, while smaller songbirds can slip through the openings and feed in peace. It's one of the most reliable pest-proofing moves you can make, and you can pull off a solid version in an afternoon with basic tools and about $15 to $25 worth of hardware cloth. <a data-article-id="21ABDDEB-D181-4968-ACF4-1CE152B29C32">Here's exactly how to do it.
How to Build a Cage Around a Bird Feeder for Squirrel Control

Marcus Brennan
22 Apr 2026
To get the best results, follow the full, step-by-step guidance for how to build a bird feeding station so the cage, placement, and add-ons work together. To round out the project, use this guidance for how to build a bird feeding station, since cage placement and add-ons need to work together.
What a feeder cage actually solves (and what it won't)
A cage guard is genuinely good at one thing: creating a physical barrier that keeps large, persistent animals away from the seed. Squirrels can and will try every angle of attack, and when they can't reach the food safely, they'll eventually give up on that feeder and move on. Larger pest birds like grackles and European starlings are also blocked by cage openings sized for smaller songbirds, which is a real quality-of-life improvement if you've watched a flock of grackles empty a tube feeder in twenty minutes.
That said, be honest with yourself about what a cage alone won't guarantee. As Audubon puts it, there's no squirrel-proof setup with total certainty, but you can get 'blank" rel="noopener noreferrer">pretty darn close.' A cage guard works best as one layer of a multi-barrier system. If the feeder is too close to a fence or branch, a squirrel will still find a way to the food even with a cage in place. blank" rel="noopener noreferrer">Penn State Extension researchers note that many products marketed as squirrel-proof fail in real-world placements because placement mistakes undermine the hardware. So build the cage, but also nail the placement and add a baffle, and you'll be in genuinely good shape.
- Blocks squirrels and raccoons from gripping or reaching through the feeder
- Excludes large birds like grackles, starlings, and blue jays from tube and hopper feeders
- Allows small songbirds (chickadees, nuthatches, finches, sparrows) to pass through or feed at openings
- Reduces seed theft, which means fewer refills and more bird visits
- Will NOT fix poor placement (feeders too close to jumping-off points)
- Will NOT stop determined raccoons if there's no pole baffle below the cage
- Will NOT prevent ground spillage from attracting rodents unless you add a seed tray
Match the cage type to your feeder setup
The right cage design depends mostly on how your feeder is mounted and what shape it is. There's no one-size-fits-all build here. A tube feeder hanging from a shepherd's hook needs a different approach than a platform feeder sitting on a post. Getting this match right before you buy materials saves a lot of rework.
| Feeder Type | Best Cage Approach | Key Sizing Concern |
|---|---|---|
| Tube feeder (hanging) | Cylindrical wire-mesh sleeve around the feeder body | Gap between cage and feeder must let birds reach ports: 2–3 inches minimum |
| Hopper feeder (hanging or post) | Rectangular box frame with hinged front or top panel | Leave 2–3 inch clearance on all sides; hinge one face for refilling |
| Platform feeder (post or standalone) | Open-sided box frame or partial cage over the feeding surface | Keep the top open or use wider mesh (1-inch openings) to allow bird flight |
| Suet cage feeder (hanging) | Wrap existing suet cage in a second larger wire frame | Woodpeckers need room to cling; 3–4 inch offset from inner cage |
| Ground or low platform feeder | Dome or arch cage staked over the feeding area | Generous arch height of at least 8–10 inches for ground-feeding birds |
If you're building a platform feeder from scratch and want pest protection built in from the start, that's actually the easiest route, because you can size the cage frame as you build the feeder base. If you want a platform-style setup, follow the same cage-guard principles while sizing the frame to your platform feeder base. The same logic applies if you're constructing a full feeding station with multiple feeder types. For most readers who already have a hanging tube or hopper feeder, the detachable cylindrical or rectangular cage guard is the practical path, and that's what the step-by-step below focuses on.
Materials, tools, and mesh sizing
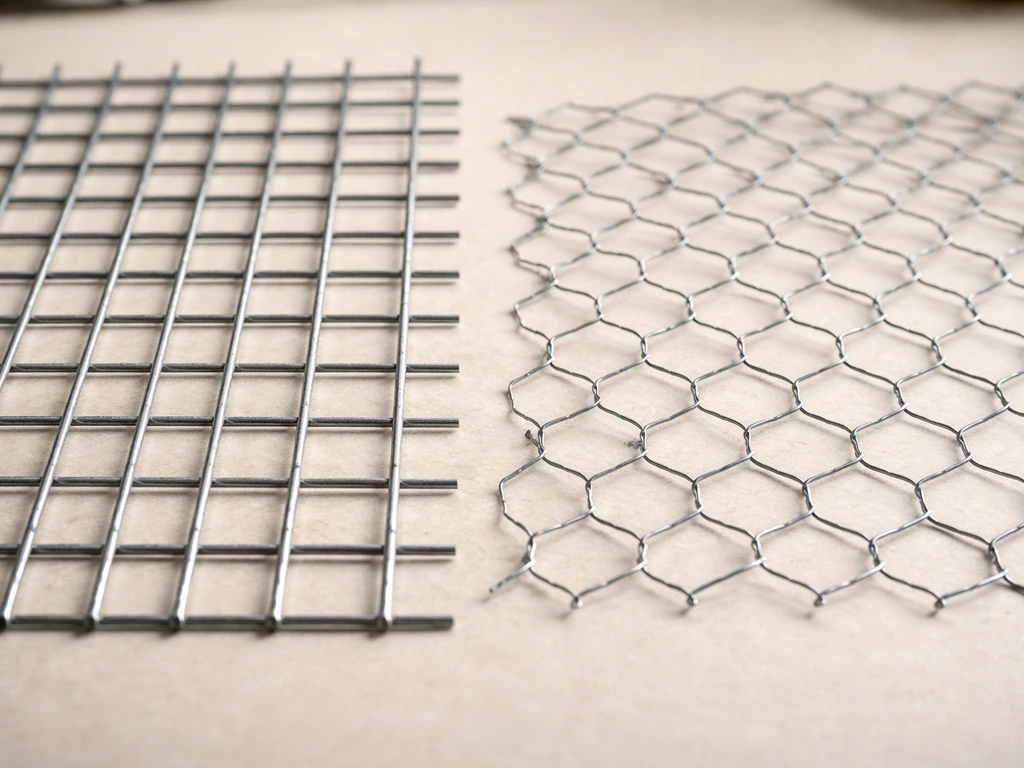
Hardware cloth is the material to use. It's a welded-wire mesh that holds its shape, doesn't deform when a squirrel grabs it, and comes in rolls at any hardware or farm supply store. The key variable is the opening size. For excluding squirrels while still letting small songbirds reach seed ports or perches on the outside of the cage, a 1.
5-inch opening is a good working standard. If you want to also block starlings and grackles from entering a fly-through style cage, drop to a 1-inch opening. For a purely exclusion-style cage where birds feed only through ports or from outside the wire, 1/2-inch openings work well and are impenetrable to even small rodents. Hardware cloth typically comes in 1/4-inch, 1/2-inch, and larger opening sizes, so the 1/2-inch variety is widely available and is a solid default choice.
Avoid regular chicken wire (hexagonal poultry netting) for this project. It's too soft, the openings aren't consistent, and a determined squirrel or raccoon can deform it easily. Welded hardware cloth is the right call. Look for a galvanized or vinyl-coated version for rust resistance, especially if your feeder is in a wet climate. Powder-coated steel components hold up the best long-term, and that same corrosion-resistant principle should guide your fastener choices too.
What to buy before you start
- Hardware cloth: galvanized, 1/2-inch or 1-inch openings, 24-inch-wide roll (a 10-foot section is enough for most single-feeder cages)
- Wire snips or aviation shears (hardware cloth is hard on regular scissors)
- Needle-nose pliers for bending and joining wire ends
- J-clips or hog rings (optional but faster than hand-twisting joins)
- A J-clip plier tool if using J-clips (speeds up the build significantly)
- Zip ties: UV-resistant black, 8-inch length
- Carabiner or S-hooks for hanging the finished cage
- A tape measure and permanent marker
- Work gloves (hardware cloth edges are sharp)
- Rust-resistant spray paint or clear coat if your mesh isn't pre-galvanized
Total materials cost for a basic tube-feeder cage is usually $15 to $25 if you're buying new. If you have leftover hardware cloth from a garden project, it could cost almost nothing. Budget an hour and a half for a first build, about 45 minutes once you've done it once.
Step-by-step: from a simple fixed cage to a detachable guard frame
These steps cover two builds: a simple fixed sleeve for a hanging tube feeder, and a detachable rectangular box frame for a hopper or post-mounted feeder. Start with the tube feeder sleeve if this is your first cage build. It's faster and the technique transfers directly to the box frame version.
Build 1: cylindrical sleeve for a hanging tube feeder
- Measure your tube feeder's diameter and height. Add 4 to 6 inches to the diameter (for a 2 to 3 inch air gap all around the feeder) and 4 inches to the height to account for the top hook and bottom drainage clearance.
- Cut a rectangle of hardware cloth to those dimensions using wire snips. Cut along the inside of a wire row so you don't leave sharp stubs pointing outward.
- Roll the mesh into a cylinder. Overlap the two short edges by one wire column and use J-clips or hand-twisted wire loops every 3 to 4 inches to join the seam. Zip ties work in a pinch but aren't as durable.
- For the top, cut a circle of hardware cloth slightly larger than the cylinder opening. Bend the edges down about 1/2 inch all around and clip or wire it to the top of the cylinder. Leave a small center opening (about 1.5 inches in diameter) for the feeder's hanging wire or hook to pass through.
- For the bottom, cut a circle the same way and attach it to the bottom of the cylinder. Cut a small cross-slit in the center if your feeder has a bottom perch rod that needs to pass through. Alternatively, leave the bottom open with just an inward-bent edge to keep the cage stable and allow drainage.
- Hang the cage from its top opening using an S-hook or carabiner, then lower your feeder inside on its own hook. The feeder should hang freely inside the cage with the seed ports accessible from outside through the mesh openings.
- Check the clearance: reach a finger through the mesh toward each seed port. You should be able to touch the port easily, which means a small bird's beak will reach it without problem.
Build 2: detachable box frame for a hopper or post-mounted feeder
- Measure your hopper feeder's width, depth, and height. Add 4 to 6 inches to each horizontal dimension and 4 inches to the height for clearance.
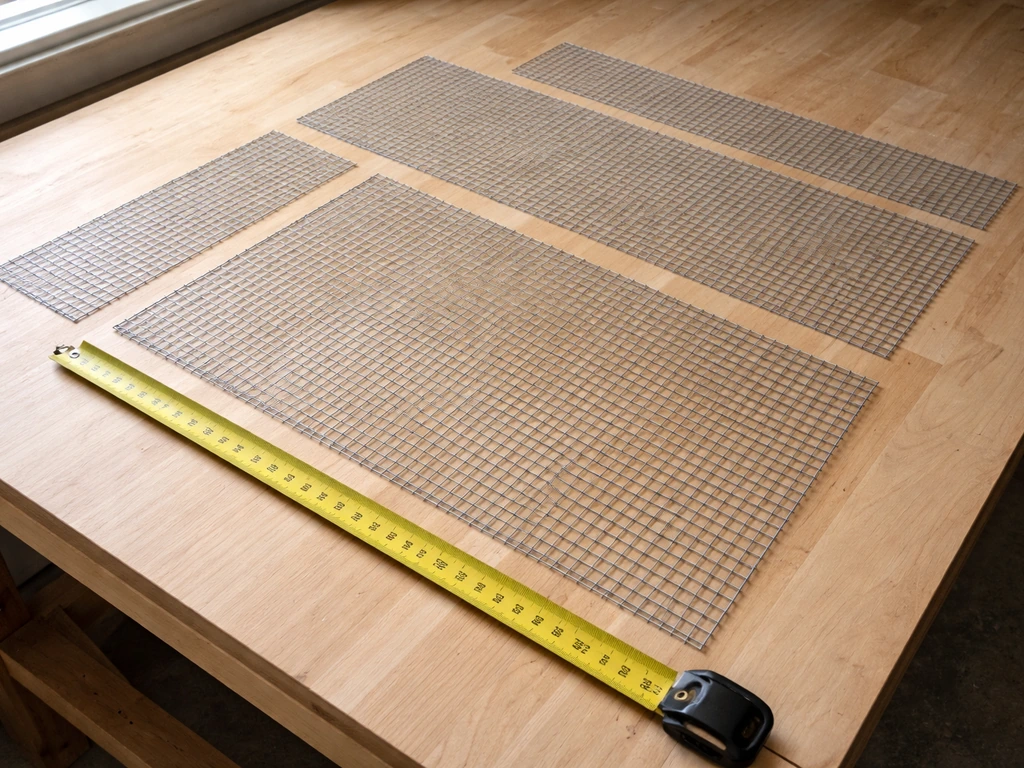
- Cut five panels of hardware cloth: two sides, a front, a back, and a top. (The bottom stays open, or you can add one if the feeder is hanging and you want full enclosure.)
- Form each panel by cutting to size and folding the edges inward about 1/2 inch on all sides using pliers. This eliminates sharp edges and creates a lip that helps panels join cleanly.
- Assemble the four walls first. Stand them up as a box and join each corner edge with J-clips or wire loops every 2 to 3 inches. Check for square before fully tightening.
- Attach the top panel the same way on three sides. On the fourth side (front or back, your choice), attach with removable S-hooks or simple wire loops so it opens like a hatch for refilling.
- If the feeder is post-mounted, drill two small holes in the bottom edge of each side panel and run a zip tie through them and around the post to hold the cage snug. For a hanging feeder, attach a J-hook or carabiner to the center of the top panel.
- Test the hatch opening. You should be able to flip it up with one hand, refill the feeder, and close it again without tools. If it's fiddly, widen the hatch opening or swap the wire-loop hinges for actual small hinges from the hardware store.
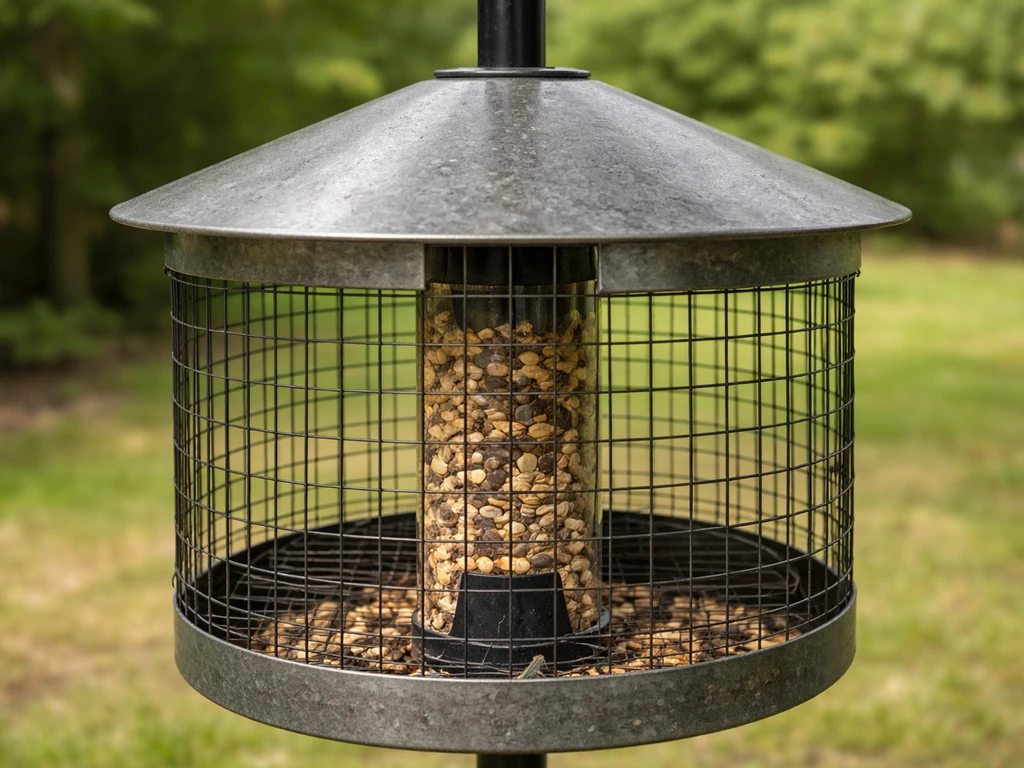
Hanging and mounting: stability, perches, and seed access
How you hang or mount the finished cage matters almost as much as how you build it. A cage that swings excessively in wind will discourage birds, and one that sits at the wrong height lets squirrels bypass it entirely. For hanging setups, use a heavy-duty S-hook rated for at least 5 pounds and make sure the branch or bracket above is solid. The cage adds weight on top of the feeder, so cheap plastic hooks will fail. If you're in a windy spot, run a lightweight chain from the bottom of the cage to the pole or a nearby hook to prevent wild swinging.
For post-mounted setups, the cage should be at least 5 feet off the ground. This height isn't arbitrary: combined with a pole baffle placed about 4 feet up, it puts the feeder above the comfortable jumping and reaching zone for most squirrels. University of Nebraska extension materials consistently emphasize that height and horizontal distance from jumping-off points are as important as the physical barrier itself.
Perches are worth thinking about when you cage a feeder that didn't originally have them. If the feeder's built-in perches are now inside the cage, small birds can still land on the outside of the mesh and cling to feed, but they'll appreciate having a horizontal wire or short dowel added to the outside of the cage at the same height as the seed ports. Just thread a 6-inch piece of stiff wire through the mesh below each port, bend both ends down so it won't slide, and you've added a perch in 30 seconds. Cling feeders like suet cages don't need this, since woodpeckers and nuthatches are happy gripping the wire mesh itself.
Pest-proofing add-ons and placement tips
A cage guard alone is strong protection, but pairing it with a baffle makes the setup close to bulletproof. For a pole-mounted feeder, a wrap-around baffle with at least an 18-inch diameter placed below the feeder is the standard recommendation, and that dimension comes up repeatedly in guidance from Project FeederWatch and manufacturers like Perky-Pet for good reason: smaller baffles can be reached around or climbed past. For above-the-feeder protection (when squirrels are dropping down from a tree branch), use a tilting or dome baffle mounted above the cage on the hanging wire. Again, 18 inches in diameter is the minimum worth using.
Placement distance from launch points is non-negotiable. Keep the feeder at least 10 feet from any fence, tree trunk, branch, or roof edge that a squirrel could leap from. A birding-focused Reddit thread similarly cautions that even squirrel-proof feeder types can fail when they are placed right next to a tree squirrels can access and reach from the feeder should be kept well away from reachable launch points. Raccoons are more likely to hug a pole and climb straight up, so a quality pole baffle matters more for them than horizontal distance does. If your yard makes the 10-foot rule hard to achieve, a cage plus baffle combination compensates somewhat, but you'll likely still see occasional squirrel attempts.
Seed spillage is a separate problem that a cage doesn't solve, and it actively undermines your pest control if you ignore it. Spilled seed on the ground attracts rodents, which in turn attracts raccoons and more squirrels. A seed-catching tray clipped to the bottom of the cage catches most fallout before it hits the ground. Use shelled seed where possible (hulled sunflower, for example) because birds eat it more cleanly with less mess. Store extra seed in a sealed, rodent-proof container, not in an open bag in a garage or shed.
Placement checklist before you hang the cage
- At least 10 feet horizontally from any fence, tree, or structure a squirrel could jump from
- At least 5 feet off the ground for pole-mounted setups
- Pole baffle installed at 4 feet high if on a pole, with 18-inch minimum diameter
- No branches hanging directly above the feeder within 8 to 10 feet
- Seed-catching tray in place below the cage
- Extra seed stored in a sealed container nearby, not in open bags
Keeping it clean and troubleshooting common problems
A wire cage doesn't need much maintenance, but it does need regular attention as part of your normal feeder cleaning routine. Project FeederWatch recommends cleaning seed feeders about every two weeks, and more often in warm or wet weather. With a cage in place, this means taking the cage off (or opening the hatch), removing the feeder, scrubbing the feeder with a 10% bleach solution, rinsing it thoroughly, and letting it dry before refilling.
While the feeder is out, check the cage itself for rust spots, bent mesh sections, or broken wire joins. Any rust you catch early can be treated with a wire brush and a coat of rust-resistant spray paint. Left alone, rust weakens the mesh and eventually creates gaps big enough for a squirrel to exploit.
If seed gets wet inside the cage (from rain blowing in or condensation), empty it immediately. Wet seed molds quickly, and moldy seed is a disease risk for birds and also keeps pests coming back to investigate the smell. A small roof panel over the top of the cage, made from the same hardware cloth bent at a 45-degree angle, does a lot to deflect rain without blocking bird access. Add a small roof panel or overhang to a platform-style cage to keep rain off the seed and help the caged feeder stay in use.
When birds won't use the caged feeder
This is the most common complaint after building a cage, and the cause is almost always one of three things: the cage is new and smells like metal, the mesh openings are too small for the birds you're targeting, or the birds can't reach the seed ports from outside the cage. New hardware cloth has a metallic odor that birds are cautious about. Leave the assembled cage outside for three to five days before hanging it with seed. Weathering kills the smell fast.
If the openings are the right size but birds still aren't entering or feeding, check the clearance between the cage wall and the seed ports. A gap of 2 to 3 inches is the working minimum for a bird to angle its head through mesh and reach a port. If your gap is less than that, you have two options: rebuild the cage slightly wider, or drill larger openings in the mesh at the port locations using aviation snips to create 2-inch circular cutouts directly opposite each port.
When pests are still getting in
If squirrels are still reaching seed despite the cage, work through this list before rebuilding anything. First, check whether the mesh openings are large enough for a squirrel's paw to reach through. Half-inch hardware cloth is impenetrable; 1. 5-inch or larger openings allow partial paw access.
Second, check whether the cage is touching the feeder body anywhere. If the mesh sits against the feeder, a squirrel can grip both and lever seed out. Third, verify your placement: is something new (a new deck rail, a fallen branch) giving squirrels a closer launch point than before? Finally, if all of that checks out, add or upgrade your baffle.
Controlling access reliably almost always requires the cage plus correct placement plus a baffle working together, not just one of those elements on its own.
If larger birds are still entering a fly-through cage style, your mesh openings are simply too big for exclusion to work. Switch to 1-inch or 1/2-inch hardware cloth and rebuild the cage panels. It's a couple of hours of work, but it definitively solves the problem. There's no other way around it because any opening that fits a starling or grackle through is going to stay a grackle door.
Quick troubleshooting reference
| Problem | Most Likely Cause | Fix |
|---|---|---|
| Birds won't approach the cage | New metal smell or unfamiliar object | Leave cage outdoors unbaited for 3–5 days before adding seed |
| Birds can't reach seed ports | Cage too close to feeder body (less than 2-inch gap) | Rebuild cage wider or cut enlarged openings in mesh at port locations |
| Squirrels reach through mesh | Openings larger than 1/2 inch | Replace with 1/2-inch hardware cloth panels |
| Squirrels bypass cage from above | No overhead baffle | Add dome or tilting baffle (18-inch min.) above feeder on hanging wire |
| Squirrels climb pole to feeder | No pole baffle or baffle too small | Add wrap-around pole baffle, 18-inch diameter, at 4-foot height |
| Cage rusting quickly | Un-galvanized mesh or coastal humidity | Treat with rust-resistant spray; replace with vinyl-coated hardware cloth |
| Seed spoiling inside cage | Rain or condensation entering | Add angled roof panel over cage top; switch to shelled seed |
| Large pest birds still entering | Mesh openings too large | Rebuild with 1-inch or smaller mesh for fly-through openings |
Building a cage around your bird feeder is genuinely one of the better investments of an afternoon in backyard birding. It's not a magic fix for every pest scenario, but combined with smart placement and a good baffle, it shifts the odds dramatically in favor of the birds you actually want to feed. Start simple with a cylinder sleeve on a tube feeder, see how your local birds respond over a week, and iterate from there. Most backyards need a tweak or two before the setup is dialed in, and that's completely normal.
FAQ
Can I use this cage on any feeder type, or only tube and hopper feeders?
You can, but the build has to match how animals reach the seed. If the feeder is horizontal or has exposed seed trays, you usually need a full rectangular sleeve or a boxed frame, plus a seed tray or lip to catch fallout. For suet holders or cling-style feeders, the mesh itself often acts as the grip surface, so you may not need inside perches, just enough enclosure to prevent reach-in attempts.
What opening size should I choose if I mostly get squirrels and want to block grackles too?
Use the tighter exclusion target first. A common practical choice is 1-inch openings for general exclusion of larger pest birds, while still allowing most small songbirds to feed through ports. If you see birds actively going inside through the mesh, drop to 1/2-inch and plan to add outside perches if your design requires them for comfortable feeding.
How do I prevent birds from getting stuck or intimidated after I install the cage?
Check for sharp wire ends and uncovered cut edges, bend or cap anything that snagged. Also, allow weathering time before the first seed fill, especially for a new cage, because the metallic smell can reduce visitation for several days. If birds are hovering but not feeding, confirm there is enough clearance so they can angle their head to reach ports, and consider adding the simple outside perch when the feeder has ports that end up behind the mesh.
Is it okay to build the cage directly onto the feeder body, or should it stay detachable?
Detachable is usually better. Even if you attach the cage tightly for security, you still need to remove and clean the feeder regularly, and you need access to inspect rust, bent sections, and broken wire joins. A removable sleeve or box frame lets you clean with the feeder fully taken out and also makes it easier to replace only the damaged cage section if needed.
How far above the ground should the cage be if I have a low yard?
Aim for at least 5 feet, and then rely on a properly sized baffle to compensate if you cannot meet the height and distance rules. If you cannot place the feeder 10 feet from launch points, prioritize wrap-around or dome baffles and keep the cage from being reachable via nearby branches, rails, or roof edges.
What if my feeder is near a fence or tree, and I cannot keep the 10-foot distance?
Treat the cage as one layer only and upgrade the barriers that compensate for shorter distances. Add a quality pole baffle where climb routes exist, and ensure the cage is not contacting the feeder mount or any nearby surface. Look for new access points, like a fallen limb or fresh growth on the tree, since those can create a closer launch angle that undermines even a well-built cage.
My birds used to feed easily, but now they avoid the feeder. What’s the most common fix?
Most of the time it is not the cage wire itself, it is access. Recheck port-to-mesh clearance (a small gap matters so birds can angle through), verify perches exist when the feeder ports are now behind mesh, and confirm the cage is positioned so ports are not blocked by the feeder body. If you still see reluctance, leave the cage outdoors for several days to weather off the new metal odor.
How can I tell whether the cage openings are too large or too small?
If squirrels can insert a paw and pull seed, openings are likely too large for exclusion in your yard and you may be seeing leverage at any contact points. If small birds cannot feed but squirrels cannot, openings may be too tight for the species or the clearance to ports may be inadequate. Adjust by either switching mesh opening size or modifying the cage at the port locations with properly sized openings directly opposite each port.
Does the cage eliminate the need for a baffle?
No, a cage is not a full substitute for a baffle. The cage blocks access to the seed once animals reach the feeder, but a baffle prevents the approach that gets them there. In real yards, the most reliable setup is cage plus correct placement plus baffle, especially for raccoons that climb poles directly.
How often should I clean the cage and feeder, and do I need special care because of the mesh?
Follow the same cleaning cadence as seed feeders, typically every two weeks, and more often in wet or warm weather. Take the feeder out and scrub thoroughly, then inspect the cage for rust spots, bent mesh sections, or broken wire joins. If you find early rust, treat it promptly with a wire brush and rust-resistant spray paint so gaps do not form over time.
What should I do if seed gets wet inside the cage?
Empty it immediately and let it dry or replace it. Wet seed can mold quickly and creates a lasting smell that draws pests back. If rain is the cause, add a small overhang or roof panel over the top of the cage, designed to deflect rain while still allowing birds to access ports.
How can I stop seed spillage from attracting more pests when using a caged feeder?
Use a seed-catching tray clipped to the cage bottom and consider feeding options that produce less mess, like hulled sunflower seed. Also store leftover seed in a sealed rodent-proof container instead of leaving it in open bags in sheds or garages, since rodents will target those storage areas even if the feeder is protected.
If squirrels still reach the seed after building the cage, what is the fastest troubleshooting order?
Start with the big failure points: confirm openings are not allowing paw access for your squirrel pressure level, check for any mesh contact where the cage touches the feeder or mount (this enables leverage), then re-evaluate placement for new launch points. Only after those checks should you rebuild, and if needed upgrade the baffle because a better approach barrier often fixes the issue without changing the entire cage design.