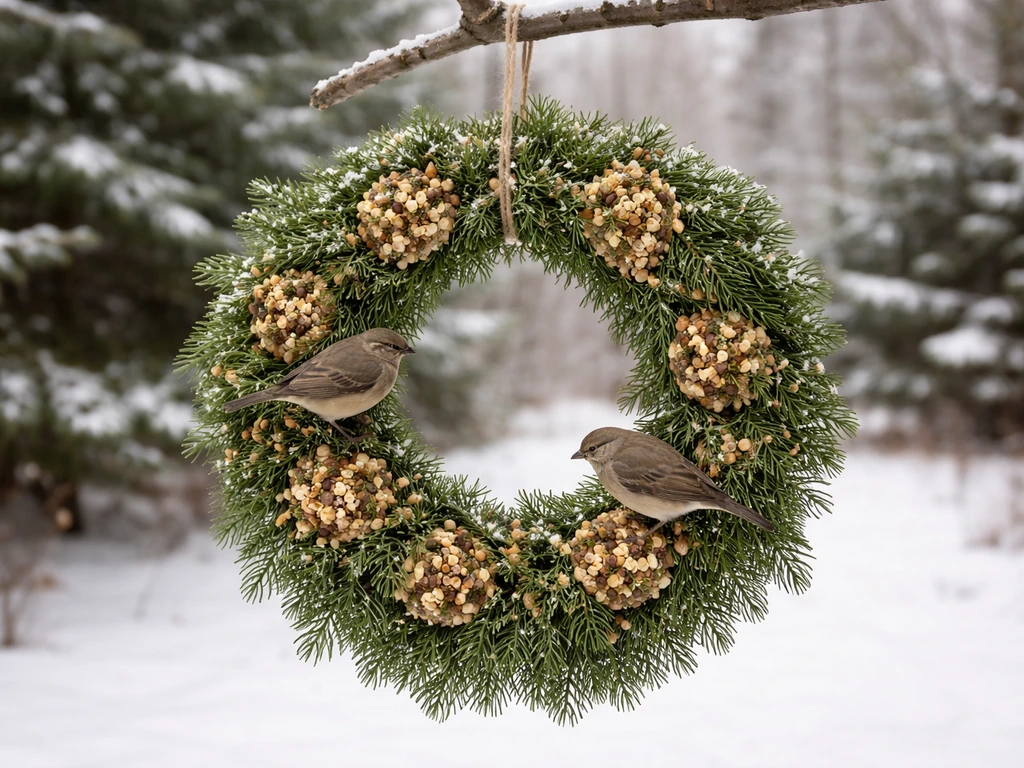
Hang a plastic bottle bird feeder by threading sturdy twine or wire through a hole in the cap (or around the bottle neck), tying it off with a secure knot, and suspending it from a shepherd's hook, S-hook, or tree branch at roughly 5 feet off the ground and well away from squirrel launch points. If you want a decorative option, you can also learn how to hang a bird seed wreath in a way that keeps it secure, level, and bird-friendly. Before you hang it, poke a few drainage holes in the bottom of the bottle, make sure your feeding openings are smooth enough not to snag feathers, and check that the whole thing hangs level. That's the core of it. The rest of this guide fills in the details so yours stays up, stays dry, and actually gets visited by birds.
How to Hang a Bird Bottle Feeder: Step-by-Step Guide

What a bird bottle feeder is and what you need
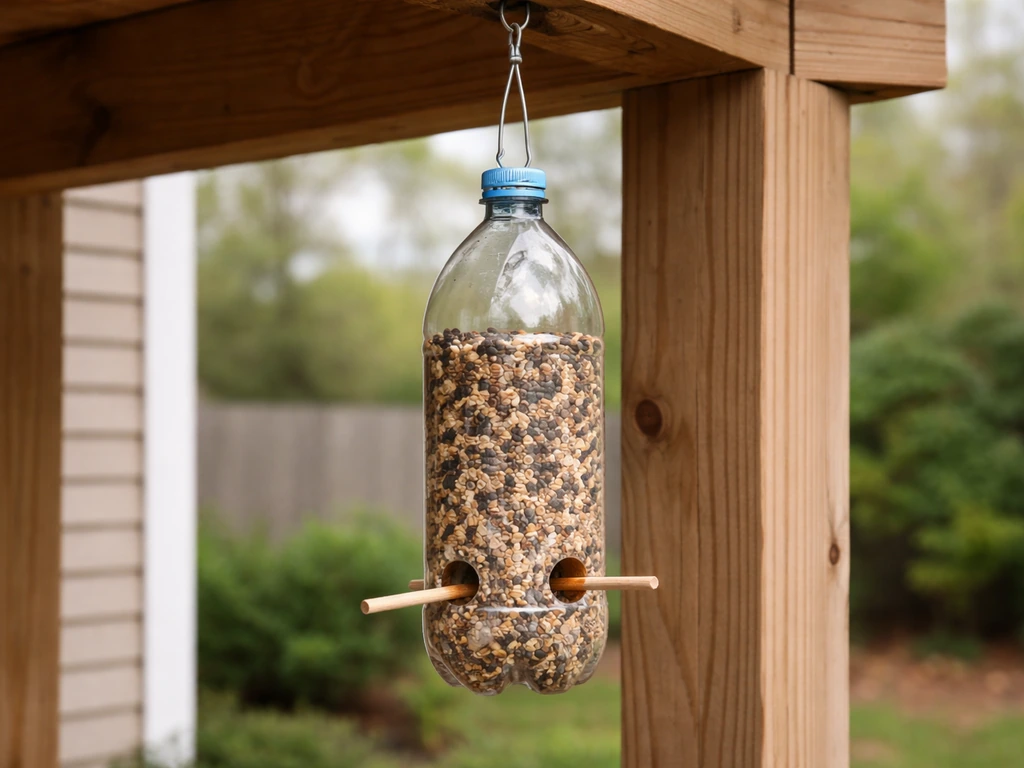
A bird bottle feeder is exactly what it sounds like: a plastic bottle (most commonly a clean 2-liter soda bottle) converted into a seed dispenser. The basic design has a hanging point at the top (through the cap or around the neck), one or two feeding openings cut into the sides so birds can reach the seed inside, and optional perch holes just below each feeding hole where birds can grip while eating. The bottle is filled partway with seed, the cap is screwed back on, and the whole thing is suspended outdoors. It works, it costs almost nothing, and birds find it just as appealing as a store-bought feeder once it's set up properly.
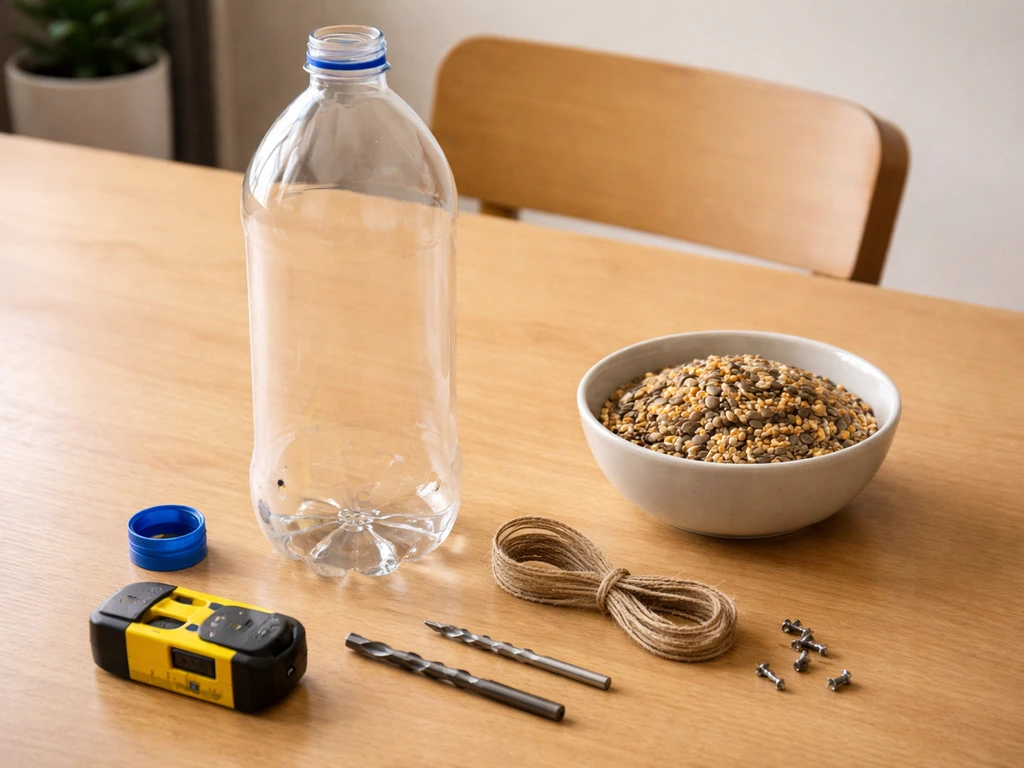
Before you start, gather everything you'll need so you're not hunting for tools halfway through. Here's what the build and hang requires:
- A clean, dry 2-liter plastic bottle with its cap
- Sturdy jute twine, paracord, or galvanized wire (at least 18 inches)
- A nail, awl, push pin, or hand drill with a small bit (1/8 to 1/4 inch)
- A soldering iron or heated nail for making smooth feeding hole edges (optional but helpful)
- Scissors or a craft knife for cutting the feeding openings
- An S-hook, carabiner clip, or shepherd's hook for the hanging point
- A small wooden dowel or pencil stub for perches (optional)
- Wild bird seed mix or sunflower seeds
- Food-safe silicone sealant if you want to seal any cracks later
You probably already own most of this. The total out-of-pocket cost is usually zero to a couple of dollars if you need to pick up twine or an S-hook. If you're building a version without perches, you can skip the dowel entirely. Chickadees, finches, and nuthatches will cling to the bottle itself just fine.
Pick the right spot: height, safety, and weather
Location makes or breaks how well a bottle feeder performs. Get this right and you'll have birds at it within a few days. Get it wrong and you'll be dealing with squirrels, wet seed, and a feeder that spins uselessly in the wind.
Height and distance from structures
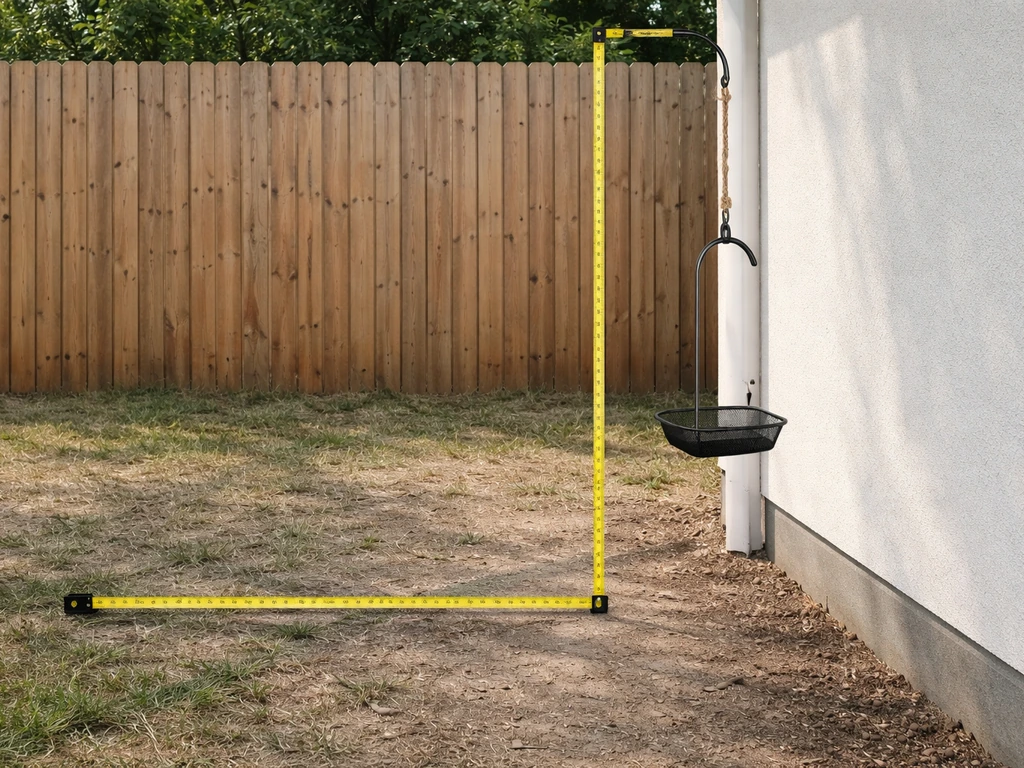
The go-to placement guideline is the 5-7-9 rule: hang the feeder about 5 feet off the ground, at least 7 feet away from any fence, deck railing, or building edge, and at least 9 feet from overhanging branches. Squirrels can jump surprisingly far, and those numbers are based on their actual reach, not guesswork. If you're hanging from a tree branch specifically, try to position the feeder at least 12 feet out from the trunk along the branch, and keep the bottom of the feeder at least 4 feet up from the ground so a squirrel baffle (if you add one later) has room to work. Perky-Pet also recommends squirrel-proofing feeder placement by positioning it at least 12 feet from the tree trunk or limb and at least 4 feet up from the ground when using squirrel-resistant feeder designs at least 12 feet out from the trunk and at least 4 feet up from the ground.
Sun, shade, and wind
In summer, shade is your friend. A feeder hanging in direct afternoon sun heats up the bottle, accelerates seed spoilage, and promotes mold growth in any moisture that gets inside. A spot with morning sun and afternoon shade is ideal. Avoid fully exposed, windy corners where the bottle will twist and spin constantly. A little movement is fine and even normal, but a feeder that spins on every gust will spill seed and deter birds that prefer a stable perch. If your yard is mostly open, a spot with a shrub or fence to one side cuts the wind nicely without trapping the feeder in shadow all day.
Distance from windows
Place the feeder either very close to a window (within 3 feet, so birds don't build up speed) or more than 10 feet away from glass. The danger zone in between gives birds enough room to fly into the window at full speed. A bottle feeder hanging right off a porch eave or window hook, close enough to watch from inside, is actually one of the safer placements.
Hanging methods that work for plastic bottles

There are three reliable ways to hang a bottle feeder, and which one you use depends mostly on what you're hanging it from and how permanent you want it to be.
| Method | Best for | What you need | Durability |
|---|---|---|---|
| Cap hole + twine loop | Porch eaves, indoor hooks, light branches | Twine, awl or nail, S-hook | Good for light feeders; check knot monthly |
| Wire wrap around bottle neck | Tree branches, heavy-duty hooks, windy spots | Galvanized wire, pliers | Very secure; wire resists UV and weather well |
| Multiple-hole twine threading | Any overhead anchor; adds stability | Twine, drill or awl, 2-3 holes near top | Excellent; distributes weight and reduces spin |
The simplest is the cap-hole method: poke a hole through the center of the bottle cap, thread 18 to 24 inches of twine or paracord through it, tie a large overhand knot on the inside so it can't pull through, screw the cap back onto the filled bottle, and hang the free end from an S-hook. This works well for sheltered spots like a porch overhang. For anything more exposed or heavier, the wire-wrap method is more reliable. Loop a length of galvanized wire (the kind used for garden projects, around 18-20 gauge) twice around the bottle just below the neck, twist the ends together with pliers to form a secure coil, then form a hanging loop above the cap. It grips the bottle without any drilling at all and won't slip even in wind.
The multiple-hole threading method is worth doing if you want the most stable hang. Drill or poke two or three holes evenly spaced around the upper section of the bottle, thread a single long piece of twine in and out through the holes, and gather the ends above the bottle to tie off. This distributes the bottle's weight across several points instead of one, which greatly reduces the spinning and tilting that single-point hangs often suffer from.
How to attach the bottle without cracking it
Plastic bottles crack when stress is concentrated on one small point, which is exactly what happens if you thread wire through a small hole and let the bottle's full weight rest on that edge. Here's how to avoid it.
- Use the cap for the main hanging attachment whenever possible. The cap is thicker and more rigid than the bottle walls, so it handles stress better. A hole through the center of the cap with a knotted cord distributes the load across the whole cap rather than a thin wall section.
- If you're drilling holes in the bottle itself, use a 1/8-inch bit and go slow. High-speed drilling generates heat that softens and cracks thin plastic. Drill at low speed or use an awl to pierce the hole manually.
- Reinforce bottle-wall holes with a small washer on each side of the plastic before threading wire or cord through. This spreads the load and prevents the hole from tearing over time.
- Never use bare metal wire directly through a plain hole in the bottle wall without reinforcement. The wire edge will saw through the plastic within a few weeks, especially once the bottle expands and contracts with temperature changes.
- If you're wrapping wire around the neck, avoid over-tightening. The wire should hold firm without biting into the plastic. Two loops twisted snugly is enough; cranking it tighter doesn't help.
- After setup, give the feeder a firm tug to test it before filling with seed. A filled 2-liter bottle can weigh close to 2 pounds, so the joint needs to handle real weight.
If a crack does develop near a hole, food-safe silicone sealant applied around the outside of the hole will buy you more time. It bonds to plastic well and is safe for birds once fully cured. That said, a cracked bottle is worth replacing rather than patching repeatedly since the crack will keep spreading.
Leveling, stability, drainage, and preventing seed spillage
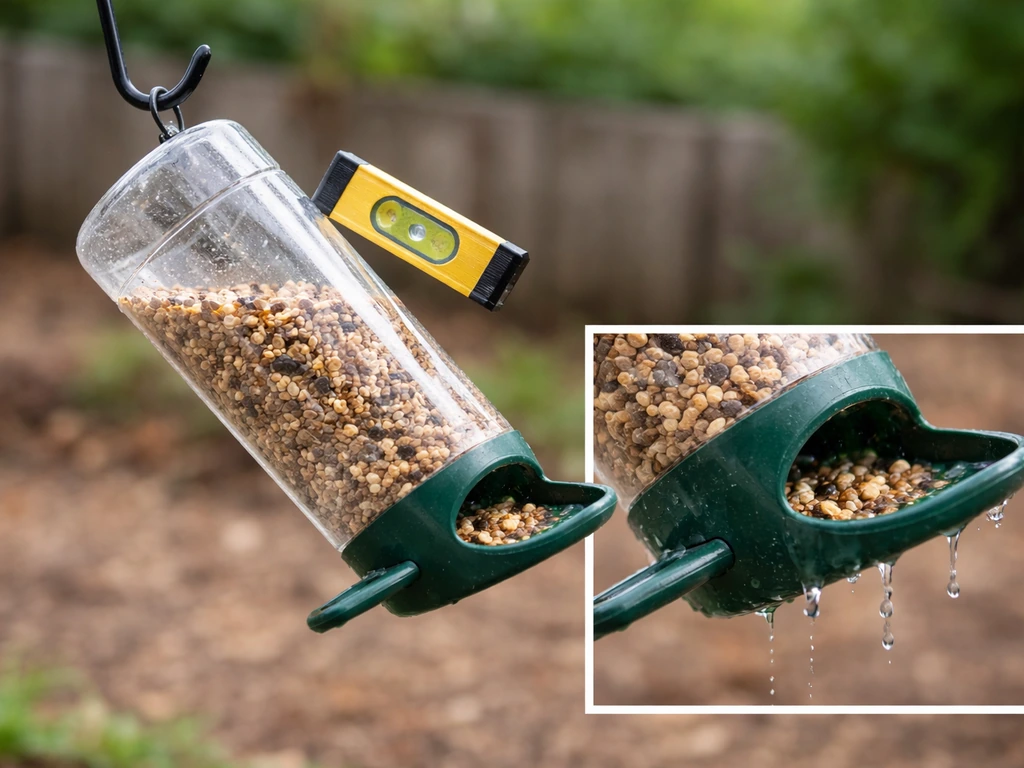
A bottle feeder that hangs at a 30-degree angle dumps seed out of one feeding hole and leaves the other inaccessible. Before you call it done, do a quick level check by stepping back and eyeballing it from the side. If it's tilting, adjust how the hanging cord is attached to the anchor point until the bottle hangs as close to vertical as possible.
Drainage is non-negotiable. Rain water gets into the feeding openings, soaks the seed, and creates exactly the moldy, clumped mess that makes birds sick. Before you fill the bottle, use a nail or awl to poke four to six small holes in the very bottom of the bottle. A 1/4-inch hole on each side works well too. These let water drain out rather than pool. They won't cause seed to pour out because the seed above sits loosely and gravity alone won't push it through small holes.
To reduce seed spillage from the feeding openings, size the holes correctly. A hole about the diameter of a quarter (roughly 1 inch) is big enough for a bird to reach in and pick seeds but small enough to prevent seed from pouring out whenever the bottle sways. If you've already cut holes too large, you can narrow them slightly by applying a thin ring of food-safe silicone sealant around the inside edge. For spinning and swaying in wind, the multiple-hole threading method described above is the most effective fix. You can also add a small weight to the bottom of the bottle (a flat stone taped inside before filling) to lower the center of gravity and keep the bottle more stable.
Pest-proofing and keeping it bird-friendly
Squirrels are the main challenge with any hanging feeder. The 5-7-9 placement rule handles most of the problem, but if squirrels are still reaching your feeder, a squirrel baffle on the line above it is the most reliable fix. Position the baffle so the bottom of the feeder ends up at least 4 feet off the ground after installation. Cone baffles that hang above the feeder are more effective for hanging feeders than pole-mount baffles.
Ants are less of an issue with seed feeders than with nectar feeders, but they will trail into any feeder with seed residue on the outside. Wipe down the outside of the bottle every time you refill it and make sure there's no sticky residue around the feeding holes. If ants become a persistent problem, an ant moat (a small water-filled cup that the hanging cord passes through) on the line above the feeder stops them cold. Fix any seed leaks around the holes promptly with silicone sealant, since wet seed residue is exactly what draws both ants and rodents.
For the hardware you use (wire, hooks, S-hooks), choose galvanized or stainless steel rather than plain steel or zinc-coated options. Galvanized wire handles weather well and won't leave rust streaks on your bottle or porch. Avoid painted or coated hooks with peeling finishes near the seed, as flaking paint is harmful to birds. Natural fiber twines like jute will eventually degrade outdoors, so if you use twine, inspect and replace it every season.
Maintenance and troubleshooting after you hang it
Regular cleaning routine
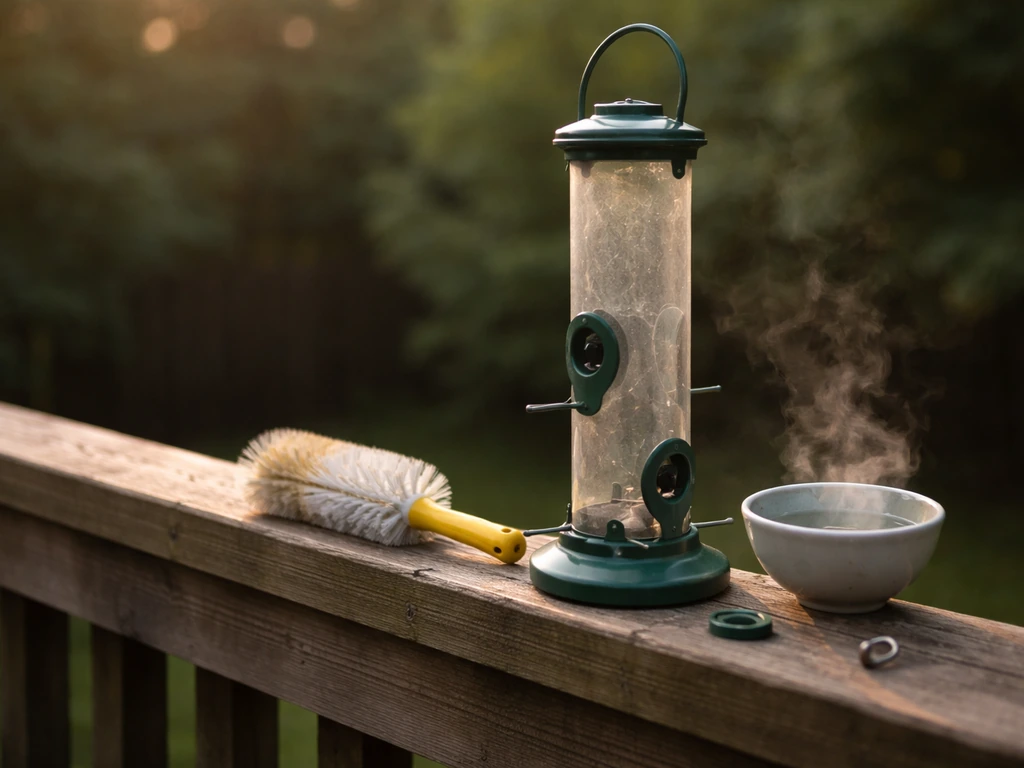
Clean the feeder at least once a week. Take the bottle down, empty any remaining seed, and scrub the inside with hot water and a bottle brush. Disinfect monthly with a 10% bleach solution (1 part bleach to 9 parts water), rinse thoroughly, and let it air dry completely before refilling. Moldy or clumped seed should be thrown out entirely, not just topped up with fresh seed. Refilling on top of old seed is the most common reason feeders stop getting visitors.
Common problems and quick fixes
| Problem | Likely cause | Fix |
|---|---|---|
| Feeder spins constantly | Single-point hang with no stabilizer | Switch to multi-hole threading or add a small bottom weight |
| Feeder tilts to one side | Off-center cap hole or uneven threading | Re-thread cord through cap center; adjust anchor point |
| Seed clumps and smells musty | No drainage holes or oversized feeding openings letting rain in | Poke drainage holes in bottom; reduce feeding hole size with silicone |
| Hanging cord frays or snaps | Jute/natural twine degraded by UV and moisture | Replace with paracord or galvanized wire; inspect monthly |
| Squirrels reach feeder | Feeder too close to branch or structure | Reposition using 5-7-9 rule; add cone baffle above |
| Bottle cracks near hanging hole | Too much stress on a single small hole | Reinforce with washers; switch to wire-wrap-around-neck method |
| Birds not visiting | Location too exposed, seed too old, or feeder not yet discovered | Move to a quieter spot with nearby perch; refresh seed; wait 1-2 weeks |
One thing that catches people off: birds may take a week or two to discover a new feeder, especially if you've just put it up. Don't assume something is wrong immediately. If you're not seeing visitors after two weeks, try sprinkling a small handful of seed on the ground directly below the feeder. Birds foraging nearby will notice it, look up, and find the feeder. That one trick has worked for me every time.
Bottle feeders are satisfying to set up because they come together quickly, cost almost nothing, and actually work. If you enjoy the process of hanging and maintaining this style of feeder, it's worth exploring other DIY hanging designs too. If you enjoy the process of hanging and maintaining this style of feeder, you can also apply similar hang-and-stability ideas to how to make bird seed hangers. If you are also learning how to hang MR Bird Wildfeast wreath, the same placement and stability tips apply other DIY hanging designs. If you want a seasonal twist, you can adapt these hanging-bottle tips to a Christmas wreath bird feeder by securing the bottle and feeding openings safely to the wreath frame. If you want an easy upgrade, consider an IIT bottle top bird feeder with hanger for a simple way to mount the feeder DIY hanging designs. Seed bells, seed wreaths, and other hanging feeders follow many of the same placement and pest-proofing principles, so everything you've learned here carries over directly.
FAQ
What should I do if my bottle feeder leaks seed through the side holes or cap opening?
If you cannot screw the cap on tightly, the feeder will leak seed and start molding faster. Use a cap that threads snugly onto the bottle neck, and confirm the bottle is partway filled but not overfilled (leave headspace so the seed does not press into the cap area). Before hanging outside, do a quick “tilt test” indoors over a tray to confirm seeds do not pour out from the side holes when you gently move the bottle.
My birds don’t use the perches, how can I make the perch setup work better?
Dowel perches can be hard to grip if they are too slick or too close to the cut edge. For the best grip, use a smooth wooden skewer or a small dowel and sand any sharp edges, then position the perch so the bird is not forced to push its feet against the plastic feeding opening. If you notice birds avoiding one side, rotate the bottle and check that both feeding holes line up equally with perches.
How do I choose the right hole size so only certain birds can feed?
For smaller birds like finches and chickadees, larger birds often dominate a feeder if the opening is too roomy. Keep side holes close to about a 1-inch diameter, and avoid cutting bigger “just to make it easier.” If you already cut holes too large, the simplest fix is to add a thin ring of food-safe silicone to narrow the opening, then let it fully cure before refilling.
Can I hang a bird bottle feeder under a roof or porch ceiling?
Yes, but you must avoid placing it where rain will directly blow into the openings. If you hang it under a roof or eave, make sure the feeder is still shaded enough to prevent overheating, and confirm drainage holes are present. Also check that the S-hook and hanging line are not directly beneath a water drip path that could rinse seed out.
My feeder spins in the wind, what’s the best way to stop the rotation?
To keep the bottle from twisting in wind, choose an anchoring point that limits rotation, then prefer the multiple-hole threading method for stability. If it still spins, tighten the hanging loop so the cord does not slip, and avoid a single top attachment point. You can also weigh the bottle slightly with a flat stone taped inside to lower the center of gravity, but keep the stone clear of the feeding holes.
Can I repair a cracked bottle instead of replacing it?
If a crack starts near the hole, food-safe silicone can delay replacement, but it should not be treated as a long-term repair. Replace the bottle when the crack spreads, when seeds leak through the damaged area, or when you notice sharp edges or separation around the hole. Always use the bottle-drainage design you already cut, since cracks can allow water to reach seed faster.
I set it up but no birds are visiting, what should I check first?
Start with the most common cause, old or wet seed. Remove the bottle, discard clumped or moldy seed, and fully clean and dry the feeder before refilling. If birds still hesitate, place a small handful of seed on the ground directly under the feeder, then wait at least a week, since discovery often takes 7 to 14 days.
How do I deal with ants finding the feeder and crawling into it?
If you see ants or other insects, it usually means there is food residue outside the bottle or a leak around the feeding openings. Wipe the exterior each time you refill, inspect the underside and seam areas for drips, and patch any leakage with food-safe silicone. For persistent ants, an ant moat on the cord line above the feeder can break their trail without changing the bird access.
Which hanging materials are safest for outdoor use, and what should I avoid?
Choose the hanging hardware based on weather durability. Prefer galvanized or stainless steel for wire and hooks, and avoid painted or flaking coated hardware near the seed because flakes can contaminate the feeding area. If you must use twine, inspect it every season, and replace it before it weakens or frays.
How should I adjust placement if my yard layout makes the 5-7-9 rule hard to follow?
Yes. If you live in a tall, open area, you may need a higher anchor point or a longer line to meet placement targets. Keep the bottom of the feeder roughly 5 feet off the ground, keep it well away from climbable launch points, and avoid overhanging branches that let predators drop closer. If you add a squirrel baffle later, ensure the baffle positioning still results in at least about 4 feet of clearance below the baffle.
How to Make a Christmas Wreath Bird Feeder Step by Step
Step-by-step guide to build a Christmas wreath bird feeder with winter-safe food, setup tips, and easy cleaning