You can build a solid wire mesh bird feeder in an afternoon using hardware cloth, a few zip ties or wire fasteners, a small piece of wood or metal for the base, and a pair of tin snips. To get started, follow this metal bird feeder plan step-by-step, from choosing your hardware cloth to hanging and filling the finished feeder how to make a metal bird feeder. The whole project costs under $15 if you buy materials new, often less if you have scraps on hand. The key decisions are picking the right mesh gauge so seeds stay in and birds can reach them, finishing the cut edges so nothing injures a beak or foot, and hanging it at the right spot so birds actually use it.
How to Make a Wire Mesh Bird Feeder Step by Step

Marcus Brennan
10 Jun 2026
Choose the right wire mesh and materials
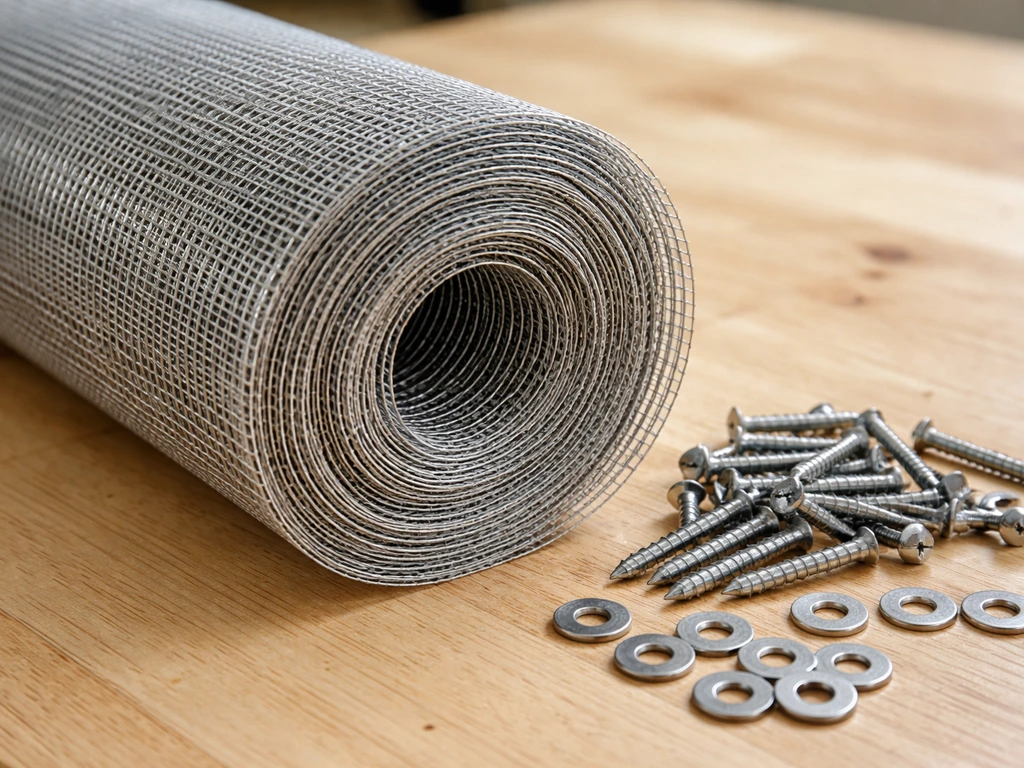
The single most important material call is the mesh itself. You want stainless steel hardware cloth, not galvanized. Galvanized wire is coated with zinc, and when birds chew on it or it weathers, that zinc can leach out and cause a condition called New Wire Disease, which is toxic to birds. Stainless steel (Type 304 or 316) is 100% non-toxic and will outlast galvanized by years outdoors. Yes, it costs a little more, but for a feeder birds are pecking at daily, it is worth it.
For gauge and opening size, aim for 18-gauge wire with 1/2-inch square mesh openings. That combination is sturdy enough to hold its shape when you bend it into a tube or box, the openings are right for sunflower seeds and most mixed seed blends, and it is still easy to cut and shape by hand. If you are building a nyjer (thistle) feeder for finches, drop to a smaller opening, around 3/8 inch, so the tiny seeds do not pour straight through. For a suet cage style, 1/2-inch or even 3/4-inch mesh works fine because suet is denser and will not fall out.
| Mesh Type | Wire Gauge | Opening Size | Best For | Bird-Safe? |
|---|---|---|---|---|
| Stainless steel hardware cloth (304/316) | 18 gauge (approx. 1.2 mm) | 1/2 inch | Sunflower, mixed seed, suet | Yes — non-toxic |
| Stainless steel hardware cloth (304/316) | 18 gauge | 3/8 inch | Nyjer/thistle, fine seeds | Yes — non-toxic |
| Galvanized hardware cloth | 19–18 gauge | 1/2 inch | Not recommended for feeders | Risk of zinc toxicity |
| PVC-coated stainless mesh | 18 gauge (1.2 mm) | 3/4 inch | Suet cage, larger seeds | Yes — if PVC is bird-safe |
Beyond the mesh, gather these before you start: tin snips or aviation snips, heavy-duty gloves and safety glasses (non-negotiable), stainless steel zip ties or thin stainless wire for fastening, a small piece of plywood or a metal plate roughly 5 to 6 inches square for the base, a drill with a small bit if you want to add a hanging hook through wood, and a length of galvanized or stainless chain or wire for hanging.
Plan your feeder design and dimensions
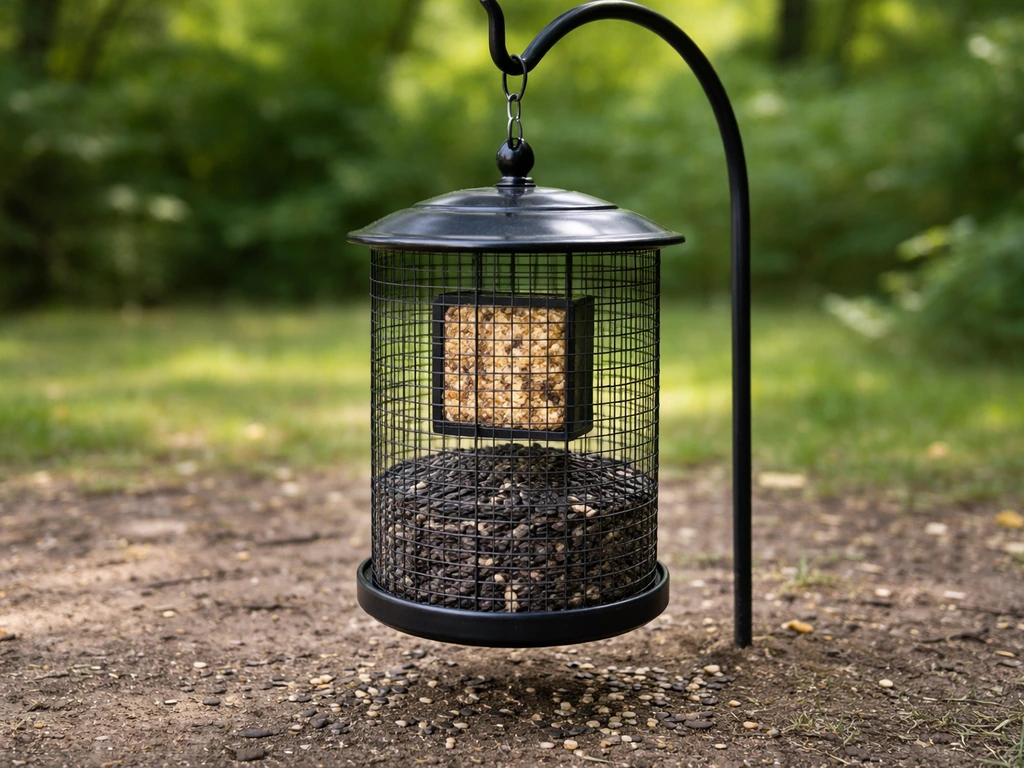
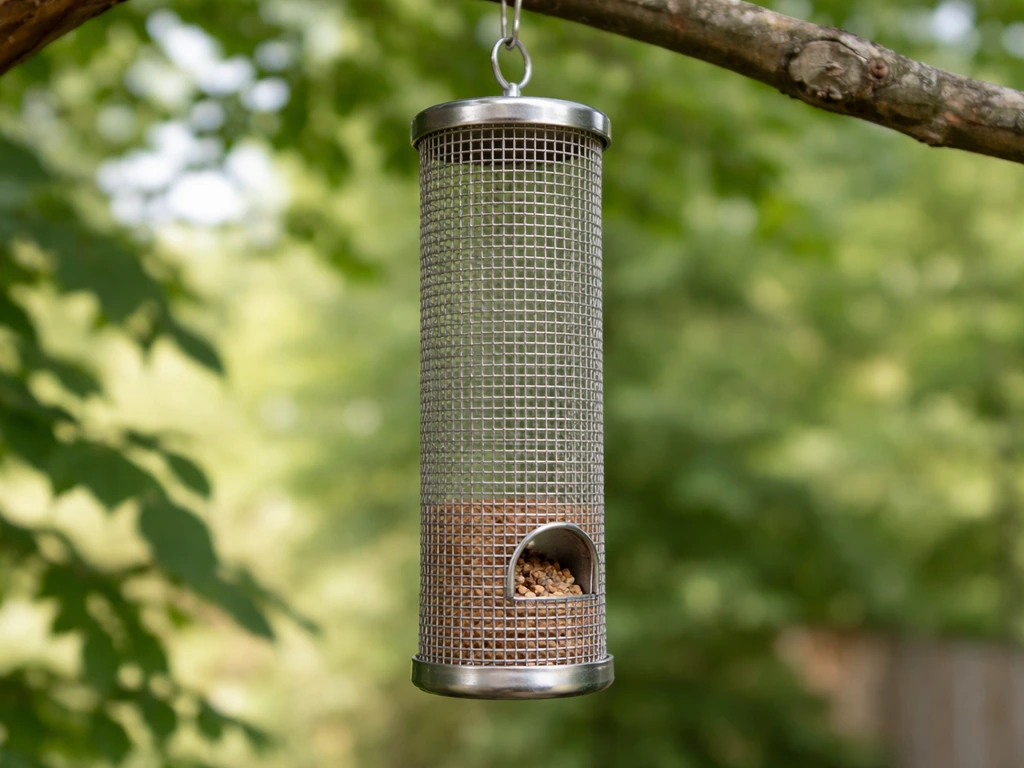
The simplest and most practical wire mesh feeder design is a tube or cylinder hopper. You roll the mesh into a tube, fasten the seam, cap it with a base, and hang it. Birds cling to the outside and pull seeds through the openings. It holds seed well, drains rain easily, and takes maybe 30 minutes to assemble.
A good starter size is roughly 10 to 12 inches tall and 4 to 5 inches in diameter. That gives you about a cup to a cup and a half of seed capacity, similar to commercial tube feeders like the Duncraft nyjer feeder (which runs about 10. 5 by 15. 5 inches and holds 1.
5 lbs of nyjer). You do not need to match that exactly, but having a reference makes cutting easier.
If you want a box or hopper style instead, plan a rectangular shape: roughly 5 inches wide, 5 inches deep, and 8 to 10 inches tall. This is slightly easier to build square than a cylinder, especially if you are new to working with hardware cloth. Both styles work well. The tube is more compact and squirrel-resistant by nature since there is no flat ledge for a squirrel to sit on. The box style offers a larger opening for birds that prefer to perch and feed from the side.
Cut, shape, and assemble the mesh body
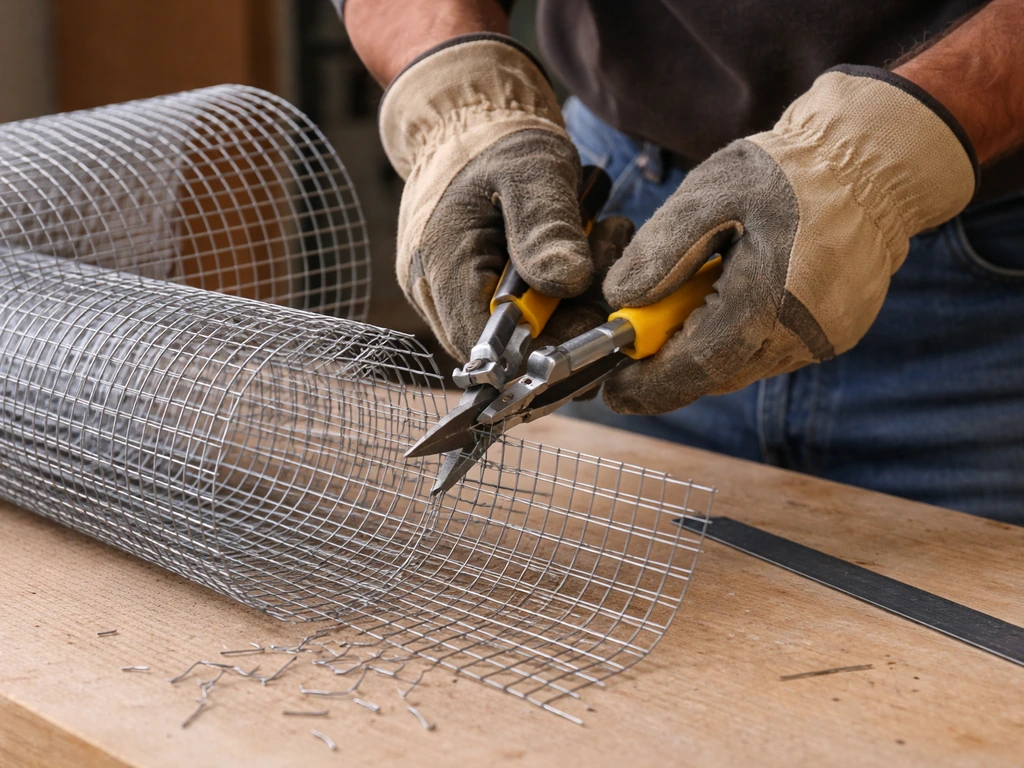
Put on your gloves and safety glasses before you unroll the hardware cloth. Instructables also emphasizes safety when cutting wire mesh for the feeder, noting to use caution because the ends may be sharp before you unroll the hardware cloth. Cut edges are genuinely sharp and wire mesh has a habit of springing back unexpectedly. Mark your cut lines with a marker directly on the wire using the grid as a guide. Cut along a wire line rather than between wires so you do not leave stray wire stubs sticking out on every edge.
- Measure and mark the mesh to your planned dimensions. For a tube feeder, you need a rectangle. The height of the rectangle becomes the height of your tube, and the width becomes the circumference. For a 4.5-inch diameter tube, cut the width to about 14 inches (diameter × 3.14 = circumference).
- Cut along your marked lines using tin snips or aviation snips. Work in short cuts rather than long slices. Keep your free hand clear of the cutting line.
- For a tube design, curl the mesh rectangle into a cylinder. Overlap the two short edges by one mesh square (about 1/2 inch) and fasten the seam with stainless zip ties or by threading short lengths of wire through adjacent openings and twisting them closed. Space fasteners every 2 to 3 inches along the seam.
- For a box design, score the mesh lightly along fold lines with a marker, then bend at 90-degree angles. Use a straight edge like a piece of lumber as a bending guide to get clean corners. Fasten the corner seams the same way, with zip ties or wire twists every 2 to 3 inches.
- Check the assembled body for any seam gaps larger than your seed size. If gaps exist, add more fasteners or overlap a small scrap of mesh over the gap and tie it in place.
Add the base, supports, and optional perches
The base keeps seed in and gives birds somewhere to land while eating. For a platform feeder, the same mesh-and-stability basics apply, but you will want a flat “platform” base and drainage so seed does not get soggy. For a tube feeder, cut a circle of plywood or thin metal sheet slightly larger than the tube diameter.
Drill four small holes near the edge and thread stainless wire or zip ties through the holes and up through the bottom ring of mesh, tying them off firmly. Alternatively, cut a disc of the same hardware cloth and fasten it as a mesh base so rain drains through rather than pooling. A mesh base is actually better in wet climates because it prevents soggy seed at the bottom.
For a box feeder, cut a solid base slightly larger than the box footprint and attach it the same way. If you use wood, treat it with a bird-safe exterior sealant or use cedar, which is naturally rot-resistant. Do not use pressure-treated lumber since those chemicals are harmful to birds.
Perches are optional on a mesh feeder because most birds that eat from mesh (finches, chickadees, nuthatches, woodpeckers at suet) are clingers and do not need a perch. But if you want to attract ground feeders or birds that prefer to sit while eating, add a wooden dowel or short branch stub through two opposing holes near the bottom of the feeder. Drill a hole slightly smaller than the dowel diameter through both sides of a wooden base, push the dowel through, and trim it to about 2 inches on each side. No need to glue it since the friction fit holds fine.
Seal sharp edges and do a bird-safety check
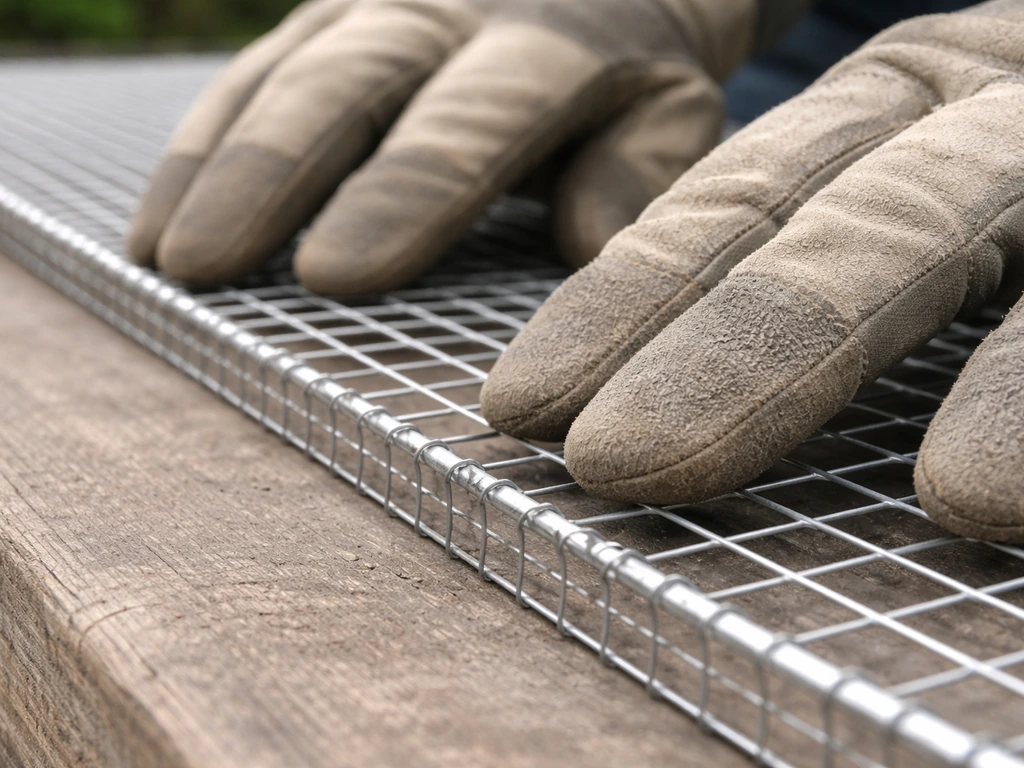
This step is where most first-time builders skip ahead too quickly, and it matters a lot. Every cut edge of hardware cloth leaves small wire stubs that can cut a bird's tongue, feet, or face. Before the feeder goes outside, go over every edge systematically.
- Run a gloved finger along every cut edge to find any protruding wire stubs.
- Use needle-nose pliers to bend each stub tightly back against the nearest wire strand. Press it flat so there is no spring-back.
- For the top rim of a tube or box (where birds may perch or reach in), wrap the edge with a thin strip of metal tape (HVAC foil tape works well) or apply a bead of food-safe silicone sealant and let it cure fully before introducing seed or birds.
- Check all zip tie ends. Trim them flush with a pair of diagonal cutters so no plastic nub sticks out.
- Do one final visual pass: look at every fastening point, every seam, every corner. Nothing should protrude inward or outward more than 1 mm.
Also check the mesh openings themselves. Make sure no opening got deformed during bending into a shape that could trap a toe or beak. If any square got pinched into a narrow slot, use pliers to open it back to its original shape or patch over it with a scrap of mesh.
Hang it where birds will actually find and use it
Location matters more than most people expect. A beautifully built feeder hung in the wrong spot will sit empty for weeks while birds ignore it. Birds need to feel safe while eating, which means they want nearby cover to escape to, but they also need clear sightlines to spot predators approaching.
- Hang the feeder 5 to 6 feet off the ground. This is high enough that cats cannot jump to it from below, but low enough that you can reach it comfortably to refill and clean.
- Position it within 10 feet of shrubs or trees so birds have an escape route, but keep it at least 3 feet from any surface (fence, wall, branch) that a squirrel could jump from.
- Avoid placing it directly under a large tree canopy. Squirrels will drop onto it from above.
- Face the seed-access openings away from the prevailing wind direction. This keeps rain from driving directly into the seed.
- If hanging from a shepherd's hook or pole, mount it at least 10 feet from any structure and add a pole baffle (a cone or tube baffle at about 4 feet height) to stop squirrels from climbing up.
For the actual hanging hardware, a length of stainless or galvanized chain works better than rope for wire mesh feeders. Rope absorbs moisture, mold, and eventually rots. Run the chain through the top of the feeder mesh, close it with a quick-link connector, and hang it from a sturdy hook. If you built a wooden top cap, drill a centered hole through it and use a large screw eye to attach the chain. Give the whole assembly a good shake before walking away. If anything moves, rattles, or tilts more than a couple of degrees, reinforce the attachment before adding seed.
Keep it clean, weather-proof, and pest-resistant
Wire mesh feeders are actually among the easiest feeders to clean because water drains through them naturally. But seed hulls, droppings, and wet seed clumps still build up, and they create a disease risk for birds. Clean the feeder thoroughly at least once a month. Mississippi State University Extension also recommends soaking backyard bird feeders in a bleach solution made with 9 parts water to 1 part bleach for 10 minutes, then rinsing well and letting the feeder dry bleach solution of 9 parts water to 1 part bleach for 10 minutes. During heavy use seasons (winter and migration in spring/fall) or after rainy stretches, bump that up to every two weeks.
- Empty all remaining seed and shake out loose debris.
- Soak the entire feeder in a solution of 9 parts water to 1 part bleach for 10 minutes. A plastic storage bin or utility sink works well for this.
- Scrub the mesh with a stiff brush to clear packed seed residue from the wire openings.
- Rinse thoroughly with clean water until you cannot smell bleach.
- Let the feeder dry completely before refilling. A wet feeder seeds mold within hours in warm weather. Hang it in the sun or leave it on a dry surface for at least an hour.
For weather protection, stainless steel mesh does not rust, but any wooden components (base, top cap, perch) will eventually deteriorate. Apply a fresh coat of exterior bird-safe sealant or linseed oil to wood parts once a year in spring. If you live in an area with heavy snow or ice, consider pulling the feeder down during the worst of winter or adding a simple cone-shaped roof fashioned from a piece of sheet metal or weather-resistant plastic. This keeps seed dry and extends how long a fill lasts.
Squirrels are the main pest challenge for a hanging wire mesh feeder. Physical baffles are the most reliable solution. A dome-shaped baffle hung above the feeder (heavy-duty plastic or metal, at least 12 inches in diameter) stops squirrels from reaching down from above. If the feeder is on a pole, a pole-mounted cone baffle at about 4 feet off the ground stops them climbing up.
Audubon and other wildlife organizations back baffles as the most practical and lowest-frustration approach. You will not get to a perfect 100% squirrel-proof setup, but a well-placed baffle gets you very close. Raccoons are deterred by the same approach, though they are stronger and heavier, so make sure your baffle is bolted securely, not just clipped on.
If birds are slow to discover the new feeder, be patient. It can take one to three weeks for birds in your yard to start visiting a new food source. Sprinkling a small amount of seed on a flat surface directly below the feeder can help birds notice it. Once one bird finds it, others follow quickly.
On the question of what seed to put in your wire mesh feeder, that depends on the mesh size and the birds you want to attract, and it is worth thinking through carefully before your first fill. To electrify a bird feeder safely, you will need to consider weatherproof wiring, proper insulation, and a suitable power source how to electrify a bird feeder.
FAQ
Can I use galvanized hardware cloth if I coat it or cover it somehow?
It is better to avoid galvanized entirely. Even if you paint or seal it, birds peck and the wire still weathers outdoors, so the zinc coating can wear and flake. If you already have galvanized mesh, the safest move is to retire it for other garden uses and start fresh with stainless for any feeder birds will chew on daily.
What if my mesh openings are too big and seeds fall out too quickly?
Re-check both the wire gauge and the opening size after cutting and shaping. Hardware cloth can distort at the seam, which effectively creates wider gaps. You can sometimes fix this by opening up pinched sections back to square and then re-tying the seam tighter, but if the opening size is wrong for the seed, the real fix is switching to the correct mesh size (for example 3/8 inch for very small nyjer/thistle-type seeds).
How do I know whether I built a tube or box with the right diameter or width?
Before final assembly, dry-fit the shape and do a quick capacity test. Fill it with the same volume of seed you plan to use and time how long it takes to pour through and how much drains out when you tilt it. If most seed dumps out from the seam or top cap, you likely need to reduce the seam gap, raise the closed end slightly, or add a tighter base ring.
What is the safest way to finish edges without leaving sharp wire stubs?
After cutting, run your fingertips slowly along each edge while wearing gloves, then use pliers to twist off or bend any individual wire points back toward the mesh so they cannot snag toes. Also inspect the interior seams, not just the outside, because toe contact often happens where the mesh overlaps or where the base is fastened.
Will a mesh base trap wet seed, or should I use a solid base?
For wet climates, a mesh base is usually better because water drains through and seed clumps stay smaller. Use a mesh base when rain or heavy condensation is frequent. Use a solid base only if you can add drainage and you are diligent about cleaning, because standing moisture increases mold and reduces feeding quality.
How often should I clean the feeder if birds are using it heavily?
A monthly clean is a baseline, but if you see hull buildup, sticky wet seed, or a crust at the bottom, clean immediately and then move to every 2 weeks during winter and migration. When temperatures drop below freezing, check more often too, because damp seed can freeze and create sharp residues and hard-to-remove mats.
What bird-safe sealant can I use on wood parts, and what should I avoid?
Use an exterior sealant or finish labeled as bird-safe, and let it cure fully before hanging the feeder. Avoid pressure-treated lumber and avoid any treated wood without verifying it is safe for animals. For small parts like top caps, a food-safe approach is to seal with a product that stays dry and does not off-gas strongly once cured.
Do I need a perch on a wire mesh feeder?
Not for many common clingers (finches, chickadees, nuthatches). Add a perch only if your target birds prefer sitting at a ledge, such as some ground-feeding species. If you do add one, place it low enough that birds can still reach seed easily through the mesh, and ensure any added dowel is smooth and securely fitted so it does not wobble.
How do I keep squirrels from getting seed if they can still reach the sides?
A baffle helps most, but you may need to combine it with placement. Hang the feeder so the path from the nearest branch or fence requires a noticeable jump or climb. If squirrels are reaching from below or from a nearby surface, raise the feeder higher or add a second barrier method like clearing nearby perching surfaces, then verify the baffle is firmly mounted, not just clipped.
How long should I wait before assuming birds will not use the feeder?
Plan on 1 to 3 weeks. If no birds arrive after about two weeks, try a small change such as topping off with the most appropriate seed for your mesh openings, and consider sprinkling a small amount directly beneath to cue discovery. Also confirm the location offers escape cover nearby and open sightlines so birds feel safe from predators.
Is it a problem if the chain is galvanized instead of stainless?
For hanging hardware, the main health concern discussed is the feeder mesh itself. That said, galvanized chain can still corrode over time, leading to rust staining and eventual weakening. If you want maximum longevity and the least maintenance, stainless is preferable, but if galvanized is what you have, inspect it periodically and replace if the links thin or seize.
Next Article
What to Put in a Wire Bird Feeder: Best Foods
Best foods for wire bird feeders: sunflower and mixed seed, plus suet, mealworms or fruit by feeder type and setup tips.