You can make a functional glass bird feeder at home using a recycled glass jar, bottle, or dish as the main vessel, combined with a wooden or wire frame, a simple perch, and food-safe silicone sealant. If you're looking specifically for a jelly bird feeder, you can adapt this same glass-and-frame approach to hold and dispense jelly safely. No glass cutting required. The safest and most beginner-friendly approach skips cutting entirely and uses the glass vessel as-is, drilling only through a metal lid or bottle cap instead of the glass itself. If you do want to drill glass, it's doable with the right diamond-tipped bit and some patience, but tempered glass is strictly off-limits and should never be drilled. This guide walks you through the full process from picking your glass to hanging the finished feeder and keeping it clean.
How to Make a Glass Bird Feeder Step by Step
Choosing the right glass and feeder design
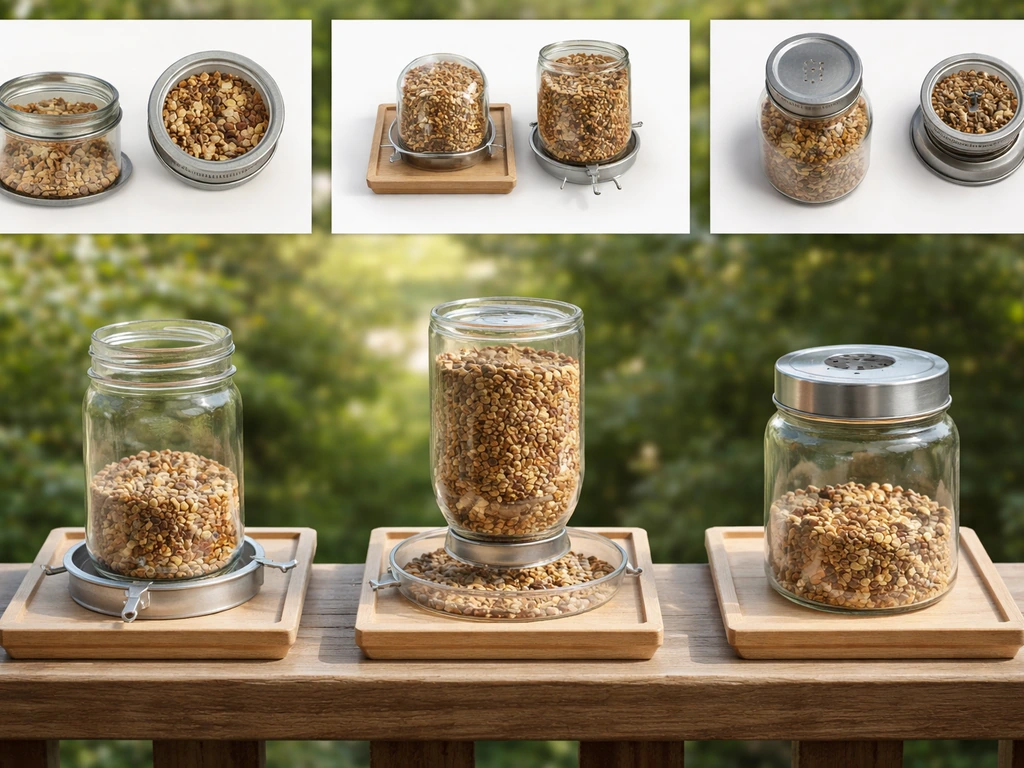
The first decision is what kind of glass to build around. The most practical options for a DIY feeder are a wide-mouth mason jar, a glass storage container with a metal lid, a recycled glass bottle (wine or olive oil bottles work great), or a shallow glass dish or plate used as a tray-style feeder. Each shape lends itself to a different feeding style. If you are set on making a willow bird feeder, look for a willow wreath or willow branches you can shape into a simple holder, then line it and hang it securely for safe access how to make a willow bird feeder.
| Glass Type | Best Feeder Style | Difficulty | Works for These Birds |
|---|---|---|---|
| Wide-mouth mason jar | Gravity/tube feeder (seeds fall into a tray) | Beginner | Finches, sparrows, chickadees |
| Glass bottle (wine/olive oil) | Gravity feeder with inverted bottle over tray | Beginner | Finches, sparrows |
| Shallow glass dish/plate | Open tray feeder | Easiest | Robins, jays, doves, most species |
| Glass storage container with lid | Platform feeder with lid drainage | Beginner-intermediate | Most seed-eating species |
| Glass lantern or hurricane globe | Decorative enclosed feeder with open bottom | Intermediate | Small songbirds |
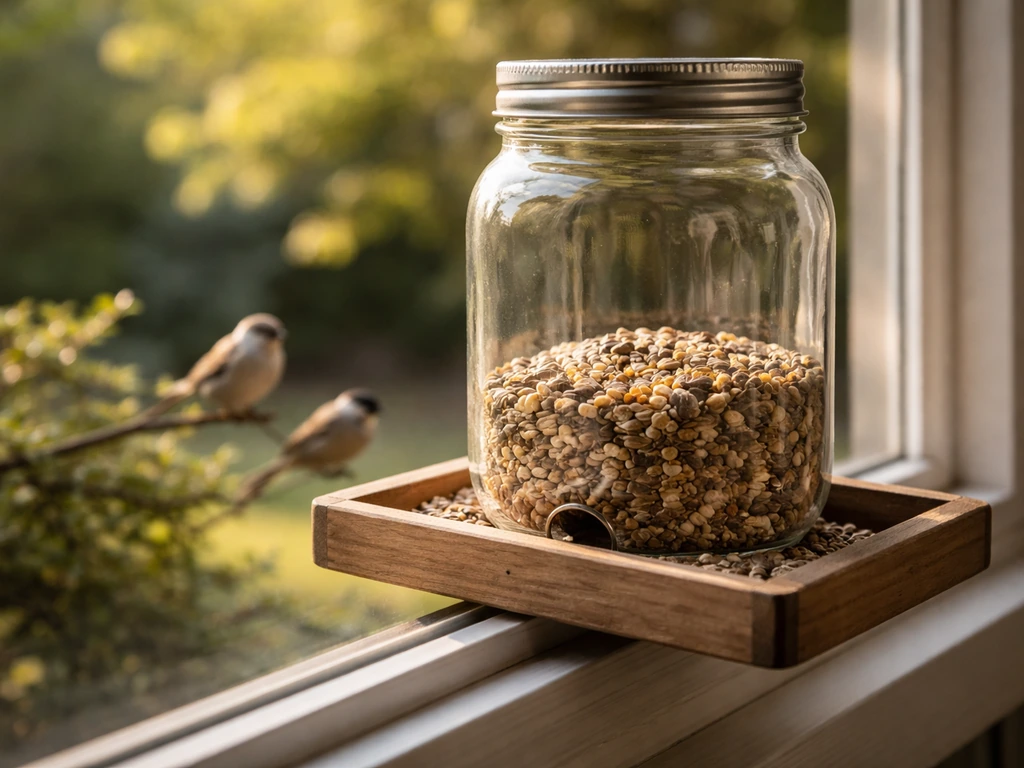
For a first build, the inverted mason jar over a wooden tray is hard to beat. You drill a small hole in the metal lid (not the glass), seeds trickle out as birds eat from the tray, and the jar refills the tray by gravity. You can apply the same jar-over-tray inverted concept to learn how to make a hopper bird feeder with a pour-in seed reservoir and gravity feed holes. You can also adapt this approach into a simple automatic feeder so it refills by gravity as birds eat automatic bird feeder. It's clean, visible, and repairable. If you want a purely recycled-glass option, an inverted wine bottle over a ceramic or wooden saucer works exactly the same way and looks beautiful.
One important design note: transparent and reflective glass surfaces can be dangerous near windows because birds struggle to perceive them as solid barriers. Audubon points out that birds cannot reliably learn to avoid reflective or transparent glass, and collisions can be fatal. If your feeder is near a window, place it closer than 3 feet to the glass rather than farther away. At that distance, birds taking off from the feeder won't build up enough speed to injure themselves if they do make contact. You can also add a frosted or textured surface treatment to the glass to increase its visibility to birds, which is the core idea behind what the Audubon Society calls 'bird-safe glass.'
Tools, supplies, and safety for glass DIY
Here's everything you'll realistically need. I've separated the 'must-have' items from the 'only if you're drilling glass' items so you can skip the drilling section entirely if that's not your plan.
Core supplies (all builds)
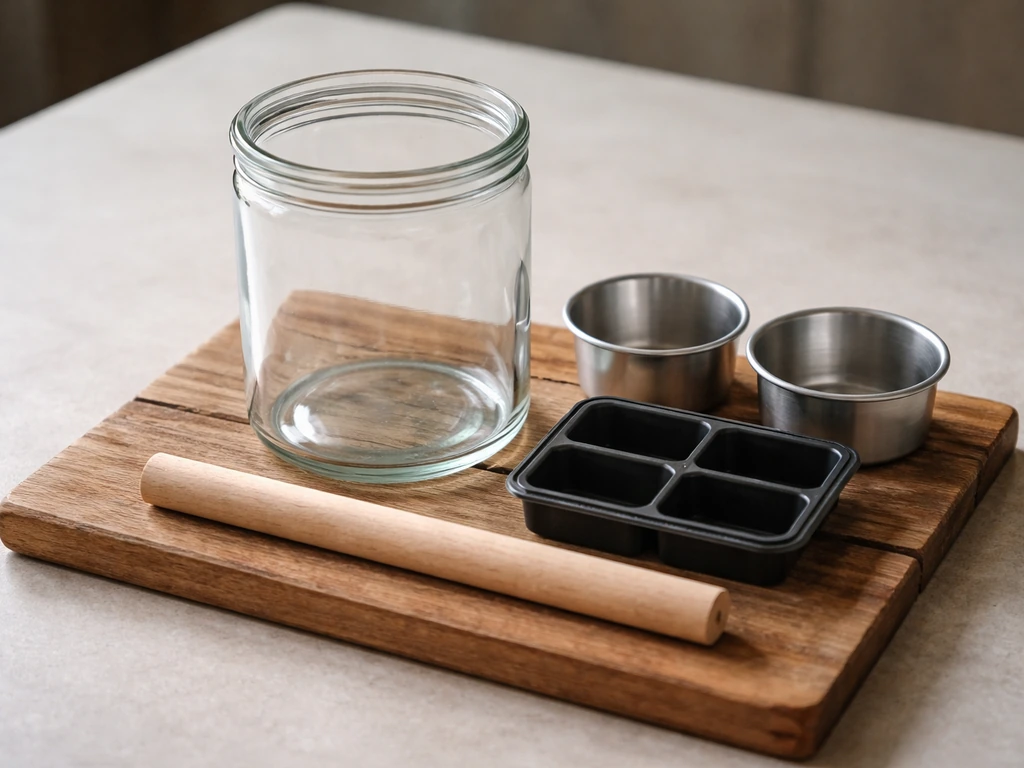
- Glass vessel of your choice (mason jar, bottle, dish, or container)
- Wooden base or tray (a cedar fence picket cut to size works perfectly and is weather-resistant)
- Food-safe, waterproof silicone sealant (100% RTV silicone is the right type; tack-free in 10 to 20 minutes, fully cured in 24 hours)
- Stainless steel or galvanized wire or eye hooks for hanging
- Wooden dowel (3/8-inch diameter) for a perch
- Exterior wood screws
- Safety glasses and work gloves (wear these any time you handle raw glass edges)
- Fine-grit sandpaper (220-grit) for smoothing wooden components
Additional tools if drilling glass
- Diamond-tipped or carbide-tipped drill bit (3/32-inch to 1/8-inch for small feeder openings, or up to 1/2-inch for larger holes)
- Cordless drill with variable speed
- Painter's tape or masking tape (to create a guide and reduce bit slipping)
- Small dam of plumber's putty or clay around the drill site (holds water at the drilling point)
- Water or cutting fluid (keep the bit continuously wet to prevent cracking and protect the diamond coating)
- Leather gloves rated for glass handling
One critical rule before you buy anything: check whether your glass is tempered. Tempered glass (the kind used in car windows, shower doors, and some storage containers) will shatter the moment you apply drilling pressure. There is no safe way to drill it at home. If your container has a label saying 'tempered' or 'safety glass,' set it aside for a different project and use a standard annealed glass vessel instead. Standard mason jars, wine bottles, and most glass bowls are not tempered and are safe to drill.
Preparing glass: how to cut, drill, and smooth edges (or skip it entirely)
The honest truth is that most DIY glass feeders don't require any cutting or drilling of the glass itself. If you design around that constraint, you save yourself time, risk, and equipment costs. But if you want to add drainage holes to a glass dish, drill a hanging hole through a bottle bottom, or create a custom feeding opening, here's how to do it safely.
How to drill glass at home
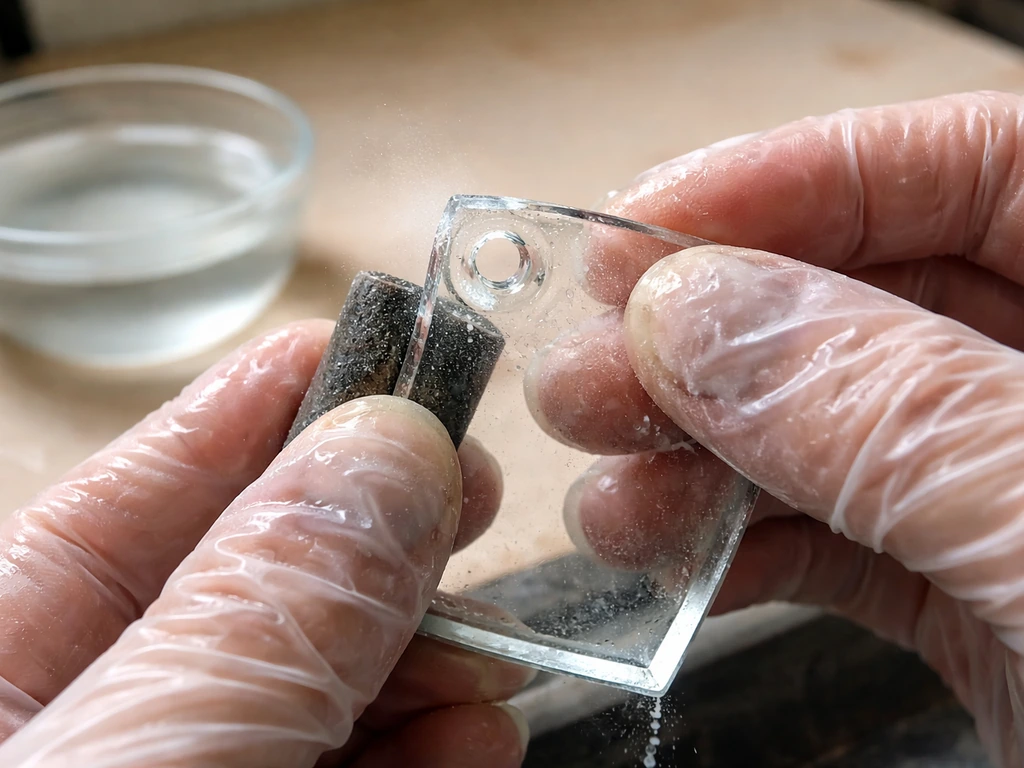
- Mark your drill point with a small piece of tape. Tape also stops the bit from skating across the glass surface when you start.
- Build a small clay or putty dam around the drill spot and fill it with water. Keeping the diamond bit continuously wet is not optional: it prevents thermal cracking and protects the coating.
- Set your drill to a low speed (around 400 to 600 RPM). High speed generates heat and breaks glass.
- Start at an angle (about 45 degrees) to create a small notch, then gradually bring the drill upright once you have a starting groove.
- Apply light, steady downward pressure. Let the bit do the work. Forcing it is how glass breaks.
- Refill the water dam as needed throughout the process.
- Once through, remove the tape and clay, rinse the glass, and inspect the hole edges carefully with gloved hands.
Smoothing sharp edges
Any time glass is cut or drilled, the resulting edge can have micro-breaks and chips that are sharp enough to cut fingers or damage hanging wire. The standard fix is edge grinding or chamfering, where the edge is worked at roughly a 45-degree angle to remove the sharpest material. At home, you can use a diamond hand pad or a small diamond file (wet) to work around the hole edge in circular motions until it feels smooth to a gloved finger. This isn't a professional polish, but it gets rid of the dangerous burrs. For a bottle rim or dish edge you didn't cut yourself, inspect it carefully anyway and run a file over any chips.
The safer alternative: build around the glass
If any of that sounds like more than you want to take on right now, just design the feeder so you never need to touch the glass with a drill. For an inverted jar feeder, all holes go through the metal lid. For a bottle feeder, the bottle sits neck-down in a drilled wooden tray and gravity does the work. The glass itself stays intact and untouched, which also means no sharp edges to worry about.
Step-by-step construction and assembly
This walkthrough covers the inverted mason jar feeder, which is the best starting point. The same principles apply if you substitute a wine bottle for the jar.
What you're building
A wooden tray with a central hole sized to fit the jar lid, a lip around the tray edge to hold seed, a perch dowel on one or both sides, and the jar inverted through the tray so seed trickles out by gravity into the tray as birds eat. The whole thing hangs from a wire attached to the tray corners or a center hook above the jar base.
Build steps
- Cut your wooden tray base to roughly 8 by 8 inches from a 1-inch-thick cedar or pine board. Cedar holds up better outdoors. Sand all edges smooth.
- Cut four 1-inch-tall strips of wood from the same board and screw them along the tray edges to form a shallow lip that keeps seed from blowing out.
- Find the center of the tray and trace the jar lid. Drill or jigsaw a circle just slightly smaller than the lid outer diameter, so the lid can rest in the hole and support the inverted jar without falling through.
- Drill a 3/8-inch hole through the side of the tray lip on one or both sides, about 1 inch from the tray surface, for the perch dowel.
- Cut your dowel to about 5 inches and push it through the holes. A snug friction fit is fine; you can add a tiny drop of waterproof wood glue if it feels loose.
- Drill small drainage holes (3/16-inch to 1/4-inch) through the tray floor in the four corners so rainwater drains out and seed doesn't sit in puddles.
- Screw a metal eye hook into each of the four tray corners, or into the center of the tray underside if you plan to hang from a single point above the jar.
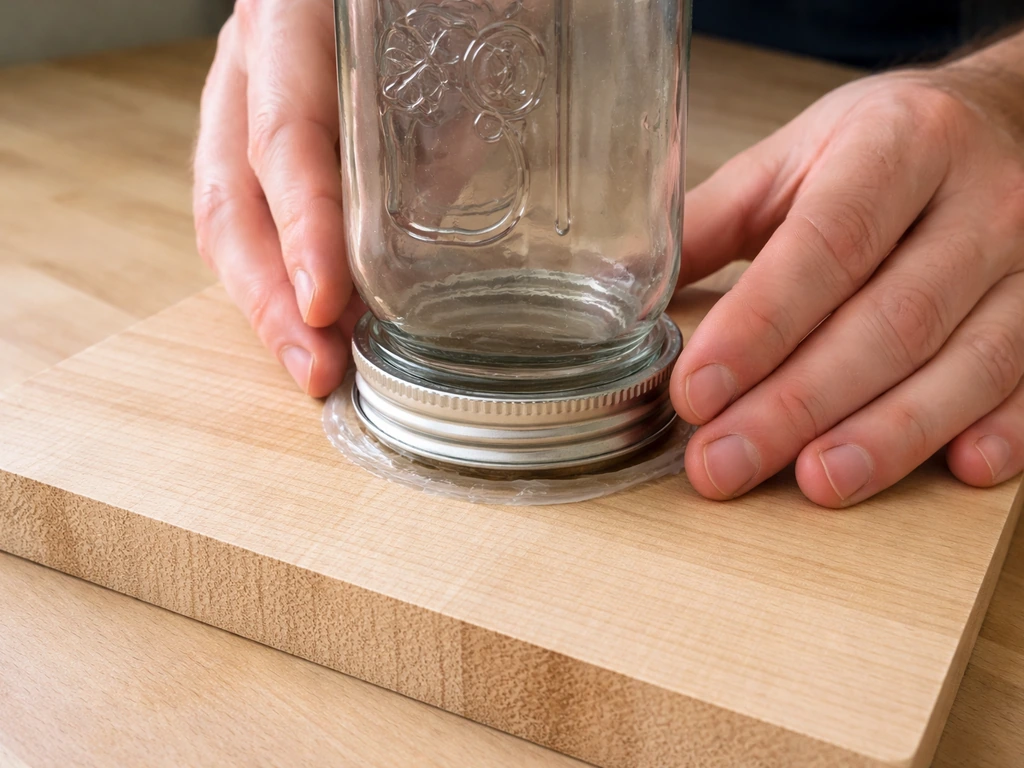
- Fill your mason jar with seed, place the metal lid loosely on top (don't fully tighten it, you want gravity to allow slow feed), and invert the jar into the tray hole. The lid rests in the hole and the jar body points upward.
- Run a bead of food-safe RTV silicone sealant around the lid-to-tray joint if you want a more stable connection. Wait the full 24-hour cure time before adding food.
- Thread hanging wire or chain through the eye hooks and bring it together above the jar base into a central loop. Twist or crimp it securely.
Total build time is roughly 1.5 to 2 hours, plus 24 hours of silicone cure time if you use sealant. The whole project can cost under $15 if you already have basic tools, and close to zero if you're using a recycled jar and salvaged wood.
Hanging and mounting for stability and bird access
Glass feeders are heavier than plastic ones, so hanging hardware matters more than people expect. A jar feeder with seed can weigh 2 to 4 pounds. Use at least 50-pound-rated galvanized wire or a sturdy chain, not thin string or twist-ties.
For placement, you want the feeder visible from a window (so you can enjoy watching birds and also monitor seed levels), but placed with window safety in mind. The 'less than 3 feet from the glass' rule is worth following if your feeder is anywhere near a window. If it's hanging from a tree or post in the middle of the yard, birds that collide with the feeder itself are unlikely to get injured since they're approaching slowly.
Height-wise, 5 to 6 feet off the ground keeps the feeder accessible for you to refill without a ladder, while being high enough to give birds a clear view of approaching predators. Hang the feeder close to cover (a shrub or tree within 10 to 12 feet) so birds have a quick escape route, but not so close that a cat can use the cover to ambush. A gap of about 10 feet between cover and feeder is a reasonable balance.
If you're mounting on a pole instead of hanging, make sure the pole is stable enough to handle wind loading. A glass feeder swinging hard in a storm can break against the pole or nearby branches. Using an S-hook with a locking clasp (rather than a plain open hook) prevents the feeder from swinging off entirely in high wind.
Filling, maintenance, and cleaning routine
Glass is actually one of the easier feeder materials to clean because it doesn't absorb odors or stain the way plastic does over time. But it still needs regular attention. The standard baseline from Cornell Lab and Audubon is to clean seed feeders roughly every two weeks, and more often in wet or humid weather when seed can mold faster.
Routine cleaning steps
- Put on rubber or nitrile gloves before handling a used feeder. Old seed and droppings can carry bacteria and fungal spores.
- Remove any remaining seed and dispose of it (don't put moldy seed back in).
- Wash all glass and wooden parts with warm water and a small amount of Dawn dish soap, which is safe for bird feeders. Use a bottle brush for the inside of the jar.
- For a deeper sanitizing clean, soak the glass parts in a 9: 1 water-to-bleach solution for a few minutes. This is the ratio recommended by the National Wildlife Health Center via Audubon for killing pathogens between birds.
- Rinse thoroughly, multiple times. Any bleach residue left behind is harmful to birds.
- Allow every component to air dry completely before refilling. Audubon is clear on this: putting food back into a damp feeder encourages mold growth almost immediately.
- While the feeder is apart, inspect the glass for cracks, chips, or new sharp edges. A cracked jar should be retired and replaced. Small chips can be re-filed smooth, but a structural crack means the jar could fail when hanging.
If your glass feeder doubles as a nectar feeder for hummingbirds, the cleaning schedule is much more frequent. Sugar water ferments fast, especially in warm weather. Plan to replace the nectar and rinse the feeder every 2 to 5 days, shortening that window as summer temperatures rise. If you're interested in building a feeder specifically optimized for nectar, that's a somewhat different design from a seed feeder.
For the wooden tray parts, re-coat with an exterior-grade, bird-safe finish every season. Uncoated cedar holds up reasonably well on its own for a year or two, but a light coat of linseed oil or exterior tung oil extends its life significantly. Check the eye hooks and wire for rust or corrosion every few months and replace anything that looks corroded.
Troubleshooting and pest-proofing
Glass feeders have some specific failure modes that plastic or wood feeders don't, and a few pest challenges worth knowing about upfront.
Common problems and fixes
| Problem | Likely Cause | Fix |
|---|---|---|
| Jar falls or tips in wind | Hanging wire unbalanced or too slack | Tighten wire, add a locking S-hook, or add a wooden brace around the jar neck |
| Seed clumps and stops flowing | Moisture getting into the jar from below | Drill smaller feed holes in the lid, or add a rain guard above the feeder |
| Condensation inside the jar | Temperature swings causing moisture buildup | Normal in cold weather; clean more frequently to prevent mold |
| Glass cracked after a hard frost | Water trapped in a micro-crack expanded when frozen | Inspect before winter, retire any cracked jars |
| Birds not visiting | Feeder too exposed or seed type wrong | Move feeder closer to cover; try black oil sunflower seed as a starting point |
| Silicone seal failing | Using the wrong silicone type or not curing fully | Use only 100% RTV silicone; allow a full 24-hour cure before loading the feeder |
Squirrels, raccoons, and other raiders
A glass feeder is actually somewhat tougher for squirrels to grip than a wooden one, but that doesn't mean they won't try. The most effective deterrent, backed by both Audubon and most backyard birding sources, is a baffle on the hanging wire or mounting pole. A dome-shaped baffle above a hanging feeder blocks squirrels and raccoons from climbing down to reach it. If you're using a pole mount, a wrap-around pole baffle at about 4 to 5 feet height does the same job from below. Keep the feeder at least 10 feet from any horizontal surface (fence, branch, roof edge) that a squirrel could jump from.
If squirrels are persistent despite a baffle, switching part of your seed mix to safflower seed is worth trying. Squirrels tend to avoid it while most songbirds accept it readily. It's not a complete solution on its own, but combined with a baffle it makes your feeder much less attractive to them.
One pest issue specific to glass feeders is that the clear vessel attracts wasps and bees, especially if you're using any kind of sugar-water or fruit-based feed. If wasps become a problem, moving the feeder to a shadier spot and cleaning the outside of the glass thoroughly after each refill (wasps follow scent trails) usually reduces the issue. Avoid any feeder designs with yellow components, as yellow is a color wasps are strongly attracted to.
Finally, keep the ground under the feeder clean. Spilled seed on the ground draws rodents, which in turn can attract larger predators that stress the birds using your feeder. A simple ground tray or regular raking keeps the area tidy and makes the whole setup work better over time.
FAQ
Can I use any recycled glass jar or bottle, or should I choose specific types?
You can use many types, but avoid anything labeled tempered or safety glass, since it can’t be drilled without shattering. Also check for cracks, chips, or chips near the area you’ll mount or drill through, because pre-damage can turn into failure when you hang the feeder and it bounces in wind.
What size hole should I drill in the metal lid for an inverted jar feeder?
For most mixed seed, start with small pilot openings in the lid, then enlarge gradually so seed trickles rather than dumps. If you use very fine seed (like millet), make the openings slightly smaller to reduce clogging and bridging in the tray.
How do I prevent the seed tray from clogging or bridging over time?
Keep the lid opening and tray entry area free of stuck hulls by giving the tray a quick shake or brush-off when you refill. If you notice consistent blockage, reduce hole size (for lid-drill designs) or switch to a seed mix with fewer dust-fine particles that settle.
Is silicone sealant required, and can I skip it?
It’s not always necessary if your jar is simply sitting in the frame and only gravity holds the sealant-free parts, but sealant helps where you intentionally create joints or contact points to stop wobbles. If you use sealant, let it cure fully (about 24 hours) before filling, and confirm it’s labeled food-safe and fully cured rather than tacky.
What kind of perch should I use, and how far should it sit from the tray?
Use a smooth dowel or a natural wood perch without splinters, sized so claws can grip comfortably (not razor-thin). Position it so birds can land without standing in seed waste, typically with the perch roughly level with the tray floor or slightly above it to reduce mess on the glass.
How do I keep birds from getting hurt if the feeder gets bumped or twisted?
Use rated wire or chain, tighten all attachment points, and leave a little slack so the feeder can sway without pulling on the jar. Recheck the hardware after the first couple of days, then periodically, especially at transitions from calm weather to windy storms.
Do I need to add drainage holes if I use a glass dish or tray-style feeder?
If the glass dish can hold standing moisture (like from rain or condensation), drainage holes or a slight tilt prevents seed from turning wet and moldy. If you cannot add drainage safely, bring the feeder under cover during rainy stretches or use smaller seed loads and refill more frequently.
What should I do if my drilled lid opening starts widening over time?
Metal lids can deform from repeated insertion/removal or vibration. Avoid removing the lid repeatedly, inspect the hole edge each refill for sharpness or distortion, and replace the lid if it becomes oval or ragged so seed flow stays consistent.
How close can I place the feeder to a window if I want easy viewing?
Follow the nearby window safety guideline and generally keep the feeder less than about 3 feet from the glass if it’s near a reflective surface. If you prefer greater spacing for viewing comfort, add visual barriers or use a textured or frosted treatment to improve visibility, since transparent and reflective glass increases collision risk.
Will the feeder work in winter, and can I use suet or other foods?
Seed and dry foods are usually workable if you keep moisture out, but many seed mixes become a problem in prolonged wet weather. For winter, consider placing the feeder closer to cover for safety and clean more often to prevent mold; suet is typically a different feeder design because it’s heavy and can drop or soften quickly.
Can I convert a seed feeder into a jelly or nectar setup safely?
You can adapt the overall glass-and-frame concept, but jelly and nectar are more likely to attract insects and ferment, so you’ll need tighter cleaning discipline and a design that prevents runny feed from spreading on the outside. For nectar, plan on much more frequent rinsing and replacing, and avoid any components that could trap residue.
How do I clean the feeder without scratching or leaving residue on glass?
Use warm water and a brush, then rinse thoroughly. Avoid abrasive pads that can dull the glass and increase residue buildup, and make sure all food-contact surfaces are fully dry before refilling, especially in humid weather to reduce mold.
What can I do about wasps and bees besides moving the feeder?
Clean the outside of the glass after each refill, because scent trails guide insects. Also keep the feeder away from yellow accents and avoid sugary or fruit-based foods unless you can commit to frequent cleaning and close monitoring.
How can I reduce seed waste under the feeder?
Add a simple ground tray or regularly rake spilled seed, because excess debris attracts rodents and can raise predation pressure. If you use a tray, empty it frequently and keep it dry so it does not become a nesting area for pests.
How far should the feeder be from branches or fences to help with squirrel access?
Keep it at least about 10 feet from horizontal launch points like branches, fence tops, and roof edges. Even with a baffle, squirrels can reach jump distance quickly from elevated surfaces, so clearance from above matters as much as clearance around the sides.
How to Make a Ceramic Bird Feeder: Step by Step
Step-by-step guide to make a bird-safe ceramic feeder today, with materials, firing or assembling options, and troublesh