Assembling a Squirrel Buster Standard bird feeder takes about 10 minutes once you have all the parts in front of you. The basic sequence is: seat the Shroud Assembly over the Seed Tube Assembly, insert the hanger hook through the top, slide the Negative Grip tube over that hook, and hang it up. After that, you confirm the spring sensitivity setting and test it with a bit of hand pressure before any squirrel gets a chance. That's the whole thing.
How to Assemble Squirrel Buster Standard Bird Feeder

Marcus Brennan
30 Apr 2026
The details below walk you through each step, what can go wrong, and how to keep it working season after season. The details below walk you through each step, what can go wrong, and how to keep it working season after season how to open bird feeder.
Confirm the parts list and tools you need
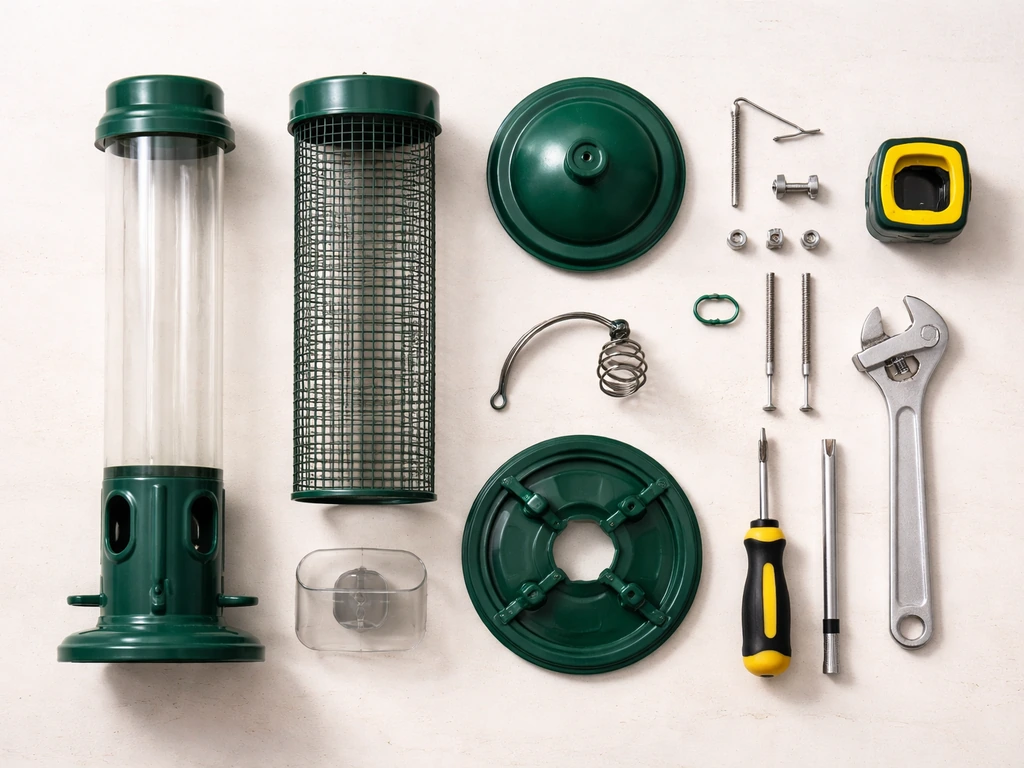
Before you start snapping anything together, lay every piece out on a flat surface and cross-check against the manufacturer's parts diagram. The Squirrel Buster Standard (model 1057-253) ships with four main assemblies and one additional component. If anything is missing or cracked, Brome sells individual replacement parts by part number, so you can fix it without buying a whole new feeder.
| Part | Part Number | What It Does |
|---|---|---|
| Perch | 1057-7 | Provides a landing spot at each of the 4 seed ports |
| Hanger Assembly | 1057-40 | The hook and trigger mechanism that activates the squirrel-proof action |
| Shroud Assembly | 1057-41 | The metal mesh cage/skirt that drops to block seed access under squirrel weight |
| Seed Tube Assembly | 1057-48 | The main body that holds up to 1.3 lbs of seed and houses the 4 feeding ports |
| Additional component | 1057-253 | Listed separately on the parts diagram; verify it is present in your box |
You will not need any tools for the actual assembly. No screwdrivers, no pliers, nothing. The feeder is designed to go together and come apart by hand, which also makes cleaning much easier later. The only thing worth having nearby is the instruction sheet or user guide, because the Negative Grip tube and hanger hook need to be oriented correctly, and the diagram makes that obvious at a glance.
Step-by-step assembly of the Squirrel Buster Standard
Work on a table or countertop so small parts do not roll away. The whole process is four steps, and each one clicks or seats into place with firm hand pressure.
- Start with the Seed Tube Assembly (1057-48). Make sure the 4 feeding ports are clear and the perches (1057-7) are inserted at each port. The perches push straight in and should sit flush. If one feels loose, it is not fully seated yet.
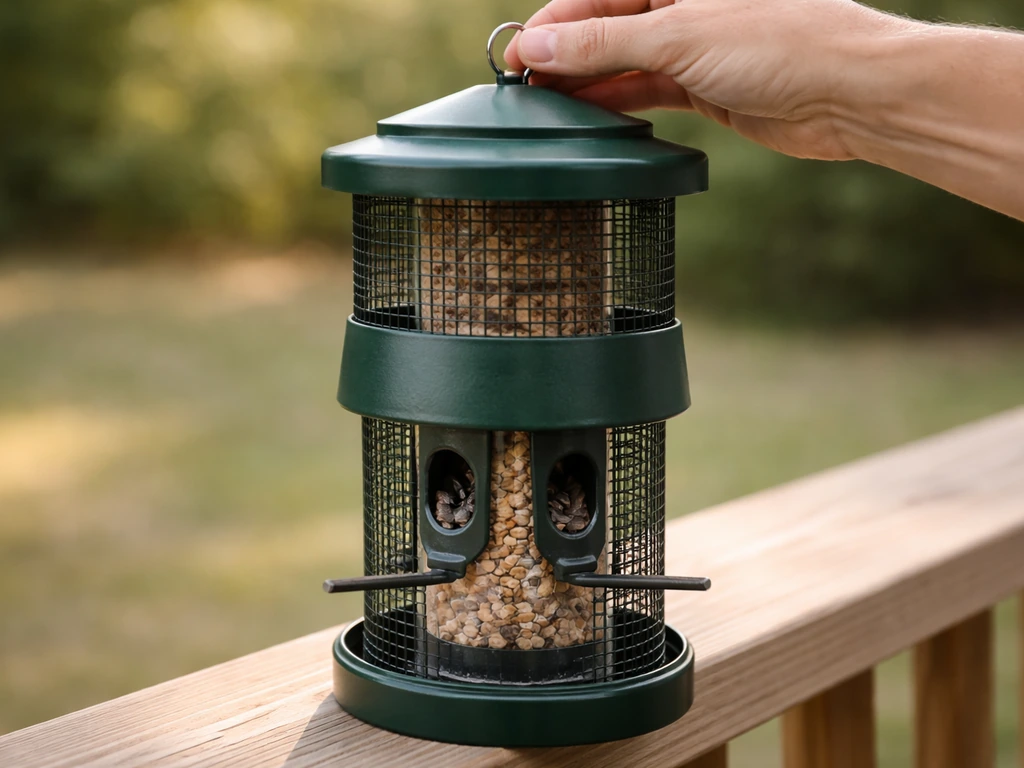
- Replace the Shroud Assembly (1057-41) over the Seed Tube. The metal mesh shroud slides down over the tube from the top. It should sit level and move freely up and down with light finger pressure. That movement is the whole mechanism, so if it is stiff or binding, something is misaligned. Lift it off, reseat the tube, and try again.
- Insert the hooked end of the Hanger Assembly (1057-40) down through the top of the feeder. The hook passes through the shroud's top opening and locks into the seed tube's hanging point. You will feel it seat. Give it a gentle tug to confirm it is not just resting there.
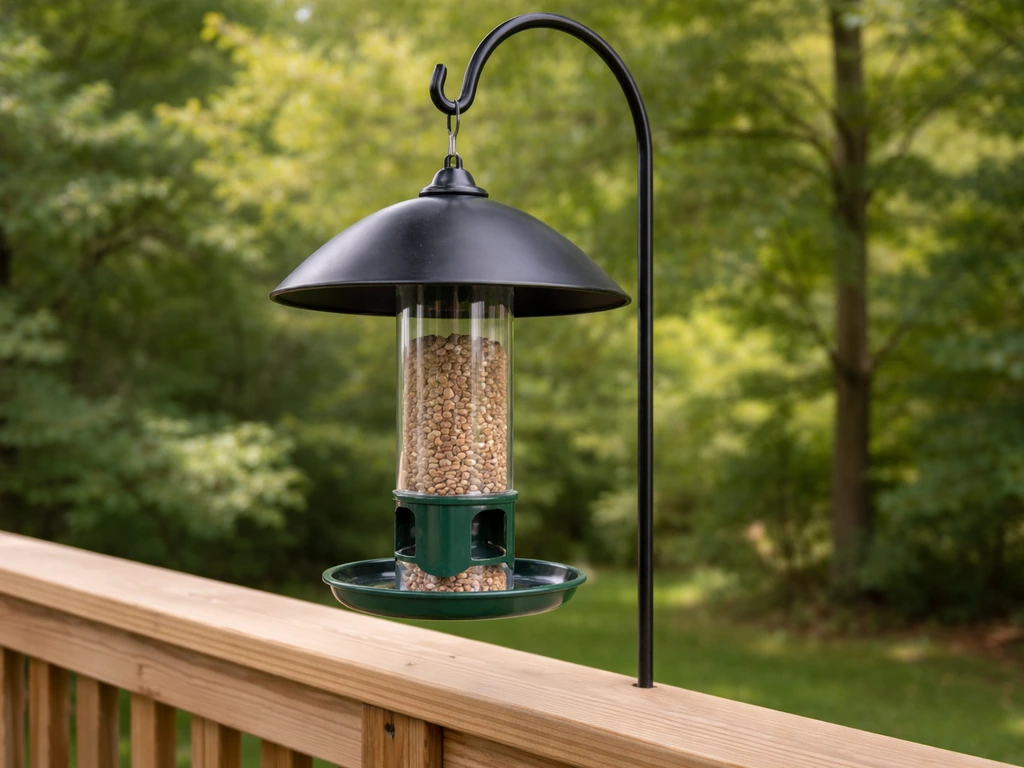
- Slide the Negative Grip tube over the hanger hook from above. This is the part that locks the hanger in place and keeps the feeder from pulling free of the hook when hanging. Slide it down firmly until it stops. The feeder is now mechanically assembled and ready to hang.
At this point the shroud should hang freely around the seed tube, not pressing against the ports. If you push up on the shroud from below, it should rise and then drop back down cleanly under its own weight. That spring action is what blocks squirrels.
Set up the hanger system and positioning for birds
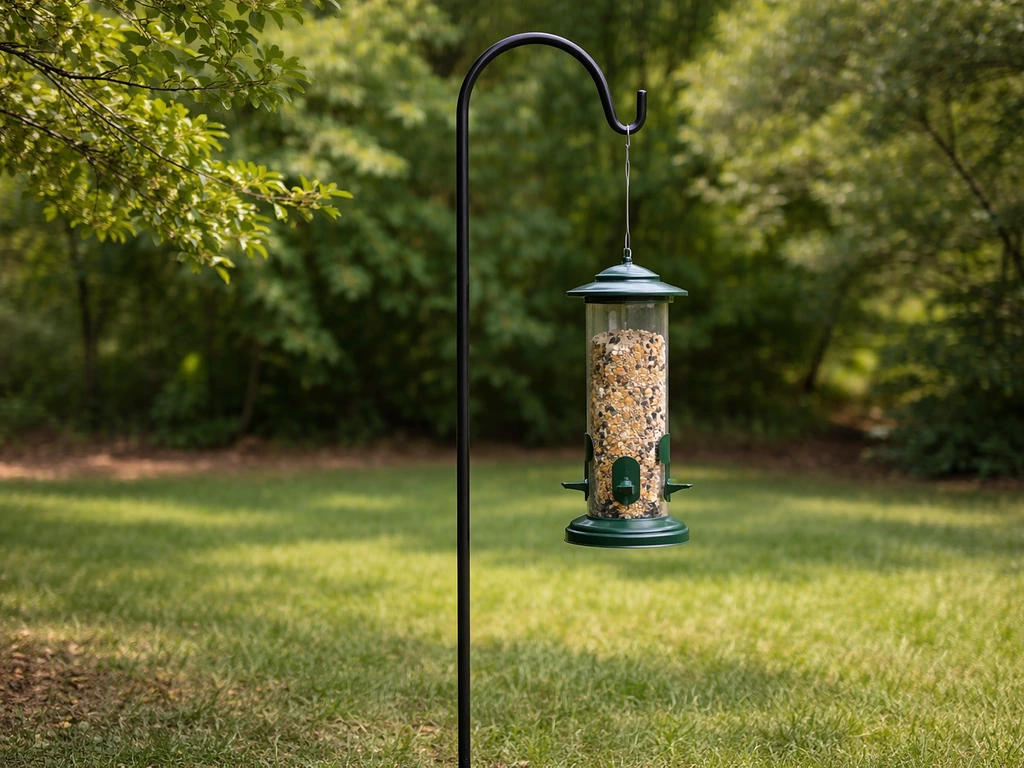
Where and how you hang the feeder matters as much as how you assembled it. If you are starting from scratch, follow the steps in our guide to learn how to install bird feeder safely and correctly how you assembled it. If you want the full walkthrough on how to set up a bird feeder, start with the assembly steps and then finish by placing the hanger system correctly for birds how to set up bird feeder.
The squirrel-proofing on this feeder relies on the spring mechanism, but that only works if squirrels cannot simply jump onto it from a nearby surface. General guidance from backyard birders: hang the feeder at least 5 feet off the ground, at least 10 feet horizontally from any tree branch, fence, roof edge, or other launch point a squirrel could use.
If you want a simple way to get started, follow these steps on how to use a bird feeder and choose a location that keeps squirrels from easily accessing it.
The Hanger Assembly is designed to hang from a standard shepherd's hook, a wire, or a hook screwed into a beam or overhang. Once you have your hanging point sorted, simply loop or hook the top of the Hanger Assembly onto it. There is no secondary locking step needed. The Negative Grip tube you slid on in the last assembly step is what keeps the feeder body secure on the hook during use.
For bird access, hang the feeder where you can actually see it from a window. Birds take anywhere from a few hours to a couple of weeks to discover a new feeder, but placement in a spot with some nearby shrub or tree cover (within 10 to 15 feet, not right next to it) gives them a safe perch to approach from.
The Squirrel Buster Standard listing from Brome US also emphasizes hanging the feeder around the yard with clearance considerations near areas like windows, trees, decks, and rain-troughs placement in a spot with some nearby shrub or tree cover (within 10 to 15 feet, not right next to it). Open exposure with no cover nearby tends to slow adoption, especially for shyer species.
Adjust feeding ports, clearance, and baffle fit
The Squirrel Buster Standard's shroud doubles as the baffle: it is the metal mesh cage that drops down and closes off the seed ports when something heavy (like a squirrel) grabs the feeder. If your feeder model uses a separate baffle, installing it correctly will further prevent squirrels from reaching the seed install a baffle on a bird feeder. For this to work correctly, the shroud needs to move freely through its full range of travel, and the gap between the shroud's bottom edge and the seed ports needs to be properly set.
The factory setting is calibrated for average-sized squirrels and typical songbirds. You will see an indicator line and a red nut on the hanger mechanism. The red nut is your reference point that the feeder left the factory correctly set. Do not move it unless you are intentionally adjusting sensitivity. The green dial next to it is what you actually turn to change weight response: rotate it anticlockwise to deter heavier birds (like large grackles or pigeons) from triggering it, or clockwise to be more permissive and let heavier birds feed without the shroud dropping.
For most backyard setups with sparrows, finches, chickadees, and nuthatches, the factory setting works fine right out of the box. Only adjust the green dial if you are seeing birds set off the mechanism or squirrels are getting through without triggering it.
Testing: verify squirrel-proof performance and bird access
Before you fill the feeder with seed, do a quick manual test to confirm everything is working. Hold the assembled feeder by the hanger with one hand and push up on the shroud from below with the other hand. It should rise smoothly and drop back down freely when you let go. If it sticks or grinds, disassemble and check that no part of the shroud is catching on the seed tube.
Next, simulate squirrel weight. Grip the shroud firmly as if you were a squirrel hanging on it and pull down. The shroud should drop to cover the seed ports completely, cutting off access. When you release, it should spring back up and reopen the ports. If the ports stay covered even after you release, the spring tension needs to be checked. In most cases this means the Hanger Assembly was not fully seated and the spring is not engaging.
Fill the feeder about halfway for the first fill (roughly 0.6 lbs of seed) and hang it. Watch it for a day or two before declaring success. The real test is a squirrel actually landing on it. You want to see the shroud drop within a second or two of the squirrel grabbing on, and return to the open position once the squirrel leaves. If a squirrel is hanging on it and still reaching seed, move to the adjustment section and try tightening the sensitivity via the green dial.
Common installation and assembly issues and how to fix them
Most problems with this feeder come down to one of a handful of recurring issues. Here is what to look for and what to do.
- Shroud is stiff and does not move freely: The most common cause is the shroud not sitting centered on the seed tube. Lift the shroud off completely, check the tube for any warping or debris around the top rim, and reseat the shroud. It should drop into place with gravity alone.
- Hanger hook will not seat properly: If the hook is not going through the shroud's top opening cleanly, check whether the shroud is twisted slightly. Rotate it so the openings line up, then try reinserting the hook.
- Negative Grip tube keeps slipping: Make sure you slid it all the way down over the hook until it physically stopped. A halfway-down Negative Grip tube looks seated but will let the feeder swing loose.
- Squirrels are still getting seed: First check clearance. If the feeder is within jumping distance of any structure, the squirrel is bypassing the mechanism entirely by jumping directly to the ports without triggering the weight sensor. Relocate the feeder. If location is not the issue, rotate the green dial anticlockwise slightly to increase sensitivity.
- Birds are not visiting: Give it more time, especially if this is a new location. If birds were using a different feeder nearby, try temporarily placing the Squirrel Buster Standard right next to the old spot so birds discover it naturally.
- Feeder swings excessively in wind and spills seed: Add a short length of chain or cord between your hook and the hanger to reduce direct swinging. Some birders also thread the hanger cable through a short piece of PVC pipe before hanging, which adds weight and stability.
- Ports are clogged after rain: This usually means wet seed is compacting inside the tube. Fully disassemble and clear the ports with a toothpick. Going forward, use a feeder roof or weather baffle above the hanger point to reduce rain exposure.
Maintenance and seasonal troubleshooting
Brome recommends cleaning the feeder every 2 to 3 weeks during active use. Brome’s official product-support page for the Squirrel Buster Standard is where you can find their guidance and support materials for the feeder Brome recommends cleaning the feeder every 2 to 3 weeks during active use.. Their official cleaning method is straightforward: fully disassemble the feeder, soak all parts in a 1:10 bleach-to-water solution for at least 15 minutes, then wash with warm soapy water, rinse thoroughly with tepid water, and air-dry completely before refilling. Do not reassemble or refill while any part is still damp. Wet seed molds fast and can make birds sick.
During disassembly for cleaning, use a toothpick to clear any seed or debris from the ventilation system at the bottom of the feeder. This is a small detail that makes a real difference. Blocked ventilation leads to seed clumping and faster spoilage, which then causes the ports to jam.
Seasonally, there are a few things worth checking. In winter, the shroud mechanism can slow down if ice builds up around the top of the seed tube where the shroud slides. If the shroud is sluggish after a freeze, bring the feeder inside for 20 minutes to thaw before reassembling and rehanging. In summer, direct sun exposure causes some plastic components to expand slightly, which can make the shroud feel stiffer than usual. If your feeder is in full sun all day and the mechanism starts feeling tight, try a shadier hanging spot.
Once a season (spring and fall are good checkpoints), pull the feeder apart and inspect the spring in the Hanger Assembly for any signs of rust or deformation. A weakened spring will not close the shroud reliably under squirrel weight. If the spring looks compromised, Brome sells the Hanger Assembly (1057-40) as a separate replacement part. Swapping it out is the same four-step process as the original assembly.
One last tip: if you are setting the feeder up for the first time after storing it over winter, run through the full assembly sequence slowly and do the manual shroud test before filling. Parts can shift or warp slightly in storage, and five minutes of checking before the birds show up is easier than diagnosing a problem once the feeder is full and hanging eight feet in the air.
FAQ
My shroud feels stiff or doesn’t drop smoothly after assembly, what should I check first?
Recheck that the Shroud Assembly is fully seated over the Seed Tube Assembly, then confirm the hanger hook is oriented the same way as the parts diagram. If you see any rubbing points or the shroud does not “float” around the ports, disassemble and look for a Negative Grip tube that was slid on without sitting flat on the hook.
How do I adjust sensitivity if squirrels are reaching seed but birds can still feed?
Do not rely on the green dial alone. If the feeder opens under squirrel weight, set the green dial slightly toward more sensitivity (small clockwise changes), then run the manual lift and drop test again before watching real squirrel trials. Make only one direction change at a time so you can tell what fixed it.
Can I assemble or refill the feeder right after cleaning?
Yes, but you must keep it fully functional and dry. If any components are damp after cleaning, let them air-dry completely before reassembly, wet seed molds quickly and can also make ports sticky, which can mimic a mechanical failure.
What should I do if the ports look closed but seed still clumps or the mechanism sticks?
If the ports jam with shroud travel, clear the ventilation area at the bottom with a toothpick during disassembly, then re-check that the shroud can move through its full range without catching on the seed tube. Jamming is often debris or clumped seed, not just spring strength.
Will it work on any hanging wire or do I need a specific hanger setup?
Use a standard shepherd’s hook or a properly sized wire, and make sure the hanger is vertical when loaded. If the hook is tilted, the Negative Grip tube can hold the feeder in a way that reduces shroud travel, leading to inconsistent squirrel blocking.
How can I test the feeder’s squirrel-proofing before putting it outside?
If you need to confirm the mechanism is ready without waiting for squirrels, do a full manual cycle test (lift, release, then simulate weight by pulling down). A successful test should reopen under its own spring action immediately and fully.
Squirrels are getting better at bypassing it, how do I stop them without over-adjusting?
For squirrels that seem to “learn” the feeder quickly, the usual fix is placement and sensitivity together. First, move the feeder farther from launch points (especially trees, fences, roof edges). Then adjust the green dial in small steps, re-test, and re-watch for 1 to 2 days.
What if large birds keep triggering the shroud too often?
The spring mechanism is calibrated for typical songbirds and average squirrel size, so heavy non-target birds can trigger it. If large birds are repeatedly setting it off, rotate the green dial anticlockwise slightly and re-run the manual tests to ensure the shroud still closes promptly under heavier weight.
How full should I fill it at first, and how long should I observe before changing settings?
Start with about a half fill so you can observe feeding behavior and mechanism response without extra seed weight masking a sticking issue. After placement, watch for a day or two, then do another check if you see inconsistent shroud drops during real squirrel attempts.
If a part is missing or damaged, what should I replace instead of buying a whole new feeder?
The most common “missing replacement part” scenarios are the Negative Grip tube, hanger assembly, or a damaged shroud component. Cross-check your kit against the parts diagram before assembly, and use the manufacturer’s part numbers to replace only the broken piece rather than the full feeder.