You can build and mount a wall-mounted bird feeder in a single afternoon using basic lumber, a few hardware-store screws, and a drill. The core idea is simple: build a small tray or hopper-style feeder from 1x6 cedar or pine, add drainage holes and a lip to keep seed in place, then fasten it directly to a fence, exterior wall, or siding using L-brackets or lag screws rated for outdoor use. Mount it at around 5 feet off the ground, at least 3 feet from any window (or more than 30 feet away if possible), and you have a feeder that stays put through wind, rain, and the occasional squirrel attempt.
How to Make a Wall Mounted Bird Feeder Step by Step

Marcus Brennan
2 Jun 2026
Pick the best wall-mounted feeder style and materials
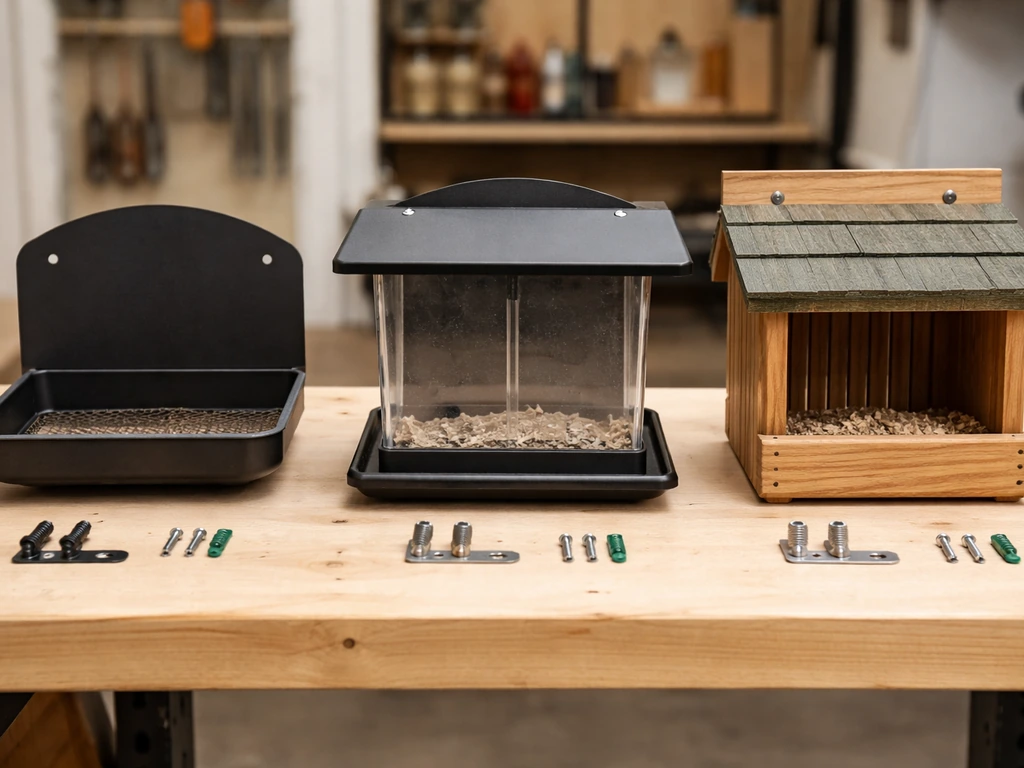
Before you cut anything, decide what kind of feeder you're actually building. Wall-mounted feeders fall into three practical categories: tray feeders (open platform, easiest to build), hopper feeders (enclosed box with a feeding slot, better for seed freshness), and repurposed container feeders (plastic bottles, milk jugs, or similar). Each has real trade-offs.
| Style | Best for | Main pro | Main con |
|---|---|---|---|
| Tray/platform | Beginners, large birds like jays and mourning doves | Fastest to build, easiest to clean | Seed exposed to rain and debris |
| Hopper box | Most backyard birds, seed freshness | Protects seed, looks tidy | More cuts and assembly required |
| Repurposed bottle/jug | Budget builds, quick projects | Near-zero cost, lightweight | Shorter lifespan, harder to mount securely |
For a first wall-mounted build, I recommend the tray feeder. It takes about an hour to assemble, uses a single 6-foot 1x6 board (cedar is ideal because it resists rot, but treated pine works too), and is dead simple to clean. If you want something fancier, the hopper is a great second project. Avoid pressure-treated lumber that contains arsenic compounds near bird food; look for ACQ-treated wood or just use untreated cedar.
For repurposed builds, a 2-liter plastic bottle or a plastic milk jug can become a wall-mounted feeder if you cut feeding ports and secure it to a backing board first. The backing board is what actually mounts to the wall, so don't skip it. These are lightweight and cost nothing, but they'll degrade in UV light within a season or two and can be harder to refill neatly.
If you've looked at making a hanging version out of similar materials, the wall-mount just replaces the rope or hook with a rigid bracket. If you want a hanging bird feeder instead, you can adapt the same basic tray or hopper design and use a sturdy hook, chain, or rope with an appropriate clearance from the ground hanging version.
If you prefer a hanging setup instead, learn how to hang a bird feeder with rope so it stays level and safe from sway.
Tools, supplies, and safety before you start
Getting your materials together before you start saves a lot of back-and-forth. Here's everything you'll need for a basic cedar tray feeder with wall mounting hardware:
- One 6-foot length of 1x6 cedar or pine board (roughly $8-12 at most hardware stores)
- Exterior wood screws, 1.5-inch and 2.5-inch lengths
- Two galvanized or stainless steel L-brackets (at least 3-inch arm length)
- Appropriate wall anchors or lag screws for your surface (see mounting section below)
- Exterior wood glue (optional but adds strength at joints)
- Sandpaper, 80-grit and 120-grit
- Exterior wood finish or paint rated for outdoor use (avoid lead-based products)
- A drill with a 1/4-inch bit for drainage holes and a bit sized for your screws
- Tape measure, pencil, and a speed square
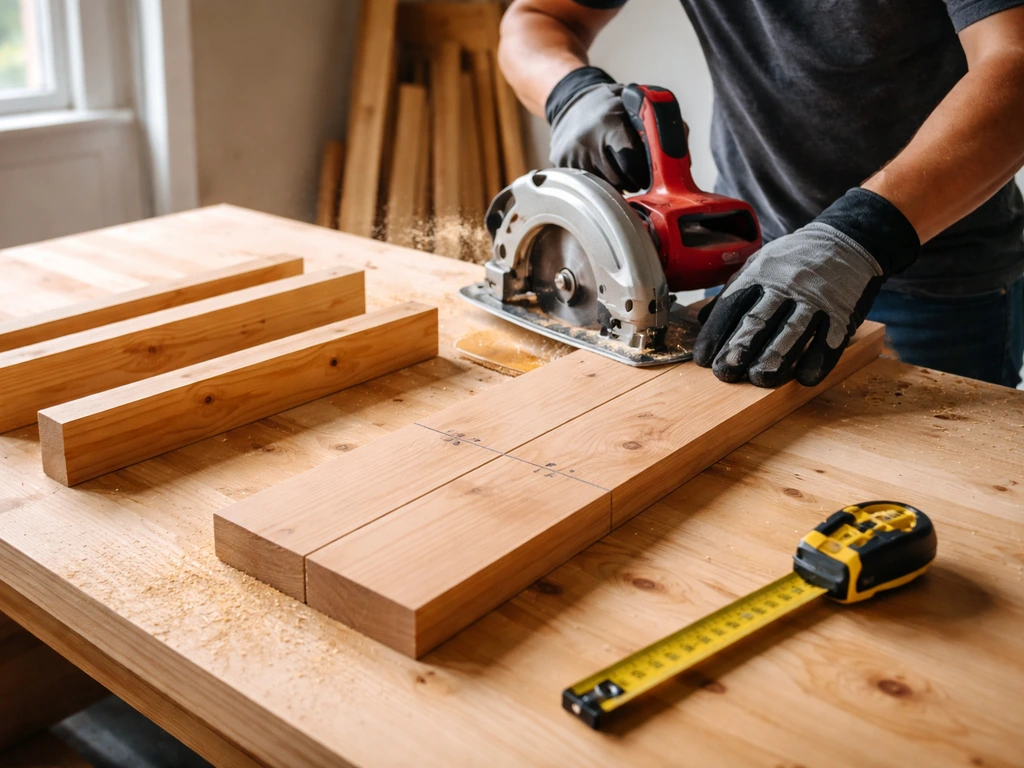
- Saw: a miter saw is easiest, but a circular saw or even a hand saw will work
- Safety glasses and work gloves
On safety: always wear eye protection when drilling into masonry or cutting wood. If you're mounting into brick or stucco, a hammer drill makes the job much easier and reduces the chance of cracking the surface. Check that your exterior wall doesn't have hidden wiring or plumbing where you plan to drill. A cheap stud finder doubles as a wire detector for most exterior wood-framed walls.
Build steps for a wall-mounted feeder
This build creates a tray feeder approximately 12 inches wide by 16 inches long with a 1.5-inch lip around three sides (the wall side stays open so it sits flush). Total build time: 60 to 90 minutes including drying time for glue. If you want the same idea with pinecone-shaped materials, you can follow a similar step-by-step approach for how to make a pinecone bird feeder wall-mounted feeder.
- Cut your 1x6 board into: one 16-inch base, two 12-inch side rails, and one 14.5-inch front rail (the front rail runs between the two sides, so it's slightly shorter than the base width).
- Sand all pieces with 80-grit first, then finish with 120-grit. Pay attention to edges where birds will perch.
- Drill five or six 1/4-inch drainage holes through the base panel, spread evenly. This is non-negotiable. Pooled water rots seed fast and can make birds sick.
- Apply a thin bead of exterior wood glue to the bottom edge of each side rail, then screw them flush to the long edges of the base using 1.5-inch screws (two screws per rail). Clamp or hold in place while you work.
- Attach the front rail across the front edge of the base the same way. You now have a three-sided tray with an open back.
- Optional but useful: drill one or two 3/8-inch holes near the front corners of the base and thread a short length of stainless wire or a small dowel through as a perch.
- Let glue cure for at least 30 minutes. Sand any rough joints.
- Apply exterior finish or paint to all surfaces. Let it dry completely (usually 24 hours) before adding seed or mounting. Skipping this step is the number-one reason DIY feeders warp or rot within a year.
- Once the finish is cured, attach your two L-brackets to the back edge of the base, one near each end, with the upright arm of each bracket facing away from the tray (pointing up and back toward the wall). Use 1.5-inch screws here.
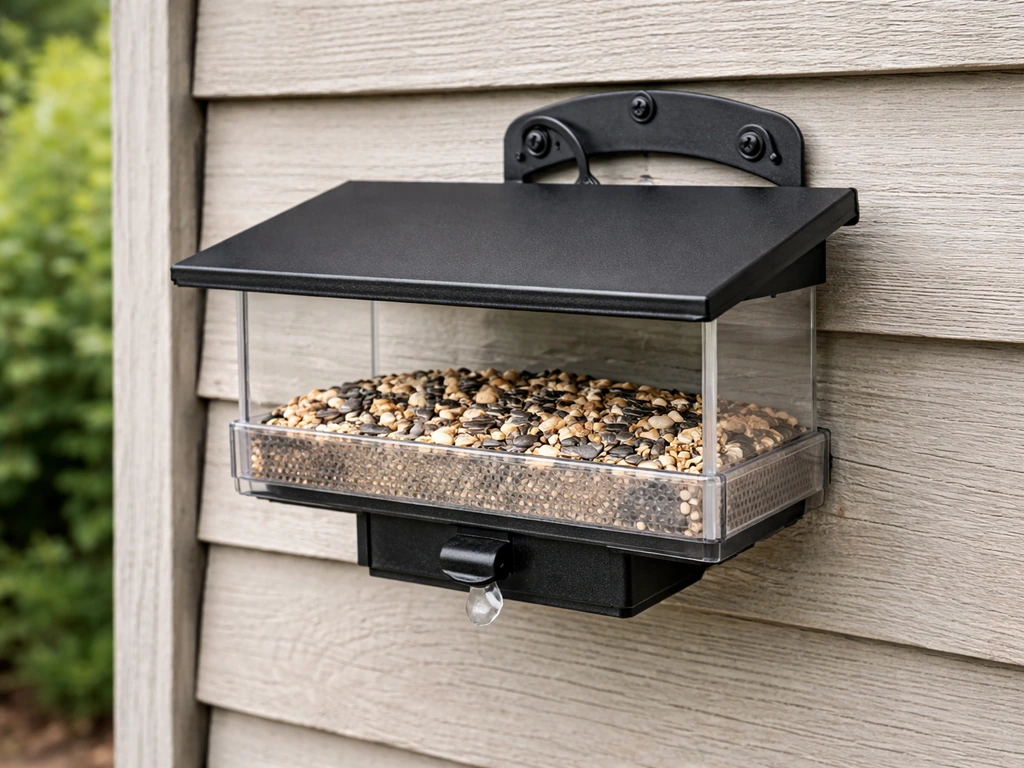
If you're building a hopper-style feeder instead, the base and side construction is the same, but you'll add a back panel, two angled roof panels, and cut narrow feeding slots along the bottom of the side panels (about 3/8 inch high and 4-6 inches wide works for most seed). The roof should overhang the front by at least 3 inches to keep rain off the seed. Add a piano hinge at the roof ridge so you can open it for refilling, and you have a functional hopper.
Wall mounting methods and hardware by surface type
This is where a lot of DIY feeders fail. The feeder is fine, but the mounting pulls out of the wall in the first windstorm. Match your hardware to your surface:
| Surface type | Best hardware | Key tip |
|---|---|---|
| Wood siding or fence boards | 2.5-inch exterior lag screws into studs or fence rail | Find the stud or fence rail before you drill. Screwing into siding alone won't hold weight over time. |
| Brick or concrete block | Masonry anchors (sleeve anchors or wedge anchors) with 1/4-inch or 3/8-inch bolts | Use a hammer drill with a carbide-tipped masonry bit. Drill to the anchor's required depth, blow out dust, then tap anchor in. |
| Stucco | Plastic expansion anchors with stainless screws | Go slow drilling; stucco cracks easily. Seal around the anchor with exterior caulk after mounting. |
| Vinyl siding | Not ideal for direct mounting. Attach a pressure-treated 2x4 backer board to studs first, then mount feeder to the backer. | Vinyl flexes and can crack under load. The backer board distributes weight safely. |
Once your anchors or screws are in the wall, hold the feeder's L-brackets against them and mark the bolt holes. Pre-drill those holes in the brackets if they aren't already slotted. Use a level to make sure the tray sits flat before you tighten everything down. A slightly tilted tray means seed slides to one corner and drainage holes stop working properly.
For fence mounting specifically, the same L-bracket method works perfectly. Screw directly into the top horizontal rail of the fence for a solid anchor. If you want the feeder to extend out from the fence rather than sit flat against it, use a short horizontal arm (a length of 2x2 lumber works) sandwiched between the fence and the feeder brackets. This gives birds more approach room from the front.
Placement tips for bird access and comfort
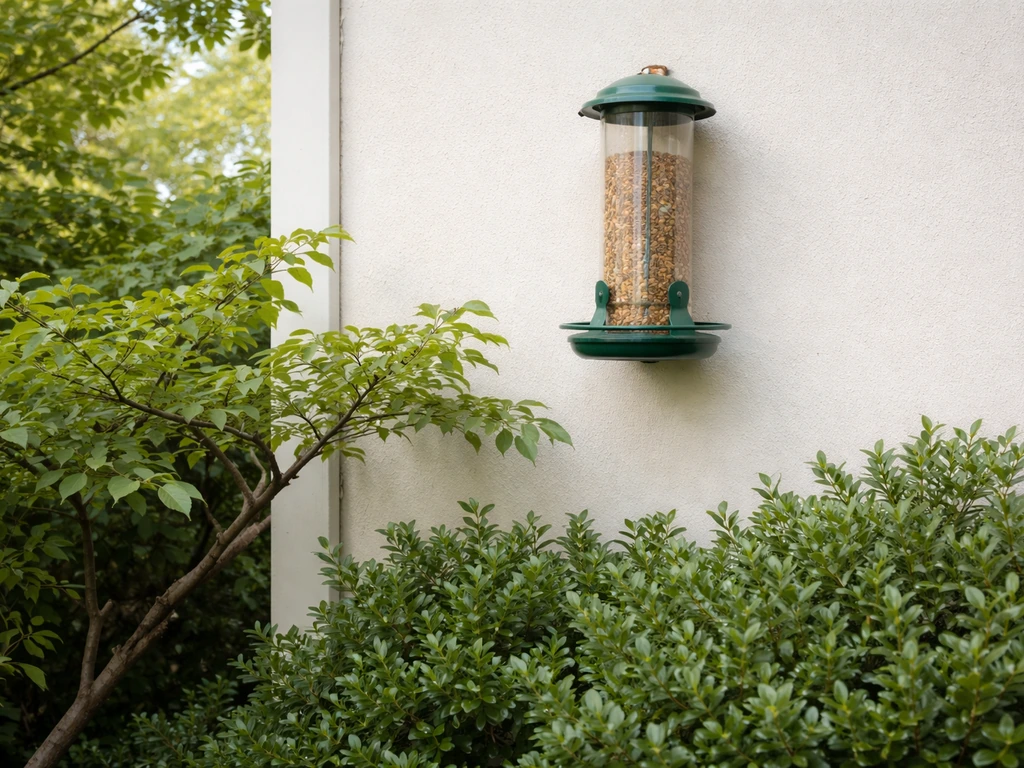
Height and position matter more than most people expect. A feeder that's technically installed but placed where birds feel exposed won't get much traffic, and one placed too close to a window can cause collisions. The Minnesota DNR recommends placing feeders where birds are in sight but away from collision risk, noting that feeders near windows can cause bird-window collisions too close to a window can cause collisions. Here's what actually works.
- Mount at around 5 feet off the ground. This keeps the feeder in a comfortable landing zone for most backyard species and makes it harder for ground-level predators to reach without actually making it inaccessible to birds.
- Stay within 3 feet of a window or beyond 30 feet from one. This is the standard collision-avoidance guideline. Wall-mounted feeders often end up right beside a window, which is actually one of the safer configurations, since birds don't build up speed in such a short distance.
- Face the feeder opening away from the prevailing wind direction if possible. In most of the US, that means facing south or east. This keeps seed dry and makes landing easier.
- Put it within 10-15 feet of shrubs or trees. Birds want a quick escape route and a place to wait their turn. A completely open wall with no cover nearby will get less traffic.
- Avoid positioning directly under overhanging eaves with active bird nests above. Nesting birds can be territorial and will chase off feeder visitors.
The 5-7-9 rule is a useful shorthand if you're also thinking about pest-proofing at the same time: aim for 5 feet from the ground, 7 feet from any vertical structure a squirrel could leap from, and 9 feet horizontally from any overhead branch or overhang. Wall-mounted feeders attached to fences are harder to apply this rule to perfectly, but it's still worth thinking about how close your nearest tree branch is above or beside the feeder.
Refill, cleaning, and maintenance routine
The number-one reason feeders stop working is neglect, not bad design. A tray feeder needs more attention than a hopper because seed is exposed, but both need regular cleaning to avoid mold and illness. Here's a realistic schedule:
- Refill as needed, but check seed condition before topping up. If seed at the bottom looks clumped, dark, or smells musty, dump it before adding fresh seed.
- Do a quick wipe-down every 1-2 weeks using a stiff brush to remove hulls, droppings, and wet clumps. This takes 5 minutes and prevents a lot of problems.
- Do a full cleaning monthly: unscrew the feeder from the wall if it's easy to detach, or scrub it in place. Use a solution of 1 part bleach to 9 parts water, scrub all surfaces, rinse thoroughly, and let it dry completely before refilling.
- Check the mounting hardware every 2-3 months. Screws can work loose from wood expansion and contraction. A loose feeder that falls on a bird or cat is a problem you don't want.
- Inspect the finish each spring. Touch up any areas where the exterior finish has chipped or worn, especially along the base where water pools.
In winter, clear snow off a tray feeder after each snowfall if you want birds to actually use it. A quick brush-off takes seconds and makes a big difference. Suet cakes are a great winter addition to any wall-mounted setup since they don't freeze solid the way seed can. If you decide to add a separate suet cage later, it can hang from a small hook screwed into the bottom of your feeder's front rail.
Pest-proofing and troubleshooting common problems
Let's be honest: squirrels will find your feeder. There's no such thing as a truly squirrel-proof wall-mounted feeder, but you can make it annoying enough that they give up. The most effective physical deterrent for wall and fence mounted feeders is a wrap-around baffle made from a PVC pipe section or sheet metal collar installed on any vertical support within jumping range. For a feeder mounted flat to a wall, the challenge is different since squirrels can approach from the wall itself, and no baffle solves that.
Your best wall-mounted pest strategy is a combination of placement distance (following that 7-foot horizontal gap from structures where possible) and seed choice. Squirrels love sunflower seeds and corn. Switching to safflower seed or nyjer (thistle) reduces squirrel interest significantly while still attracting finches, chickadees, and cardinals. Mixing in cayenne pepper is a popular DIY trick. Birds can't taste capsaicin, but squirrels find it very unpleasant. Use about 1 tablespoon of ground cayenne per pound of seed and mix thoroughly.
Troubleshooting the most common wall-mounted feeder problems
| Problem | Likely cause | Fix |
|---|---|---|
| Birds aren't visiting | Too exposed, wrong location, or fresh paint fumes | Add nearby shrub cover, wait a week for new feeders to lose the 'human smell', try different seed |
| Seed gets wet and clumps | Drainage holes blocked or too small, feeder faces into wind | Clear drainage holes with a toothpick, reorient feeder, add roof overhang if using tray style |
| Feeder wobbles or tilts | Mounting screws loose or not into solid anchor point | Re-drill into a stud or use longer lag screws with proper anchors |
| Ants swarming the feeder | Feeder near ant trail or sweet nectar residue | Apply petroleum jelly or a commercial ant guard to the mounting bracket. Keep feeder clean. |
| Raccoons emptying feeder overnight | Feeder too accessible from above or nearby structures | Move feeder at least 4 feet from anything raccoons can climb. Consider a hopper lid with a latch. |
| Mold appearing in seed | Seed staying wet too long | Increase drainage holes, clean more frequently, switch to smaller seed quantities so seed cycles out faster |
If birds are colliding with a nearby window, that's a sign your feeder is in the danger zone between 3 and 30 feet from glass. The fix is simple: move the feeder to within 3 feet of the window (close enough that birds can't build up speed) or further than 30 feet away. Adding window decals or external screens also helps break up the reflection that confuses birds into thinking the glass is open sky.
Your next steps checklist
Here's where to go from here. This checklist works whether you're starting from scratch today or just need to get a half-finished project across the finish line:
- Choose your feeder style: tray for speed and simplicity, hopper for better seed protection, repurposed bottle for zero cost.
- Pick up one 6-foot 1x6 cedar board, a box of exterior screws, two L-brackets, and the wall anchors that match your specific mounting surface.
- Build the tray or hopper following the steps above. Don't skip drainage holes or exterior finish.
- Identify your mounting spot: check the window distance rule, confirm you have a solid anchor point (stud, fence rail, or masonry), and think about nearby escape cover for birds.
- Install using the right hardware for your surface type. Level the feeder before final tightening.
- Fill with a seed that works for your local birds. Safflower or a black-oil sunflower and safflower mix is a great starting point that also discourages squirrels.
- Check the feeder after the first rain to confirm drainage is working and seed isn't pooling.
- Set a recurring reminder to clean the feeder monthly and inspect mounting hardware every 90 days.
That's genuinely all there is to it. If you want a simpler, temporary option, you can also hang a pine cone bird feeder using peanut butter and birdseed. If you want a more detailed walkthrough, review the full guide on how to hang bird feeders.
A well-built, well-placed wall-mounted feeder will outlast several seasons with minimal effort, bring a lot of bird activity close to your windows, and cost you under $20 in materials if you use cedar scraps or recycled containers. If you prefer a pulley setup, you can mount the feeder with a strong overhead bracket, run the rope through a pulley, and use a stopper so the feeder lowers for refilling.
Build it once, maintain it consistently, and you'll wonder why you waited. If you prefer a mason jar option, you can use similar mounting and placement tips to keep the jar secure and the seed accessible mason jar bird feeder. If you want a mason jar feeder, the same placement and mounting principles apply, but the jar needs a secure bracket so it can be refilled easily mason jar bird feeder.
FAQ
What type of screws or brackets should I use so my wall-mounted bird feeder does not rust or pull out?
Use stainless steel screws or exterior-rated coated hardware, and pre-drill near board edges to prevent cedar or pine splitting. Also seal the exposed screw heads with exterior wood sealant or paint so rain and seed moisture do not accelerate corrosion.
How do I handle heavy rain or roof runoff so the seed stays dry?
Do not place the feeder where rainwater can constantly run off a roof edge onto the seed. If your mounting location gets frequent drip, add a small rain guard (a scrap strip angled upward under the roof overhang) or switch to a hopper style with an overhanging cover.
Can I mount a wall feeder into stucco, brick, or concrete, and what changes should I make?
If you mount to stucco, brick, or stone, use masonry anchors rated for exterior loads, and drill into mortar joints only if they are sound. In doubtful areas, mount to structural wood behind the surface (or use toggles designed for masonry) rather than relying on weak anchors.
What should I know about feeder opening size and bird access so the right birds use it?
If you want birds to access the seed comfortably, keep the tray lip low enough that small songbirds can land, then leave at least a few inches of clear approach space in front. For hopper feeders, keep the slot height in the range you intended, because too-wide openings invite larger birds and more seed waste.
Can I use repurposed containers like bottles or jugs and still mount them safely on a wall?
Yes, but only if the wall mounting hardware is designed for that load and your attachment points are solid. Plastic containers can flex in heat and cold, so reinforce the backing board and use multiple attachment points rather than relying on two screws.
How often should I clean a tray versus a hopper feeder to prevent mold and disease?
Clean the feeder more often than you think in warm months, when mold grows fast. A practical approach is empty and scrub every 1 to 2 weeks, then do a quick rinse after heavy rain, and let everything fully dry before refilling.
Should I seal or paint the wood before mounting so it lasts longer?
Avoid adding thick paint or heavy sealants to surfaces that contact seed, because coatings can flake and contaminate food. Instead, use a thin exterior sealant on exterior-facing wood only, and keep the interior surfaces mostly untreated or sanded smooth.
My feeder seems level but seed piles up in one spot, what should I check?
If the tray sits slightly crooked, seed will jam in corners and drainage will fail. Before the final tighten, pour a small cup of seed to test flow and watch it through the drainage holes, then adjust with shims behind brackets if needed.
What should I do if my seed gets wet or clumps together?
No, do not put out seed that is wet, clumped, or has a sour smell. When you refill, discard any remaining seed that looks damp or has visible mold, and dry the feeder before adding fresh seed.
What is the most practical squirrel deterrent when the feeder is flat to a wall?
If you see squirrels chewing or jumping to reach it, first increase distance from any jumping surfaces, then reduce appeal by switching to safflower or nyjer. For wall-mounted setups where squirrels approach along the wall, focus on placement and consider a wrap-around baffle on a nearby vertical support that they must use.
How can I tell if my feeder is in the window-collision danger zone, and what is the best fix?
If you hear birds bumping glass, the fix is repositioning, not just adding more seed. Move the feeder either very close (so birds cannot build speed) or much farther away, and if you cannot move it, add exterior screen protection and relocate to the least-reflective side of the home.
Can I add suet to the same wall-mounted setup, and how do I keep it from messing up the seed?
If you want to hang a suet option, mount it separately from the seed feeder so you can clean them on different schedules and so grease does not drip onto seed. Use a small, sturdy hook screwed into a front rail underside, and keep suet away from drainage zones to prevent contamination.