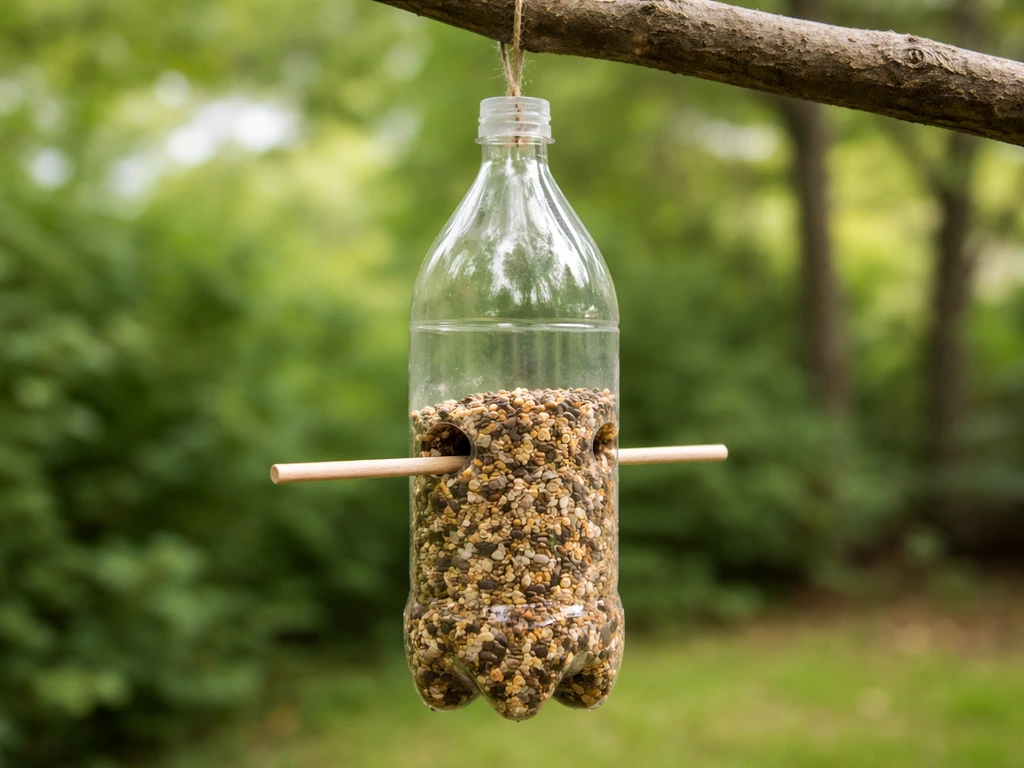
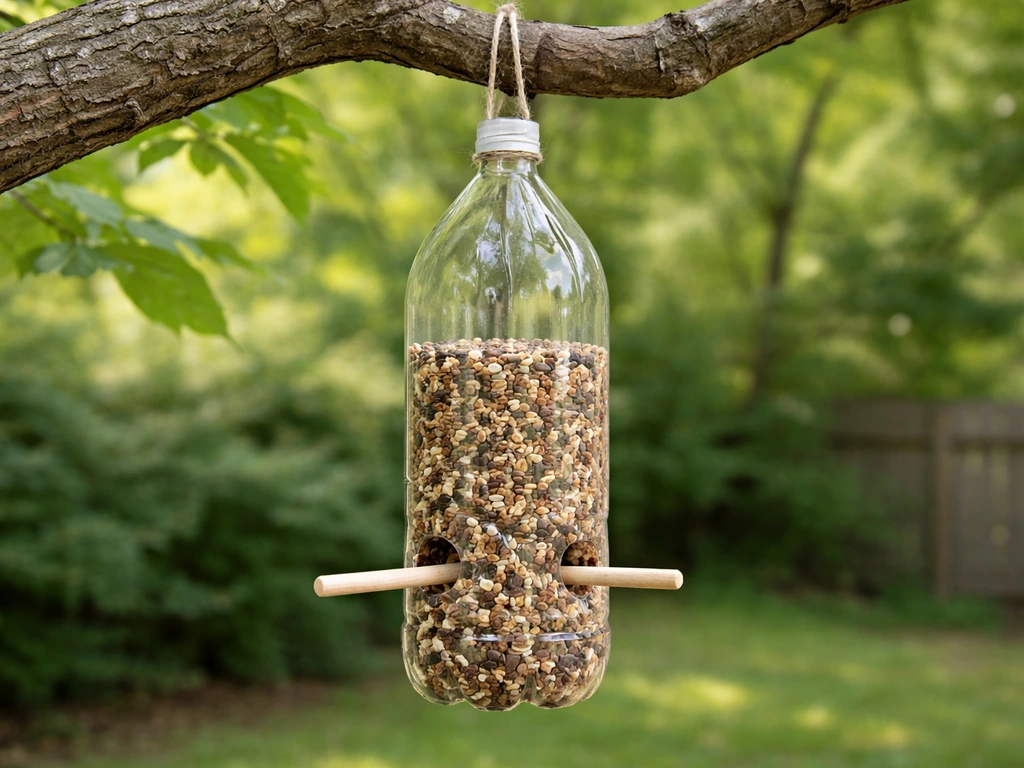
You can make a working bird feeder from a Coke or soda bottle in about 20 minutes using stuff you probably already have at home: an empty 2-liter or 20-oz plastic bottle, a couple of wooden dowels or chopsticks for perches, a box cutter or sharp scissors, some twine or wire for hanging, and a little patience. If you want a seasonal version, learn how to make a pumpkin bird feeder using the same basic ideas for cut openings, perches, and easy cleaning. Clean the bottle, cut feeding holes, push the perches through, fill it with black-oil sunflower seed, and hang it outside. That's really the whole project. The rest of this guide fills in the details so yours actually works, holds up in the rain, and stays clean enough to keep birds healthy.
How to Make a Bird Feeder From a Coke Bottle

Marcus Brennan
22 May 2026
What you need before you start
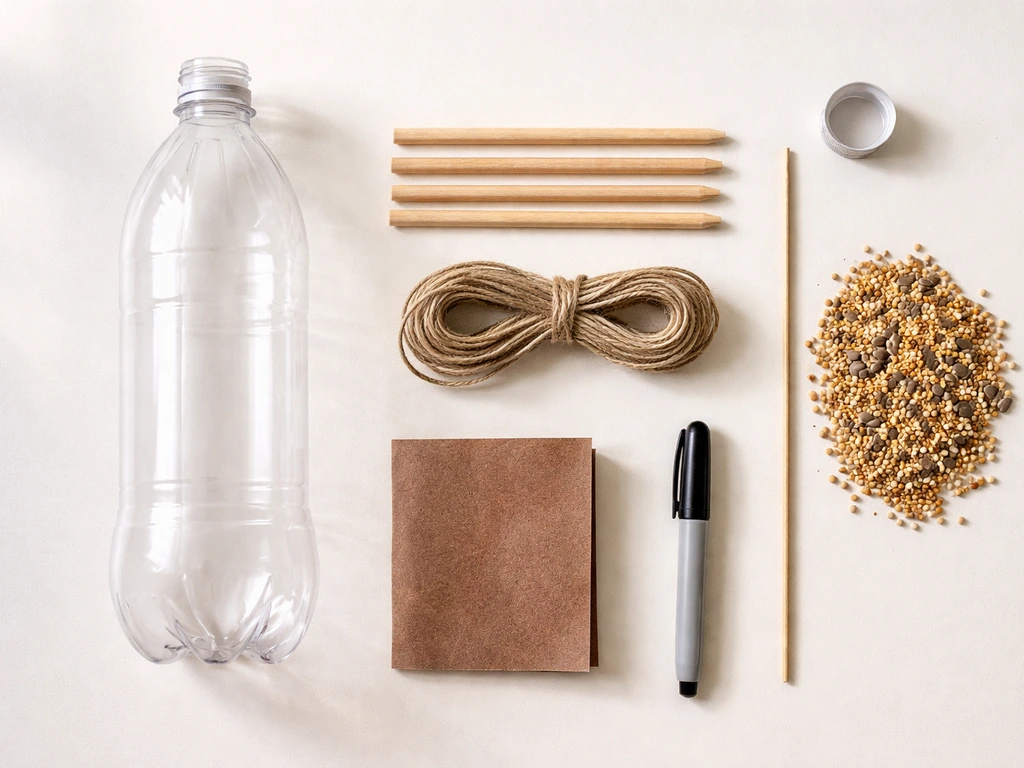
The good news is this is genuinely a zero-budget build if you already drink soda. A 2-liter bottle gives you the most capacity and is the easiest to work with, but a 20-oz bottle works fine for a smaller feeder. Keep the cap, because you'll use it. Here's the full list:
- One clean, dry plastic soda bottle with its cap (2-liter recommended, 20-oz works too)
- Two wooden dowels, chopsticks, or pencils for perches (about 10-12 inches long)
- A box cutter or sharp craft knife (scissors work but are harder to control)
- A permanent marker for marking your cut lines
- Strong twine, paracord, or thin wire for hanging (at least 18 inches)
- A hole punch or skewer for making the initial pilot holes
- Sandpaper or a lighter (briefly) to smooth any sharp plastic edges
- Black-oil sunflower seed to fill it
That's it. No glue gun required, no special hardware. If you want to make it a little sturdier or weather-resistant, a thin bead of clear waterproof sealant around the perch holes is a nice optional upgrade, but it's not necessary to get started.
Building the feeder: step by step
Step 1: Clean and prep the bottle
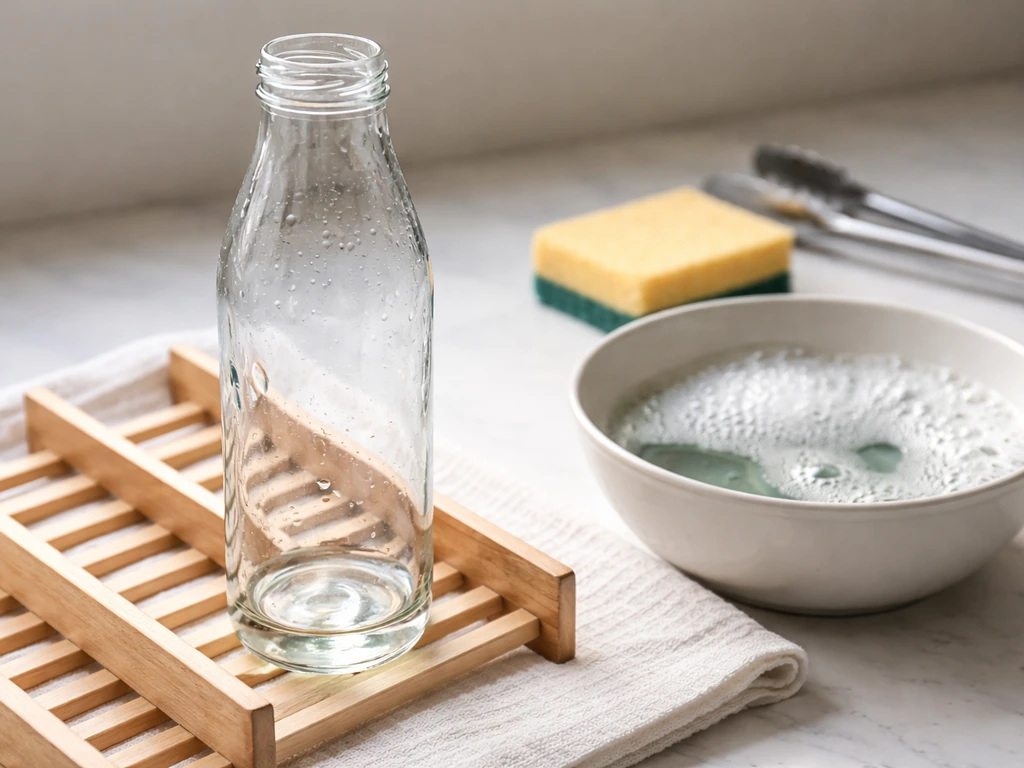
Rinse the bottle thoroughly with hot soapy water and let it dry completely before you do anything else. Any leftover soda residue will attract wasps and make your seed go sticky fast. NOAA's Marine Debris Program specifically calls for a clean, dry bottle, and they're right. Shake out any water droplets and leave the cap on loosely while it air-dries, then remove it before cutting. Keep the cap nearby because you'll need it later.
Step 2: Mark and cut the perch holes
Hold the bottle upright and use your marker to make two small dots on opposite sides of the bottle, roughly 4 inches up from the base. These are your first perch holes. Then rotate the bottle 90 degrees and mark another pair of dots at the same height, so you end up with four evenly spaced marks around the bottle for two crossing perches. Use your skewer or a thin nail to punch starter holes at each mark, then carefully widen them with the box cutter just enough for your dowel or chopstick to slide through snugly. You want a firm fit, not a loose rattle.
Step 3: Cut the feeding holes
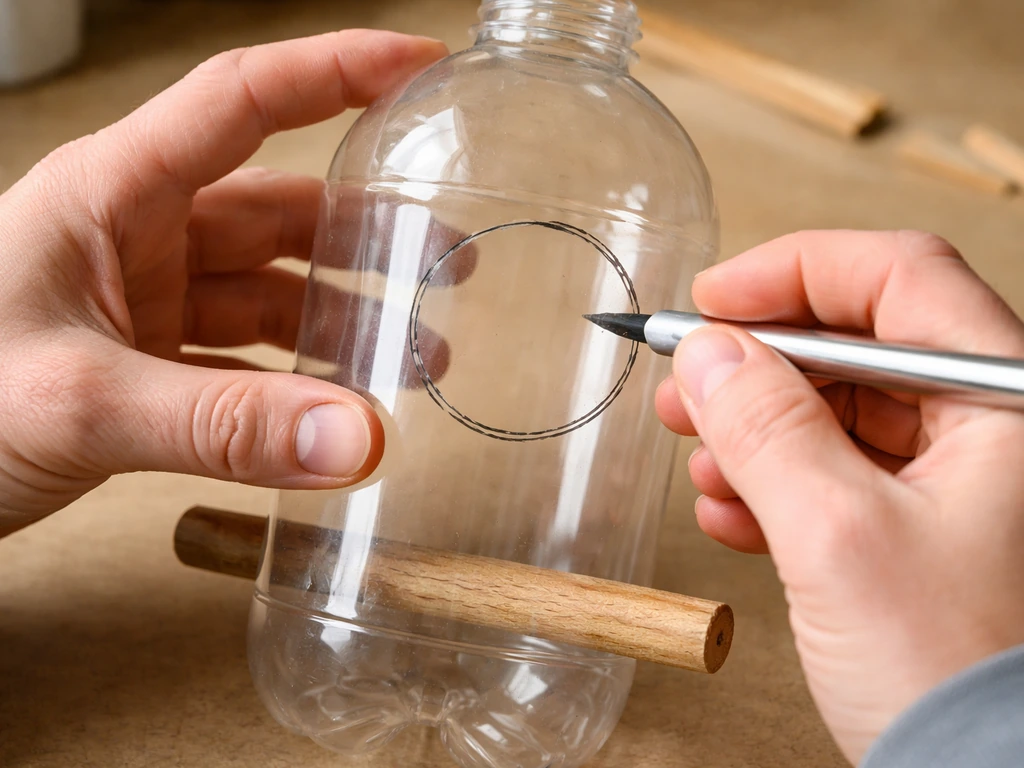
This is the step most people get wrong on the first try. The feeding holes need to sit a couple of inches above each perch, not right at perch level. If you want a more species-specific setup, see how to make an oriole bird feeder for guidance on building ports and placement that suit orioles’ feeding behavior feeding holes need to sit a couple of inches above each perch. A bird lands on the perch and then reaches up slightly to grab seed, which is a natural posture for them. Mark a small oval or circle about 1/4 to 1/2 inch in diameter directly above each perch position. Cut carefully, going slowly. If you make the holes too big, seed will pour out uncontrollably. Start small, test with a few seeds, and widen if needed. You can always cut more away, but you can't put plastic back.
Step 4: Smooth the edges
Run a small piece of sandpaper around every cut edge. This matters for bird safety: sharp plastic edges can cut small feet or beaks. You can also very briefly pass the flat of a lighter flame near the edge to melt any spiky bits, but go slow and keep your face back. Sanding is safer and gives you more control.
Step 5: Thread the perches
Slide your dowels or chopsticks through the pairs of holes so they cross inside the bottle. Push them far enough that each side sticks out about 2 to 3 inches on either side of the bottle. This gives birds enough room to grip and balance comfortably. If the fit is loose, a small wrap of electrical tape around the dowel at the contact point will tighten things up.
Step 6: Add the hanging mechanism
Screw the cap back on tightly. Use your skewer to punch two small holes through the cap, directly across from each other. Thread your twine or wire through both holes, pull it up, and tie a secure knot underneath the cap (inside the threads) so the loop can't pull free. Then tie the loose ends together above the cap to form a hanging loop. This is the simplest and most reliable hanging method. The bottle hangs upside down, so the cap faces down when it's actually filled and hanging, which I'll explain next.
Step 7: Fill and hang
Before you hang it, flip the bottle right-side up (cap down) and fill it with seed through the base. You'll need to temporarily remove the cap, hold the bottle upside down to fill, or funnel seed in through one of the feeding holes if they're large enough. Once filled, screw the cap on tight and hang the bottle so the cap faces downward. Gravity does the work: seed settles toward the cap end and becomes accessible through the feeding holes as birds pull from them.
Where to hang it for the best results
Placement makes a surprisingly big difference in whether birds actually use the feeder. The two things you're balancing are safety from window collisions and access to natural cover. For window safety, the safest zones are either very close (within 3 feet of a window) or far (30 feet or more). In the close zone, birds don't build up enough speed to hurt themselves if they do fly toward the glass. In the far zone, there's less reflection confusion. The tricky middle zone (3 to 25 feet) is where most window strikes happen, so try to avoid that range if you can.
For bird comfort, hang the feeder near trees or dense shrubs. Birds like to dart in, grab a seed, and retreat to cover to eat it safely. A feeder hanging 5 to 10 feet from a shrub or low tree branch sees a lot more traffic than one stuck out in the middle of an open lawn. Partial shade is also better than full sun, which dries out or spoils seed faster and can make the plastic bottle uncomfortably warm.
Height is flexible. Hanging between 4 and 6 feet off the ground keeps it accessible for ground-foraging birds that hop up to feeders, and makes it easier for you to refill and clean. If squirrels are a problem in your yard, go higher (8 feet or more) and position it away from any branch or fence a squirrel could jump from.
What to fill it with (and what to skip)
Black-oil sunflower seed is the right choice for this feeder. It attracts the widest variety of common backyard birds, including cardinals, chickadees, finches, nuthatches, and sparrows. The shells are thin enough for small birds to crack, and the seeds are small enough to flow naturally through the feeding holes you've cut. Project FeederWatch calls it the most common feeder seed in North America, and there's a good reason for that: it just works.
Skip nyjer (thistle) seed entirely for this style of feeder. Nyjer is so tiny it requires specialized feeders with very small, tight ports to prevent it from spilling everywhere. The holes in a bottle feeder are too large, and you'll end up with nyjer seed blanketing the ground under the feeder every time the wind blows. Shelled sunflower (sunflower chips) is a great mess-reducing option if you want to minimize hulls on the ground. Millet works too and attracts juncos and sparrows. Avoid mixes with lots of filler seeds like red milo, which most birds ignore and just kick to the ground.
| Seed Type | Works in Bottle Feeder? | Birds It Attracts | Mess Level |
|---|---|---|---|
| Black-oil sunflower | Yes, best choice | Cardinals, chickadees, finches, sparrows, nuthatches | Moderate (hulls) |
| Sunflower chips (shelled) | Yes, excellent | Same as above plus more small species | Low |
| White millet | Yes | Juncos, sparrows, doves | Low to moderate |
| Nyjer (thistle) | No, too small | Finches, siskins | Very high spill |
| Mixed seed with milo filler | Technically yes | Limited | High (birds reject filler) |
One more tip on mess: don't overfill the bottle. Fill it about two-thirds full. A completely packed bottle creates too much pressure at the feeding holes and seeds pop out when birds jostle it. Two-thirds gives enough seed for several days while reducing the spray.
Keeping it clean and knowing when to refill
Clean this feeder every two weeks minimum. That's the guidance from Project FeederWatch, Audubon, and most wildlife health organizations, and it's the right interval for a seed feeder in normal conditions. Audubon recommends cleaning seed feeders every two weeks or so, citing National Wildlife Health Center and Project FeederWatch guidance. In warm, humid weather or after heavy rain, bump that up to once a week. Old wet seed grows mold fast, and moldy seed makes birds sick.
To clean: remove any remaining seed, rinse the bottle out, then soak or scrub with a diluted bleach solution of 1 part bleach to 9 parts water. Let it sit for about 10 minutes, then rinse extremely thoroughly. Any bleach residue left in the bottle is harmful to birds. A bottle brush is genuinely useful here for reaching the interior. After rinsing, let it dry completely before refilling. Putting seed into a damp bottle is how you get a moldy clump stuck inside within days.
For refilling frequency, check the feeder every 2 to 3 days. If it's empty, refill. If the seed looks wet, clumped, or smells off, dump it all out, do a quick rinse, and start fresh. Don't just top off a feeder that has old seed at the bottom. Fresh seed on top of wet old seed still means birds are eating from a contaminated supply.
When things go wrong: troubleshooting
Seed is getting wet inside the bottle
This is the most common issue with bottle feeders. Rain can get in through the feeding holes, especially if the feeder is exposed rather than under an eave or tree canopy. The fix is to relocate the feeder to a more sheltered spot, or to add a simple rain guard. A frisbee or plastic plate with a hole punched through the center and threaded onto the hanging cord above the bottle works surprisingly well. You can also angle the feeding holes very slightly downward when you cut them, which encourages water to drip out rather than pool inside.
Wasps and insects are taking over
Wasps are attracted to the sweet residue from the soda bottle if you didn't clean it thoroughly enough. Go back and re-clean with hot soapy water, paying attention to the cap area and the threading. Also check for old or fermented seed, which draws insects just as reliably. If wasps persist, apply a thin ring of petroleum jelly around each feeding hole opening on the outside of the bottle. Wasps hate landing on it. Birds, which perch below the hole, aren't affected.
Squirrels are raiding it
Squirrels are persistent and clever. A bottle feeder hanging by a cord is actually harder for them to raid than a flat platform feeder, but they'll still try. The most effective tactics: hang it far from any branch or fence post they can leap from (at least 8 to 10 feet horizontally), and add a squirrel baffle on the cord above the feeder. A simple cone-shaped baffle made from a plastic bottle cap or purchased separately slides over the cord and prevents them from shimmying down. If they're climbing a pole to reach it, a pole-mounted baffle placed 4 feet up solves it.
The feeder is spinning or swinging too much in the wind
A lightweight plastic bottle is going to sway in any real breeze. If it's spinning so much that birds won't land, add a small weight to the base. A few heavy washers taped or zip-tied to the bottom of the bottle give it enough ballast to stabilize without adding much bulk. You can also run a second piece of twine from the bottom of the feeder to a nearby branch or hook as a stabilizing anchor, keeping the feeder from spinning freely.
Seed is pouring out too fast or not coming out at all
Holes too big: seed spills freely. Holes too small: birds can't extract seeds easily and lose interest. For too-large holes, you can patch with a small piece of waterproof tape and re-cut a smaller opening. For too-small holes, just carefully widen them a little at a time with the tip of your box cutter, testing between each cut. The sweet spot for black-oil sunflower is an oval about 3/8 to 1/2 inch wide.
A few safety things worth knowing
Plastic bottle feeders are safe for birds when built and maintained correctly. The main risks are sharp cut edges (sand everything smooth), mold from wet seed (clean religiously), and chemical residue if you don't rinse the bleach solution out completely. Always do a final rinse with plain water after cleaning and let the feeder dry before refilling.
Plastic does degrade in UV sunlight over time. A 2-liter Coke bottle that's been hanging in direct sun for six months will start to become brittle and may crack. Inspect the bottle every time you clean it. If you see cracking, crazing (a network of fine surface cracks), or any structural weakness, retire that bottle and start fresh with a new one. They're free, so there's no reason to keep using a compromised one.
Avoid using old soda bottles that had anything other than soda in them. Residues from juice, sports drinks, or other sugary liquids can be harder to remove and more likely to attract insects or promote mold. Straight soda (even diet) rinses clean easily. If you're making feeders from other materials too, the same cleanliness principles apply whether you're working with tin cans, mason jars, or other repurposed containers. If you want to try a different option, you can also learn how to make a bird feeder from a tin can using the same basic cut-and-clean principles.
What to expect once it's up
Don't panic if birds don't show up in the first day or two. Birds find new feeders by sight and by watching other birds. It can take anywhere from a few days to two weeks for regulars to discover it, especially if you're new to feeding in that spot. You can speed things up by scattering a small handful of seed on the ground directly below the feeder as a visual cue. Once one bird finds it, others follow quickly. Chickadees are usually the first scouts, and where chickadees go, finches, sparrows, and eventually cardinals tend to follow.
If you enjoy the bottle feeder build and want to expand, this same basic approach scales up nicely to a 2-liter bottle for more capacity, or you can try variations using tin cans, mason jars, or other repurposed containers using similar construction logic. You can use the same cut, fill, and hang approach to make bird feeders out of mason jars as well. If you want a different look, you can also learn how to make a bird feeder out of an orange using the same basic hole-and-perch idea variations using tin cans, mason jars. You can also adapt the same idea to make a bird feeder out of a gourd, using similar hole placement and hanging methods variations using tin cans, mason jars. If you want a different DIY style, you can also learn how to make a bird feeder out of wine corks using a similar repurposing approach repurposed containers. Each material has its own quirks, but the placement and maintenance principles stay the same across all of them.
FAQ
Can I use a different soda bottle size or plastic type, like a smaller 12-oz bottle?
Yes. Just scale the hole and perch spacing so the openings still sit a couple inches above the perches, and keep the perches long enough that they stick out about 2 to 3 inches each side. Smaller bottles also empty faster, so expect more frequent refills (often every day).
What is the safest way to cut and widen the feeding holes so I do not overdo it?
Start with a small pilot cut, then widen gradually while checking fit and flow with a few test seeds in the sink. If seed pours out too easily when the bottle is gently tilted, the openings are oversized and birds will waste seed in rain or wind.
How can I stop the feeder from molding even if I clean on schedule?
Keep water out between cleanings. Place it under tree cover or a roof edge if possible, and after rain, inspect for wet clumps at the feeding holes. If you see damp seed, dump and rinse sooner than your normal two-week schedule.
Will this feeder work for birds that prefer suet or nectar?
Not usually. A bottle feeder designed for black-oil sunflower seed is optimized for seed-eaters that can crack shells. If you want different species, you will need different food and often different port size and feeder type.
How do I prevent seed from spilling out when birds jostle the bottle?
Fill the bottle about two-thirds full (not more) and ensure perches fit snugly so the bottle does not sway excessively. Also confirm the feeding holes are slightly above the perches, so birds pull seed upward rather than shaking it straight through.
Can I use peanut butter, bacon grease, or other foods in a Coke bottle feeder?
It is not a good idea. Those foods get very sticky, can run, and are harder to clean without leaving residue that attracts insects. This design is best kept to dry seed like black-oil sunflower.
How do I handle it if the feeder is covered in bees or wasps?
First, re-clean the bottle including the cap threads and any residue around the holes with hot soapy water, then rinse well. If they keep returning, add petroleum jelly only as a thin ring around the hole openings on the outside, so birds can still access seed from below.
What should I do if squirrels learn to target the feeder anyway?
Move it farther from any jump route (aim for at least 8 to 10 feet from a branch or fence they can use) and add a baffle on the hanging cord above the feeder. If they are reaching up from a pole, use a pole-mounted baffle placed a few feet higher than the feeder.
How much height should I use for different types of birds in my yard?
A typical range of 4 to 6 feet works well for hopping and perching birds, but if you have lots of ground predators or frequent squirrel activity, go higher (often 8 feet or more) and keep it near cover. Adjust height after a week based on which species show up.
My bottle feeder is too windy and keeps spinning, what is the best fix?
Add ballast to the bottom (like tape-secured washers) and consider anchoring it with a second tie to a nearby branch or hook. That reduces spinning and makes landing easier for smaller birds.
Is it okay to leave the feeder out year-round, including freezing weather?
It can be, but inspect it more often. Plastic becomes brittle in winter sun cycles, and cold can make seed harder to access if holes get partially clogged with ice or frozen clumps, so clean and check after storms and cold snaps.
Do I need to use bleach every time I clean the feeder?
No. The bleach soak is for deep cleaning between dirty or mold-prone situations, especially after wet weather. For routine upkeep, rinse thoroughly and replace seed if it looks damp or smells off, then do the bleach method when you notice residue buildup.
Next Articles
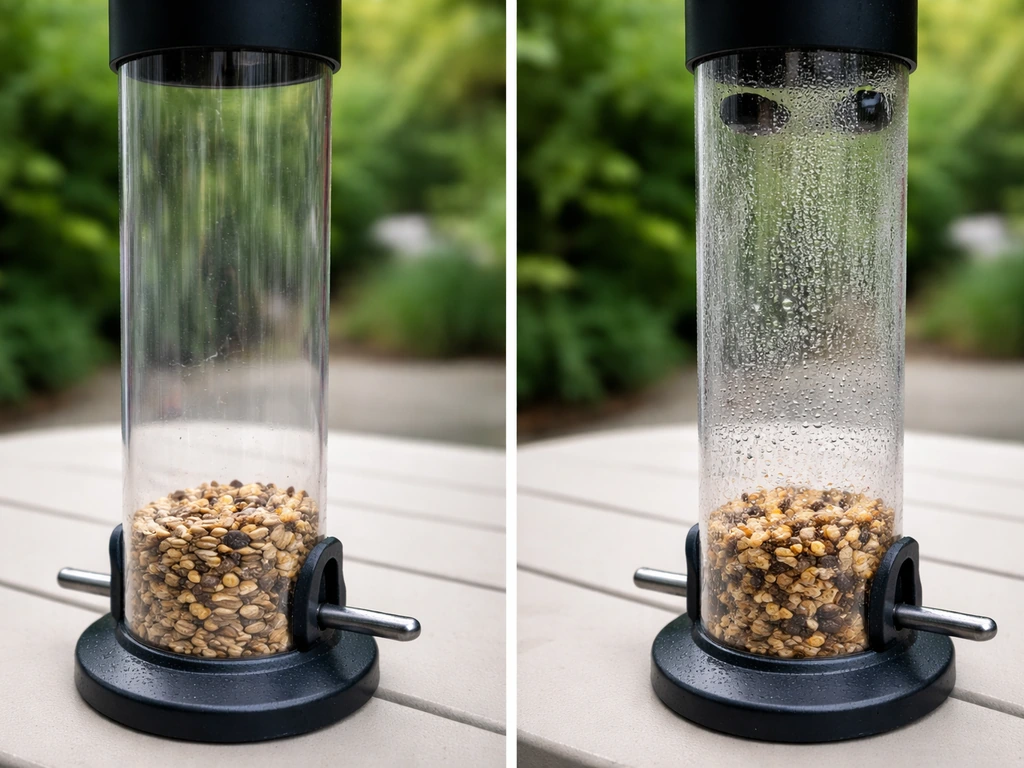
How to Make a Bird Feeder From a 2L Bottle
Step-by-step guide to build a 2L bottle bird feeder with perches, drainage, safe hanging, cleaning, and troubleshooting.
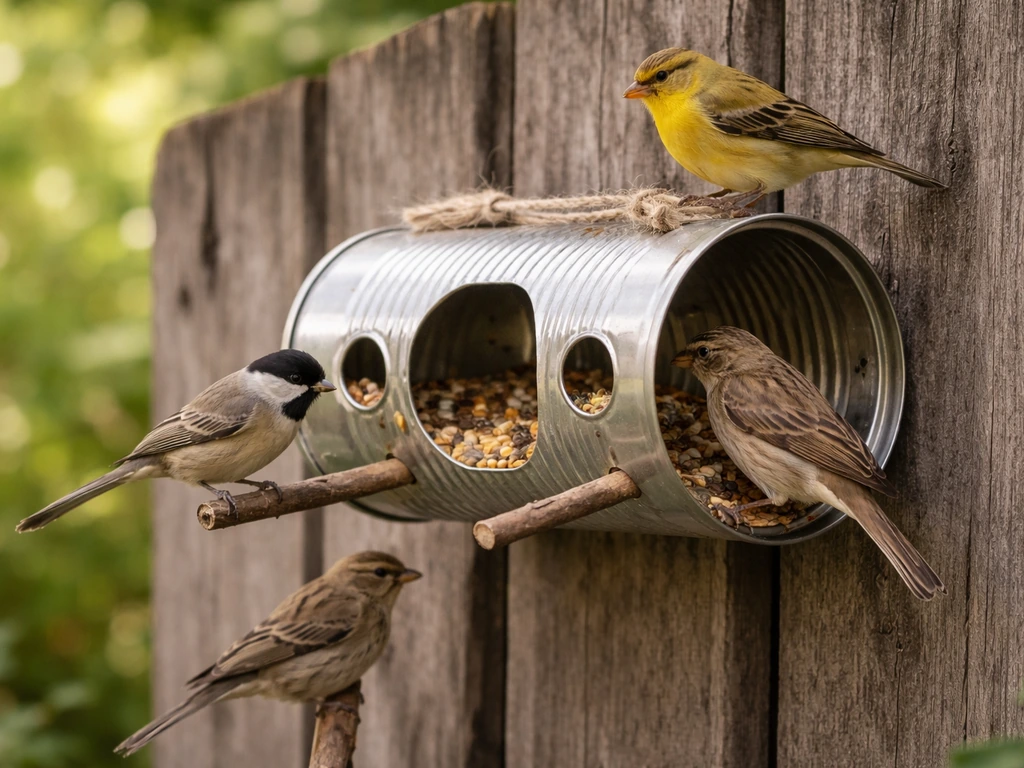
How to Make a Bird Feeder From a Tin Can
Step-by-step guide to make a tin can bird feeder, safely cut and drill, add access, mount it, and keep it clean.
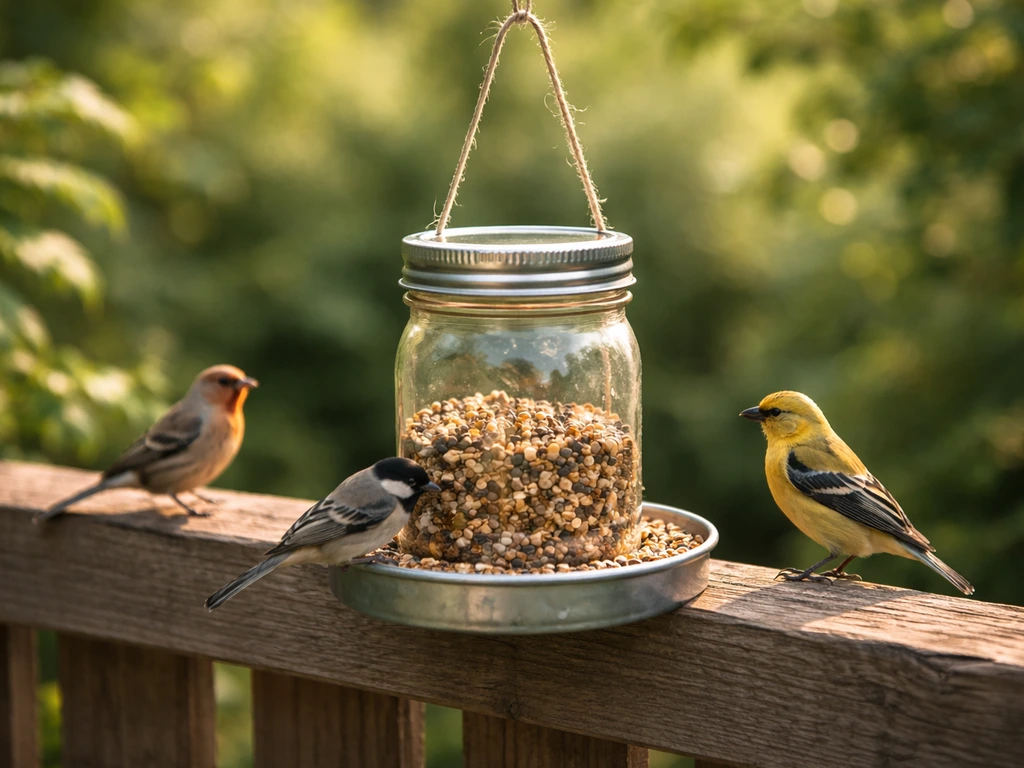
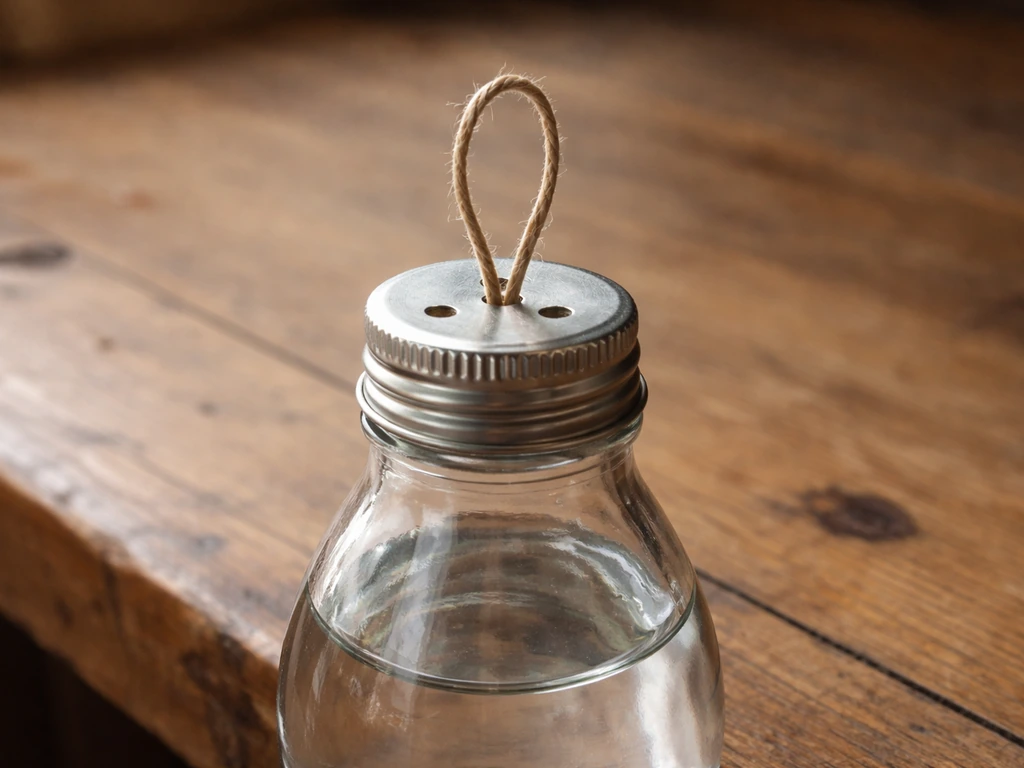
How to Make Bird Feeders Out of Mason Jars Step by Step
Step-by-step guide to make a mason jar bird feeder, including secure lid setup, hanging design, placement, and care.