You can build a working nectar feeder for tūī, bellbirds, and silvereyes in about an hour using a glass or plastic bottle, some basic hardware, and a simple sugar-water mix. If you want options beyond a bottle or trough, see our guide on how to make a sugar bird feeder in different styles. The nectar recipe recommended by Forest & Bird and the BPCT is 1 part white sugar dissolved in 8 parts warm water. That's it. No honey, no food colouring, no supplements. Fill the feeder, hang it at a comfortable perch height, and change the nectar daily in summer. Get those three things right and you'll have birds visiting within a few days.
How to Make a Nectar Bird Feeder NZ: DIY Guide

Marcus Brennan
12 Jun 2026
Which NZ birds will actually use your nectar feeder
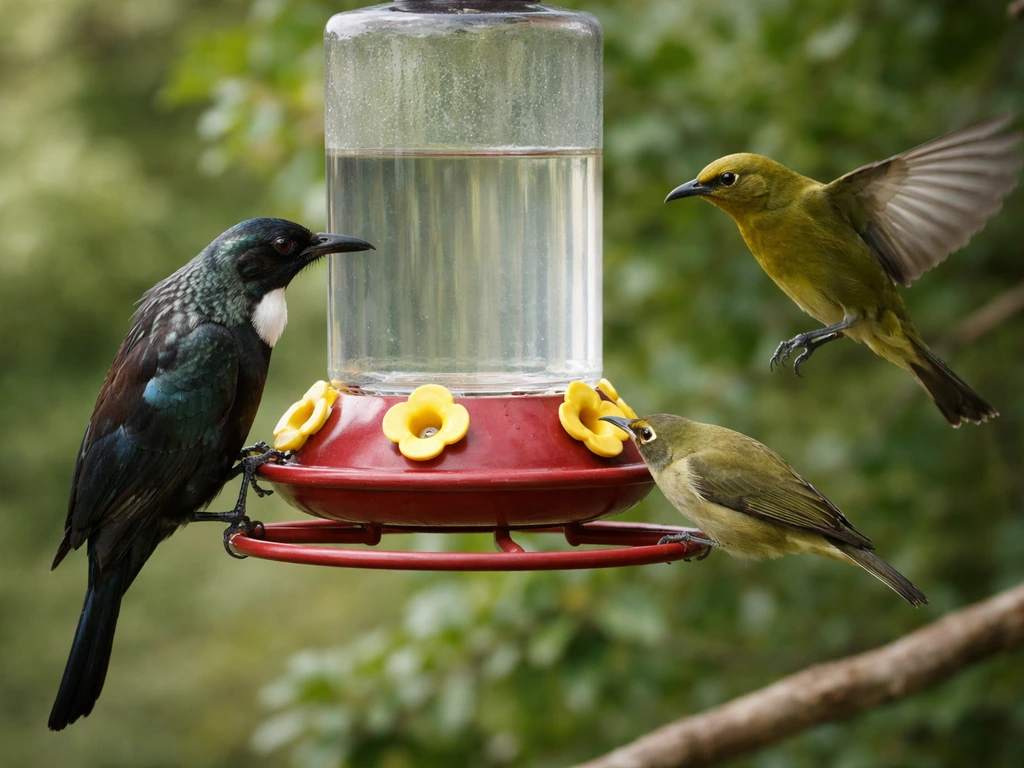
The three main species you're building for are tūī, korimako (bellbirds), and tauhou (silvereyes, also called waxeyes). All three are confirmed regular visitors to sugar-water feeders according to Birds New Zealand research. The Department of Conservation also notes that tūī, which feed mainly on nectar from native plants, can be reliably attracted to sugar-water offered in a garden feeder.
The design you choose matters a lot here. blank" rel="noopener noreferrer">Tūī are big birds, up to around 30 cm tall, and they need a solid, stable perch and a feeder opening they can actually access comfortably. A hummingbird-style feeder from the US or UK is basically useless for a tūī. If you want hummingbirds specifically, you can use the same basic sugar-water principles but adjust the feeder style and feeding port size for hummingbirds hummingbird-style feeder. Silvereyes are tiny and can manage much smaller feeding ports. Bellbirds sit somewhere in between. If tūī visit your section, build bigger. A bottle-style feeder with a wide trough or feeding dish underneath the port works well for all three.
Materials and tools you can find in NZ
The easiest approach is to work with what you already have or can grab cheaply from a hardware store, supermarket, or Mitre 10. Here's what you'll need depending on which build you go with.
- A 750 ml glass wine bottle or a clean 1-litre plastic bottle (the wine bottle is ideal and is exactly what the Creative Woodcraft tui feeder design uses)
- A shallow plastic dish or container for the feeding trough, around 10–15 cm wide
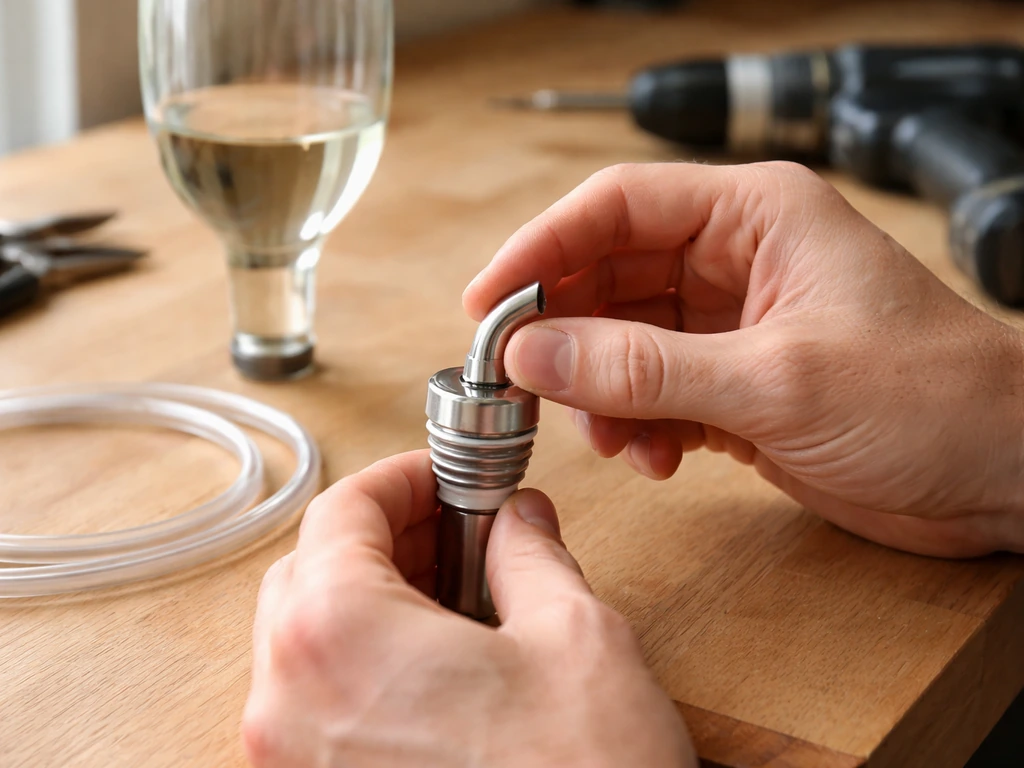
- A rubber stopper or cork drilled with a 6–8 mm hole, or a short length of aquarium tubing to act as the dispensing spout
- Scrap timber (pine or treated hardwood from Bunnings or Mitre 10) for a wooden mounting bracket if you want a sturdier build
- Galvanised wire or stainless steel wire for hanging
- Waterproof wood glue and exterior screws if building a wooden frame
- White granulated sugar (supermarket standard, not raw or brown)
- A drill with a 6–8 mm bit
- Sandpaper (80 and 120 grit) if finishing wood
- A funnel for filling
You don't need to buy specialty nectar feeder components. The only part that sometimes takes a bit of hunting is a rubber stopper or bung the right size for your bottle neck. Hardware stores usually stock these, or you can repurpose a cork and seal around the tubing with food-safe silicone sealant from the plumbing aisle. Keep materials food-safe: avoid galvanised metal that contacts the nectar itself, and don't use copper or zinc fittings near the sugar water.
Two builds that actually work: bottle feeder and simple trough feeder
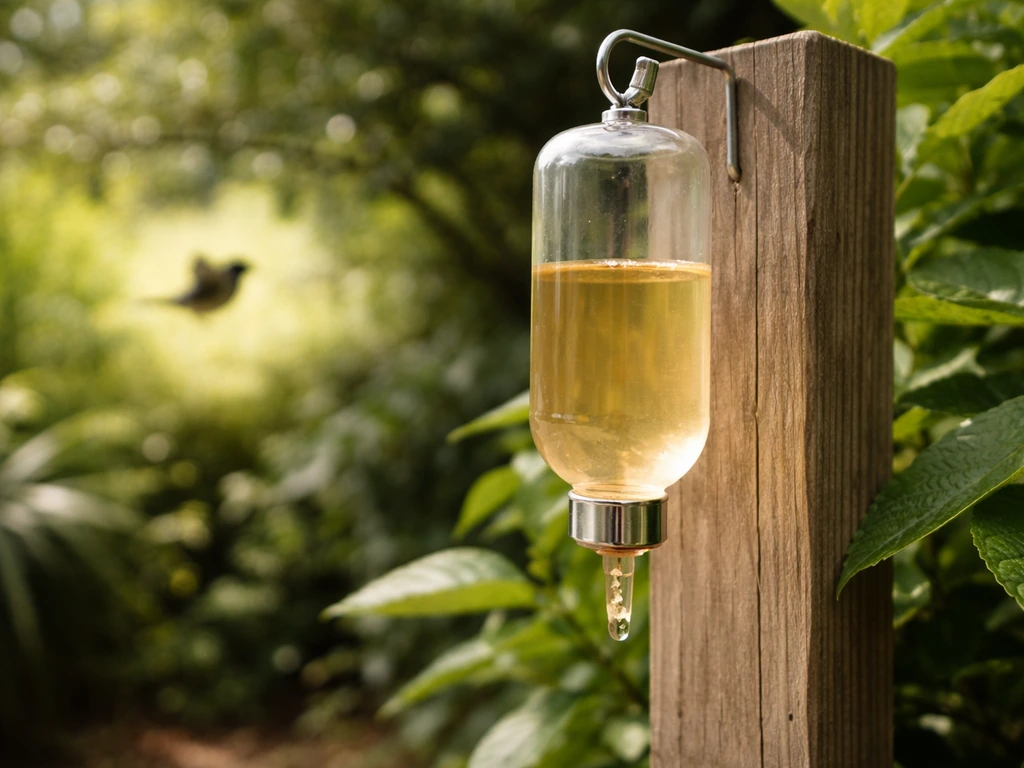
Build 1: Inverted bottle feeder (beginner-friendly, 30–45 minutes)
This is the most common DIY nectar feeder style in NZ and works exactly like the commercial Topflite and Creative Woodcraft designs. Next, you can switch to a macrame feeder style and use the same nectar and placement principles so your birds still get reliable access. The bottle holds the nectar reservoir, sits inverted above a shallow trough, and gravity-feeds a constant small supply to the dish.
- Take your clean glass wine bottle or plastic bottle and drill or fit a 6–8 mm opening in the stopper or cap. If using a cork, drill the hole through the cork and push a short length of aquarium tubing through it so the tube extends about 1 cm past the cork into the bottle.
- Fill the bottle with your nectar mix (see recipe section below), fit the stopper or modified cap firmly, then quickly invert the bottle over your shallow dish. A small amount of nectar will flow into the dish and then stop as a vacuum holds the rest in the bottle.
- Test the seal: a small bead of nectar should appear in the dish within a minute. If it keeps flowing freely, the stopper hole is too large or the seal is loose.
- To mount it, cut a piece of timber into an L-shaped bracket or use a simple forked branch. Drill a hole or carve a groove into the upright section that holds the neck of the inverted bottle securely. The dish sits on the horizontal arm below.
- Sand any wooden surfaces smooth, especially around the feeding area, and apply two coats of exterior water-based varnish. Let it cure fully before use.
- Attach galvanised wire to the bracket and hang from a branch or hook. Make sure the whole assembly is level so the trough doesn't tip.
Build 2: Open trough feeder (simplest possible, under 20 minutes)
If you want something you can test today without any drilling, an open trough works fine as a starting point. Take a shallow plastic container (a clean takeaway container or small Tupperware tray), drill or punch a couple of small drainage holes near the rim (not the base) to stop it overflowing in rain, and attach it to a fence post, branch, or bracket with wire or zip ties. Fill it with nectar each morning and rinse it clean each time. This won't hold much nectar and you'll lose some to rain, but it's a legitimate way to test whether birds in your area will come to a feeder before you invest more time in a fancier build.
The nectar recipe, filling, and keeping it fresh

The recipe is simple: dissolve 200 g of plain white sugar in 1 litre of warm water and stir until fully clear. That's the 1:8 ratio recommended by Forest & Bird, the BPCT, and TuiGarden. Don't use honey (it ferments fast and can carry pathogens), raw or brown sugar (unnecessary minerals and faster spoilage), artificial sweeteners, or food colouring. The birds don't need it and it can harm them.
Let the mix cool completely before filling the feeder. Warm nectar sitting in a bottle in the sun will ferment and turn into something that can make birds sick. The BPCT and Birds New Zealand are both clear on this: sugar-water should be replaced daily, especially in summer. In cooler months (June through August), you might stretch to every two days if the feeder is in shade and temperatures are low, but daily is the safer habit.
Signs that your nectar has turned: it goes cloudy, you'll see bubbles or a slightly fizzy appearance, or there's a sour smell when you open the feeder. Toss it, rinse the feeder immediately, and refill fresh. Birds may avoid a feeder if they detect spoiled nectar, so keeping it clean is also the best way to keep them coming back.
Where to hang it in a NZ backyard
Placement makes or breaks whether birds actually use the feeder. Tūī and bellbirds are naturally cautious and prefer to approach from a nearby perch before committing to a feeding spot. Hang the feeder within about 1–2 metres of a shrub, tree branch, or fence where birds can land and assess the situation first. If it's totally exposed with no perch nearby, you'll wait a long time for visitors.
Height-wise, somewhere between chest and head height for you (roughly 1.5–2 metres off the ground) is practical for refilling and cleaning while still being high enough that cats and other ground-level threats aren't immediately obvious to feeding birds. Avoid placing it directly against the house wall where wind can slam it around or where drips attract ants indoors.
Shade matters too. Full sun in a NZ summer afternoon heats the nectar fast and speeds up fermentation. A spot that gets morning sun and afternoon shade is ideal. If your only option is a sunny position, just commit to replacing the nectar more frequently, ideally twice a day in hot weather.
For hanging, wrap a loop of galvanised wire around a branch or hook and make sure the feeder can't swing violently in wind. A short length of bungee cord or a rubber washer between the hook and the bracket helps absorb movement and stops the feeder spinning and leaking on a blustery day. If you're in a Wellington or exposed coastal garden, a bracket screwed to a fence post is more wind-stable than a hanging setup.
Cleaning and maintenance: what the schedule actually looks like
Hygiene is the most important part of running a nectar feeder responsibly. If you want to take it further, you can also add a simple magic halo around your bird feeder to help guide birds to the feeding port how to make a magic halo for bird feeders. Birds New Zealand and the BPCT both flag inadequate feeder hygiene as the main welfare risk with sugar-water feeding. Bacteria and fungi can build up quickly in sugar solution, and birds drinking contaminated nectar can get genuinely ill.
| Task | Frequency | How to do it |
|---|---|---|
| Replace nectar | Daily (every 2 days maximum in cool weather) | Empty old nectar, rinse with hot water before refilling |
| Rinse the trough/dish | Every refill | Hot water rinse, scrub with a bottle brush if residue present |
| Full clean of all components | At least twice a week in summer, weekly in winter | Disassemble fully, scrub with hot soapy water or run through dishwasher if parts are dishwasher-safe |
| Inspect for mould or cracks | Weekly | Check inside the bottle and all joints for black or green mould; discard and replace any cracked components |
| Check hanging hardware | Monthly | Inspect wire, hooks, and bracket for rust or fatigue, especially after storms |
When you clean, avoid bleach if possible. A solution of white vinegar and hot water works well for killing mould and bacteria without leaving chemical residue that might harm birds. If you do use a very dilute bleach solution, rinse thoroughly at least three times with clean water afterwards and let the feeder air dry before refilling. The Topflite glass-bottle feeder is designed to go through the dishwasher, and if your DIY bottle and trough components are dishwasher-safe, that's a great option for a reliable deep clean.
Pest-proofing and fixing common problems
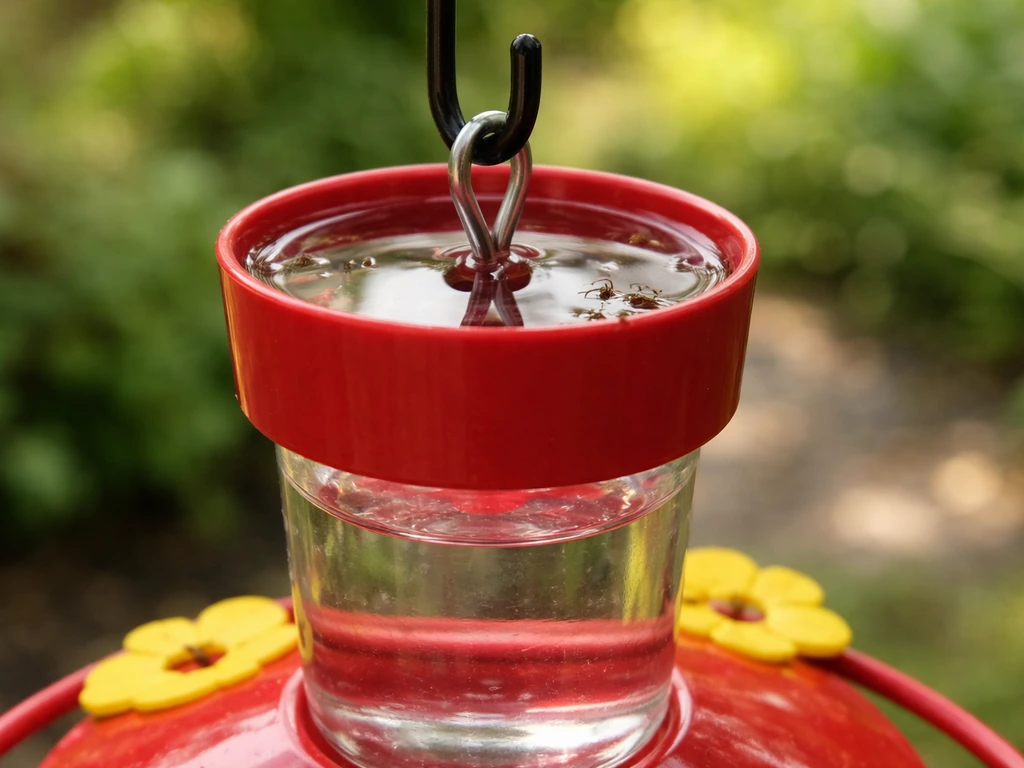
Ants
Ants are the most common problem with any nectar feeder in NZ. They find the sugar water quickly and can overwhelm a feeder within hours. The fix is an ant moat: a small water-filled cup or container threaded onto the hanging wire above the feeder. Ants can't cross the water barrier to reach the feeder below. You can buy these from bird supply stores or make one from a small plastic bottle cap with a hole drilled through the centre for the wire. Keep the moat topped up with water, not nectar.
Bees and wasps
Wasps in particular are a real issue in late summer and autumn in NZ. They're attracted to the sugar water and will aggressively monopolise a feeder. A few strategies help: make the feeding port smaller so only bird beaks (not wasp heads) fit easily, hang a commercial wasp trap baited with fruit juice or jam about 3–4 metres away to divert them, and temporarily reduce the sugar concentration slightly (try 1:10 instead of 1:8) during peak wasp season. You can also make a grape jelly bird feeder for certain backyard birds, but the feeding method and hygiene rules still need to match the food you’re offering. Some people report that placing a couple of drops of almond or anise extract near (not in) the wasp trap makes it more attractive to wasps than the feeder itself.
Starlings and other opportunists
Starlings and mynas aren't really nectar feeders but they'll drink sugar water if they can access it. A narrow feeding port that fits a curved tūī or bellbird beak but not a blunt starling beak helps filter out the uninvited guests. Tūī will also often dominate and chase away starlings themselves once they've claimed a feeder as their territory, so patience sometimes solves this one.
Feeder leaking
Leaking is almost always a stopper or seal issue. Check that the cork or rubber bung fits snugly with no gap around the tube. A wrap of plumber's PTFE tape around the tube where it enters the stopper creates a better seal. If the trough keeps overflowing, the dispensing tube may be too wide, allowing too much flow. Try a narrower tube or add a small knot or crimp to restrict flow rate.
Birds aren't coming
Give it at least a week before concluding the feeder doesn't work. Try moving it closer to a perching spot, or hang a short strip of bright red or orange ribbon nearby to attract initial attention (tūī are drawn to bright colours, as red flowers are their natural nectar source). If you're not sure whether tūī or bellbirds even visit your neighbourhood, check whether native flowering plants like harakeke (flax), kōwhai, or pohutukawa grow nearby. These birds follow the food, and a feeder in a garden without native plantings may just not be on their regular route yet.
Quick checklist before you hang it up
- Nectar is 1 part white sugar to 8 parts water, fully dissolved and cooled
- All surfaces that contact nectar are smooth, non-toxic, and easy to rinse
- Feeder is hung near a perching spot, in partial shade
- Hanging wire or bracket is secure and has some wind dampening
- Ant moat is in place above the feeder
- You have a cleaning routine planned: daily refill, twice-weekly full scrub in summer
- A wasp management plan is ready for late summer
Once your nectar feeder is running reliably, it's worth thinking about what else you can offer. A separate feeder for fruit (like halved apples) can attract the same species and gives birds variety. If you want to try something similar with an apple, see the guide on how to make an apple bird feeder fruit (like halved apples). The principles around hygiene and placement are similar across all these feeder types, so the habits you build with a nectar feeder translate directly to whatever else you add to your backyard setup.
FAQ
Can I use honey, raw sugar, or brown sugar instead of plain white sugar for a nectar bird feeder in NZ?
No. Honey is more likely to ferment quickly in warm NZ weather, and it can also introduce extra microbes. Stick to plain white sugar and warm water (then cool fully) so you can reliably replace it daily.
What should I do if my nectar looks cloudy or smells odd, and can I just top it up?
If you see cloudy nectar, bubbles, a fizzy look, or smell sourness, treat it as spoiled and discard it right away. After that, rinse the bottle, tube, and trough thoroughly before refilling, because residue can seed the next batch even if you make a “fresh” mix.
How do I stop wasps from taking over, without harming birds or changing the feeder placement?
Don’t increase sweetness to fix problems. If wasps are dominant, use a smaller feeding port, add a wasp trap 3 to 4 metres away, and consider a lower concentration (for example 1:10 instead of 1:8) during peak wasp periods.
Can I rely on quick rinses or only dishwasher cleaning between refills?
Use your cleaning routine, not just a rinse. Even with dishwasher-safe parts, you still need to remove all syrup film from the dispensing tube and around the feeding port because biofilm can form. If any nectar was left to sit more than a day in summer, do a deeper clean before refilling.
Why do tūī or bellbirds ignore my feeder even though the nectar recipe is correct?
If you want to prevent bottlenecks, aim the feeder at bird access, not human access. Keep the perch close enough for tūī and bellbirds to land and evaluate the spot, typically within 1 to 2 metres of cover, and ensure the feeding opening matches the target beak size.
What materials are unsafe for parts that touch the nectar, and what should I use instead?
For outdoor use, avoid any metals that contact nectar directly, especially galvanised, copper, or zinc. Even if they do not immediately discolor the nectar, these can react over time and affect bird safety.
In winter, can I reduce how often I change the nectar, or is daily still required?
In cooler months, you can sometimes stretch to every two days when the feeder is in shade and temperatures are low, but only if you consistently keep it clean and the nectar stays clear. If you are unsure, daily replacement is the safer default, especially if the feeder has any sun exposure.
What should I do if ants keep finding the feeder even after adding an ant moat?
If you notice ants returning, refilling nectar won’t solve it. Ensure the ant moat is filled with water (not nectar), check the wire/hook seals for any bridging points, and refill the moat after wind or evaporation.
Is an open trough feeder a good long-term solution, or only for testing?
Yes, but only if you keep the drinking port size appropriate and follow the same hygiene and replacement rules. Open troughs may test whether birds visit quickly, but they tend to lose more to rain and may need more frequent refills until you upgrade to a bottle and trough style.
How long should I wait before assuming the feeder won’t work in my garden?
Provide a feeder area that birds can approach confidently, then give them time to claim it. Tūī can take a while to commit even when nectar is perfect, so wait at least a week, and if you are not getting visitors, check whether you have nearby native flowering plants that are part of their normal foraging route.