The quickest way to shorten bird feeder wire is to cut it cleanly with a proper wire or cable cutter, fold the cut end back on itself to form a loop, and secure it with a ferrule crimp sleeve or a pair of wire rope U-bolt clips. That gives you a clean, strong termination that won't slip, fray, or shed sharp ends onto your deck. The whole job takes about 10 to 15 minutes and costs next to nothing if you already have pliers and a cutter on hand.
How to Shorten Bird Feeder Wire Safely Step by Step

Marcus Brennan
21 May 2026

Identify your bird feeder wire type and setup

Before you cut anything, figure out exactly what you're working with. Bird feeder hanging systems come in a few common forms, and the right shortening method depends on which one you have.
- Thin coated wire or picture-hanging wire: Usually 18 to 24 gauge, twisted or braided, often sold as feeder-specific hanger wire. This is the most common type for lightweight tube or platform feeders.
- Stainless steel aircraft cable or vinyl-coated cable: Thicker, multi-strand wire rope, typically 1/16 to 3/32 inch. Often used for heavier feeders or longer spans between a branch and a hook.
- Chain or solid metal S-hooks and clasps: Not wire at all, but sometimes confused with it. If your hanger is chain, skip to the re-hanging section since you just remove links.
- Rope or cord: Nylon, cotton, or jute. These shorten differently (simple knots work fine) and are outside the wire-specific scope of this guide.
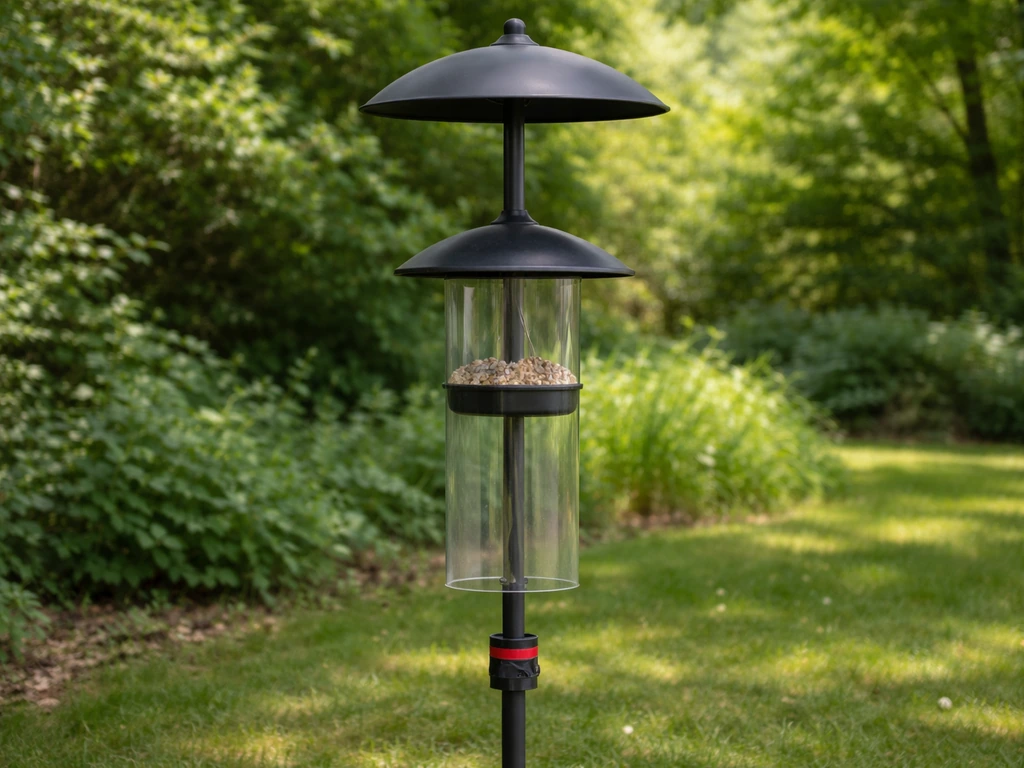
Also note your mounting setup. Are you hanging from a tree branch, a porch hook, a shepherd's crook pole, or an overhang bracket? To put a slinky on a bird feeder pole, match the spring’s attachment to your exact mounting setup and secure it so it doesn't wobble. And is the feeder currently hung or on the ground? If it's still hanging, take it down before doing any cutting. Working on a wire under tension is awkward and risks sending the feeder crashing.
Safety checks and tools you'll need
Give the wire a quick inspection before you shorten it. Look for corrosion, kinks, frayed strands, or crushed sections. If you spot any of those, the smarter move is replacing the wire entirely rather than shortening a compromised piece. A feeder that drops because of a corroded wire isn't just frustrating. It can hurt a bird that happens to be on it when it falls.
For tools, what you use matters more than most people realize. A hacksaw or standard bolt cutter will crush and splay the strands on braided wire rope rather than cutting them cleanly. This creates sharp, uneven ends that are hard to secure and will fray further over time. Use a dedicated wire or cable cutter (also called wire rope shears) for any braided or multi-strand wire. For thin single-strand feeder wire, good-quality diagonal cutting pliers work fine.
- Wire rope cutters or cable shears (essential for braided/multi-strand wire)
- Diagonal cutting pliers (fine for thin single-strand wire)
- Work gloves (cut wire ends are sharp)
- Ruler or tape measure
- Marker or tape flag to mark your cut point
- Ferrule crimp sleeves and a crimping tool (for most setups)
- Wire rope U-bolt clips if you're working with thicker cable (1/16 inch or above)
- Needle-nose pliers for threading loops through tight hooks
- A small carabiner or swivel clasp if you want easy future adjustments
Methods to shorten wire/cable safely
There are two main approaches: cut and re-loop, or fold and clamp without cutting. Choose based on your wire type and how much length you need to remove.
Option 1: Cut and re-loop (best for most setups)
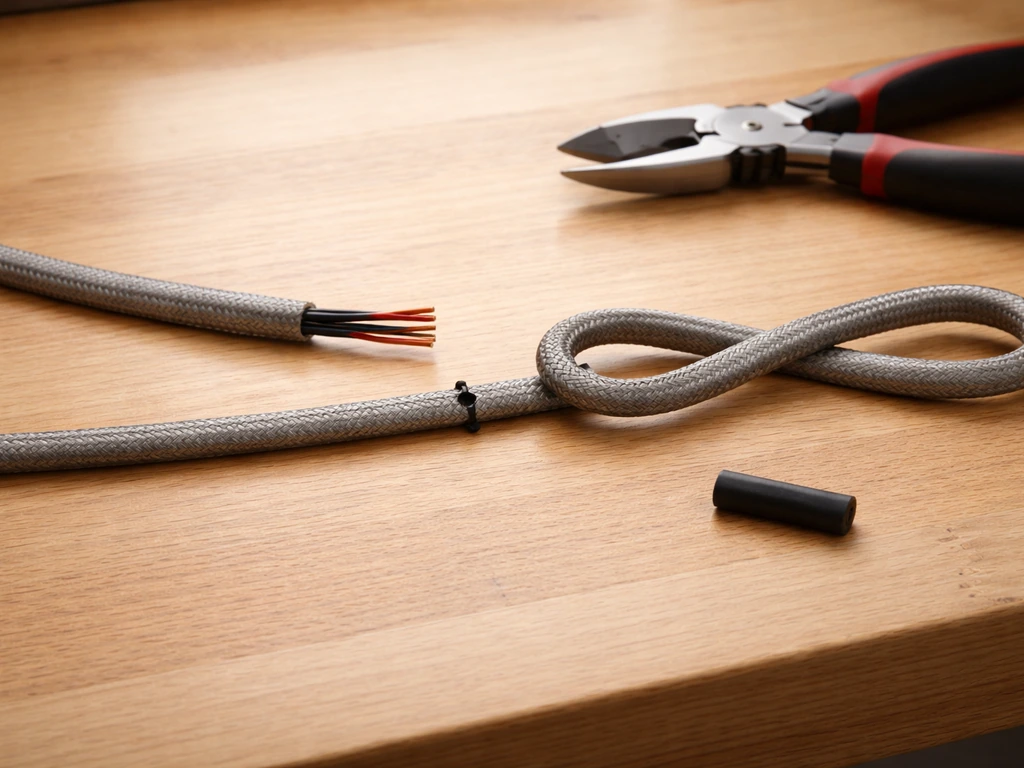
- Lay the wire flat on a workbench or the ground. Measure the length you actually need from hook to feeder, add 3 to 4 inches for the terminal loop, and mark your cut point with tape or a marker.
- Tape both sides of the cut point with electrical tape or masking tape before cutting. This holds the strands together during the cut and prevents immediate fraying.
- Make the cut with your wire rope cutter in a single firm squeeze. Don't saw back and forth. One clean cut is what keeps strands intact.
- Immediately apply a tiny dab of superglue or heat-shrink tubing to the cut end if you're working with multi-strand wire. This stops fray before you form the loop.
- Thread the cut end back through your hook or eye, fold it back parallel to the main line to form a loop, and secure with a crimp sleeve or wire rope clips (see next section).
Option 2: Fold and clamp without cutting (best when you want reversibility)
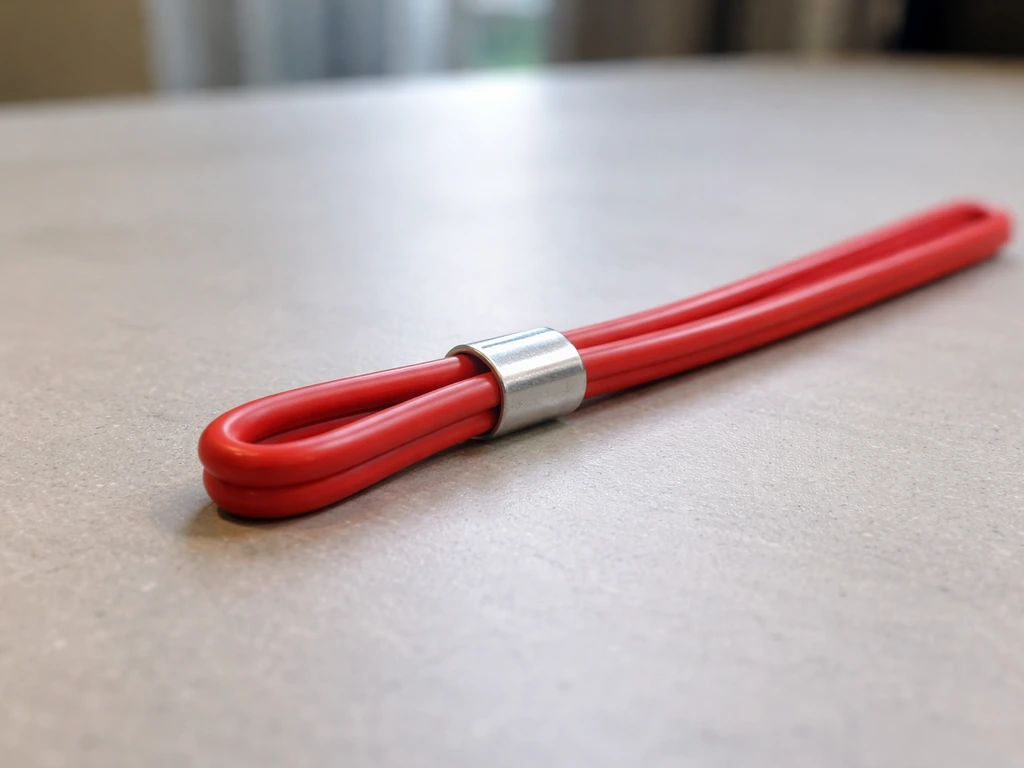
If you don't want to permanently shorten the wire, you can simply fold the excess back on itself and clamp the two parallel sections together with a ferrule crimp sleeve positioned at the point where you want the effective length to end. The folded portion hangs behind the main line out of sight. This is reversible and requires no cutting, though it looks slightly bulkier. It works best when you only need to remove a few inches rather than a foot or more.
Securing the shortened end: connectors, crimps, knots, and clamps
This is the step most people rush and then regret. A poorly secured end is how feeders fall. Here are your main options ranked from easiest to most heavy-duty.
| Method | Best for | Strength | Ease of use | Cost |
|---|---|---|---|---|
| Ferrule crimp sleeve | Thin to medium wire (up to 1/16 in) | High if crimped correctly | Very easy | Under $5 for a pack |
| Wire rope U-bolt clips | Thicker cable (1/16 in and above) | Very high | Moderate (requires torquing nuts) | Around $5 to $10 each |
| Thimble plus U-bolt clips | Heavy feeders or long spans | Highest | More involved | Under $15 total |
| Double overhand or bowline knot | Cord and thin single-strand wire only | Moderate | Easy if you know the knot | Free |
| Locking carabiner or swivel clasp | Any wire with a pre-formed loop | High | Easy and fully adjustable | $5 to $15 |
Using ferrule crimp sleeves
Feed the wire end through the crimp sleeve, loop it back through the sleeve to form a closed loop, and squeeze the sleeve firmly with a crimping tool. Two crimps staggered about a quarter inch apart are stronger than one. Don't use regular pliers to crimp if you can avoid it. A proper crimping tool deforms the sleeve evenly and won't leave gaps that let the wire slip.
Using wire rope U-bolt clips correctly
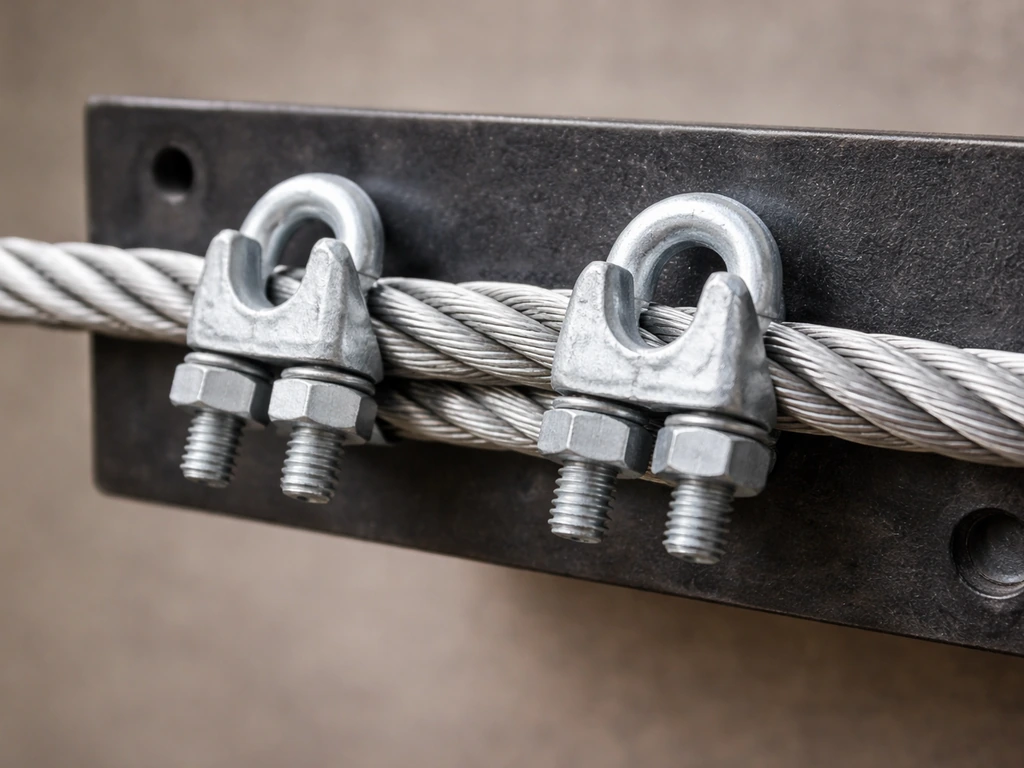
Wire rope U-bolt clips have one critical installation rule that's worth memorizing: saddle on the live side, U-bolt over the dead end. To make a guy-rope style thimble termination, bend the rope around the thimble groove, fold the dead end back parallel, then install the U-bolt clips over both legs and torque the saddle nuts. The "dead end" is the short tail that folds back. If you flip this orientation, the U-bolt crushes the load-bearing strands and can dramatically reduce the wire's strength. This principle is sometimes remembered as "never saddle a dead horse." For anything over about a foot of span or for heavier feeders, use at least two clips spaced about 6 wire-diameters apart, and snug the nuts down firmly. If you're building a thimble-eye termination for a really permanent setup, three clips is the recommended minimum.
Balancing and re-hanging the feeder at the right height
Once the wire is shortened and secured, hang the feeder and check that it sits level. A feeder that tilts to one side sends seed sliding out and discourages birds from landing comfortably. If your feeder has a central hanging ring, make sure the wire attaches dead center. If it uses side hooks, check that both sides of the wire are equal in length.
For height, the consensus from wildlife and birding guidance is clear: blank" rel="noopener noreferrer">hang feeders 5 to 6 feet off the ground. This keeps them out of easy reach for ground-level predators like cats, reduces squirrel jump range from the ground, and puts the feeder at a comfortable approach height for most backyard species. If you're hanging near a tree or shrub for cover (which helps birds feel safe while feeding), aim for the 5 to 6 foot range from the ground to the base of the feeder, not to the hanging point.
After hanging, give the feeder a gentle push and watch how it swings. It should rock smoothly without twisting or rattling at the connection point. If it spins continuously, add a swivel between the wire and the hook above. Swivels are cheap, eliminate wire-twist buildup in wind, and make re-hanging a lot easier if you need to adjust things later.
Troubleshooting loose connections and wire twist issues
The connection feels loose or the wire slips
If a crimp sleeve slips, it usually means it wasn't deformed enough or the sleeve diameter was too large for the wire gauge. Remove it, use a properly sized sleeve (match it to the wire's outer diameter, not a guess), and crimp twice. If U-bolt clips are slipping, check that the saddle is on the live side and re-torque the nuts. Clips need to be tight. Finger-snug isn't enough.
The wire keeps twisting or the feeder rotates
This is almost always a wind issue combined with a wire that has internal twist memory from being stored in a coil. To fix it, unclip the feeder, let the wire hang free for a minute to unwind on its own, then add a barrel swivel (the kind used in fishing or camping gear works perfectly) between your top hook and the wire loop. That single addition eliminates the problem almost entirely.
The feeder hangs at an angle
Check whether the feeder's hanging hardware is centered. Some cheaper feeders have slightly off-center rings. You can compensate by sliding a small zip tie or wire loop along the top hanger to shift the balance point. It sounds inelegant but it works reliably.
Sharp wire ends snagging or sticking out
If you have a sharp tail poking out from a crimp or clip, fold it back tight against the main line with needle-nose pliers and wrap it with a short piece of electrical tape. Don't leave sharp ends exposed near a feeder. Birds perching or hovering near the top can catch a wing on them, and you'll nick your own fingers every time you refill.
Maintenance tips to prevent future slipping or corrosion
Bird feeder wire lives outside year-round in rain, sun, ice, and humidity. Even stainless steel and vinyl-coated cable degrade over time if you ignore them. A little attention a couple of times a year keeps everything solid.
- Inspect the wire and all connection hardware every spring and fall. Look for rust spots, corroded crimp sleeves, and any strands that have started to fray near the termination points.
- Replace vinyl-coated wire if the coating cracks or peels. Exposed metal under a cracked coating corrodes faster than bare wire because moisture gets trapped under the coating.
- Re-torque U-bolt clip nuts once a season. Metal expands and contracts with temperature changes, which can loosen hardware over time.
- Apply a thin coat of clear waterproof sealant or paste wax over crimp sleeves to slow oxidation. This is especially useful in humid climates or coastal areas.
- If you use a swivel, check that it still rotates freely. Seized swivels defeat their whole purpose. A drop of light oil once a year keeps them spinning.
- Store any spare wire indoors in a dry place. Coiled wire stored in a shed or garage picks up moisture and surface rust surprisingly fast.
- When you take the feeder down to clean it (ideally every one to two weeks during heavy use), use that moment to tug the wire and check connection points while the feeder is in your hands.
If you're already thinking about the broader hanging system beyond just the wire, the pole setup matters too. If you are using a ground-mounted setup, you can also follow this guide on how to put a bird feeder pole in the ground to make sure the base is stable. If you are setting up a pole, this is where our guide on what to put on a bird feeder pole can help broader hanging system beyond just the wire. Keeping a feeder pole stable and straight, and making it hard for squirrels to climb, are challenges that go hand in hand with getting the wire length right. If you’re dealing with a wobbling or sinking feeder pole, stabilize it with a firm mounting method and bracing so the wire connection doesn’t keep working loose stabilize a bird feeder pole. Use the best grease for a bird feeder pole on any metal contact points to help prevent squeaking and corrosion over time best grease for bird feeder pole. Sorting out the wire is a great starting point, but the whole system works best when every piece is dialed in. Applying the same careful setup ideas to the pole and hardware helps keep the bird feeder from slipping the whole system works best.
FAQ
Can I shorten bird feeder wire by tying a knot instead of using a crimp or clip?
Avoid knots, they can cut into strands, reduce wire strength, and create bulky, uneven sections that shift under wind. If you need a non-permanent adjustment, use the fold-and-clamp method with a properly sized ferrule crimp sleeve instead of a knot.
What if I only have regular cable ties or zip ties to secure the shortened end?
Zip ties are not a secure termination for feeder wire, they can loosen with vibration and UV exposure. Use a crimp sleeve with a crimping tool or U-bolt clips tightened correctly, then conceal the folded tail so nothing sharp is exposed.
How much wire should I remove if the feeder hangs unevenly or tilts after I shorten it?
Shorten to the length that centers the feeder first, then make micro adjustments by trimming in small increments if needed. Removing too much forces you to rebuild the termination, and if the ring or hooks are off-center it can look like a wire-length issue when it is actually a balance issue.
Is it safe to shorten feeder wire that shows corrosion or crushed spots?
If you see corrosion, kinks, frayed strands, or crushed sections, replacing the wire is safer than shortening. Cutting out a damaged section does not restore the original strength of the remaining strands, especially if the damage was near a previous crimp or clip.
Do I need a barrel swivel if my feeder is already stable when it hangs?
Not necessarily. If the feeder rocks smoothly without twisting or continuous spin, you can skip the swivel. Add it when you notice persistent wire twist from wind or when the wire wants to unwind during re-hanging.
How can I tell the ferrule crimp sleeve is the wrong size for my wire gauge?
If the sleeve slides, does not deform, or the connection feels loose after crimping, the sleeve diameter likely does not match the wire's outer diameter. Use the correct sleeve size, then crimp twice, staggered, for a stronger grip.
Can I reuse crimp sleeves or U-bolt clips after removing them?
In most cases, no. Once a crimp sleeve or clip has been tightened and deformed, the grip surface changes and reuse increases the chance of slipping. Rebuild with new sleeves or fresh clips and re-crimp or re-torque.
How tight is tight enough for U-bolt clips on feeder wire?
Tight enough that the clip does not shift when you attempt to move it by hand, and the saddle fully sits on the live side with the U-bolt over the dead end. “Finger snug” is not reliable, so re-check torque after the first adjustment and ensure at least two clips for longer spans or heavier feeders.
What should I do with a leftover short tail when using clips or a crimp?
Fold the tail back tight against the main line and cover it to remove sharp edges. This prevents birds from catching a wing and protects your fingers when refilling, especially if the connection is near the feeder’s top where birds perch.
Are there any situations where I should switch from shortening to replacing the wire entirely?
Replace instead of shorten if the wire has heavy rust, many frayed strands, a crushed section you cannot remove cleanly, or if you already shortened it once and the connection is now close to wear points. When in doubt, a fresh wire ensures the termination is built on sound material.
Next Article
What to Put on a Bird Feeder Pole: Baffles, Ants, and More
Choose bird-safe pole accessories for baffles, squirrel guards, and anti-ants, plus setup tips to stop spill and pests.