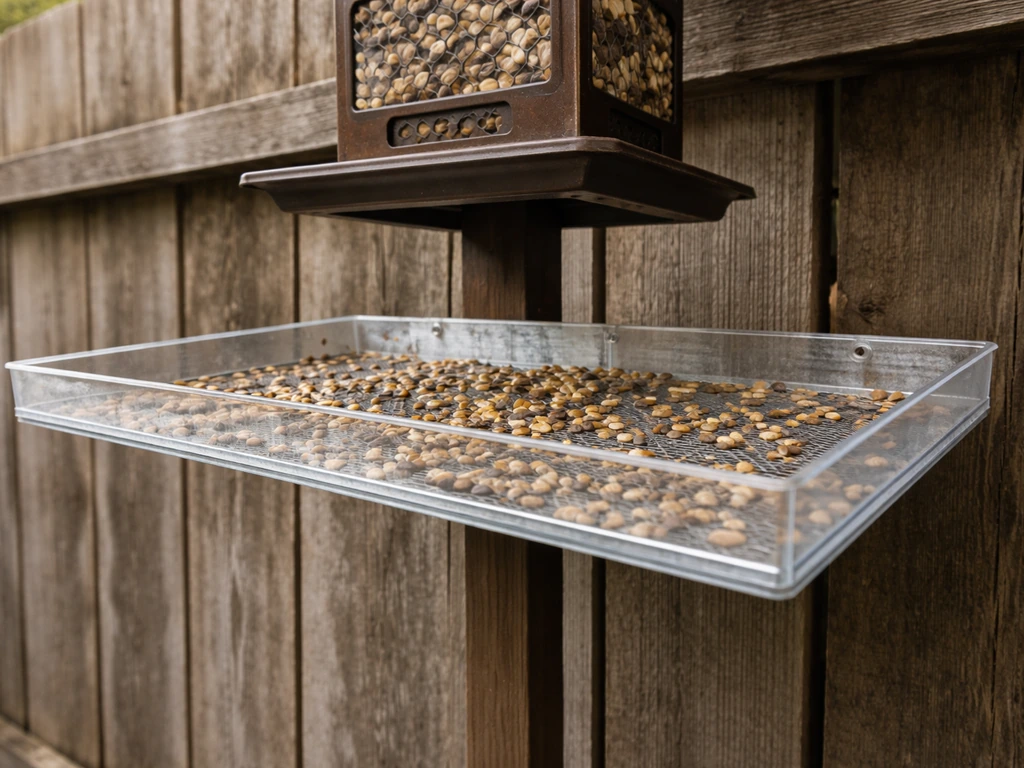
A bird seed catcher tray is simply a shallow tray or platform mounted directly beneath your feeder's feeding ports (or cage openings) to catch the hulls, debris, and uneaten seeds before they hit the ground. You can build one today using a plastic bin lid, a scrap of plywood, or even a repurposed salad container. The goal is the same regardless of what you use: intercept falling seed, keep your yard cleaner, and ideally give ground-feeding birds a bonus snack in the process.
How to Make a Bird Seed Catcher Tray for Feeders

Marcus Brennan
20 Apr 2026
Pick the right design before you build anything
The first thing to decide is whether you're solving a mess problem under an outdoor bird feeder or under an indoor or porch-mounted bird cage. These are different builds with different priorities, and mixing them up wastes time and materials.
For a bird feeder, your tray hangs or mounts below the feeder itself, catching hulls and spilled seed before they pile up on the lawn. It needs drainage holes so rain doesn't turn it into a soup bowl, and it needs to hang level under the feeding ports. Commercial versions, like the combined seed catcher and tray feeder accessories sold by outfitters such as Lee Valley, essentially do double duty: they catch debris from the feeder above while also functioning as a tray feeder for ground-feeding species. Your DIY version can do the same.
For a bird cage, the tray sits right below the cage's seed ports or perch openings, usually attached directly to the cage bars. There's no need for drainage holes since the cage is under cover (or you're controlling the weather exposure). What matters here is a snug fit against the cage, steep enough sidewalls to contain a bird's enthusiastic flinging, and easy removal for daily cleaning. If you've built or read about making a tray bird feeder, some of those same flat-platform principles apply here, but the attachment method is completely different.
| Feature | Bird Feeder Tray | Bird Cage Tray |
|---|---|---|
| Primary purpose | Catch spilled seed under outdoor feeder | Contain seed mess from cage opening |
| Drainage needed | Yes, drill holes in base | No (usually sheltered) |
| Attachment method | Hangs below feeder on wire or cord | Clips or ties to cage bars |
| Sidewall height needed | 1–2 inches | 2–3 inches |
| Cleaning frequency | Weekly minimum | Daily or every other day |
| Best DIY material | Scrap plywood or plastic bin lid | Plastic storage container or mesh tray |
What you need: materials, tools, and budget options
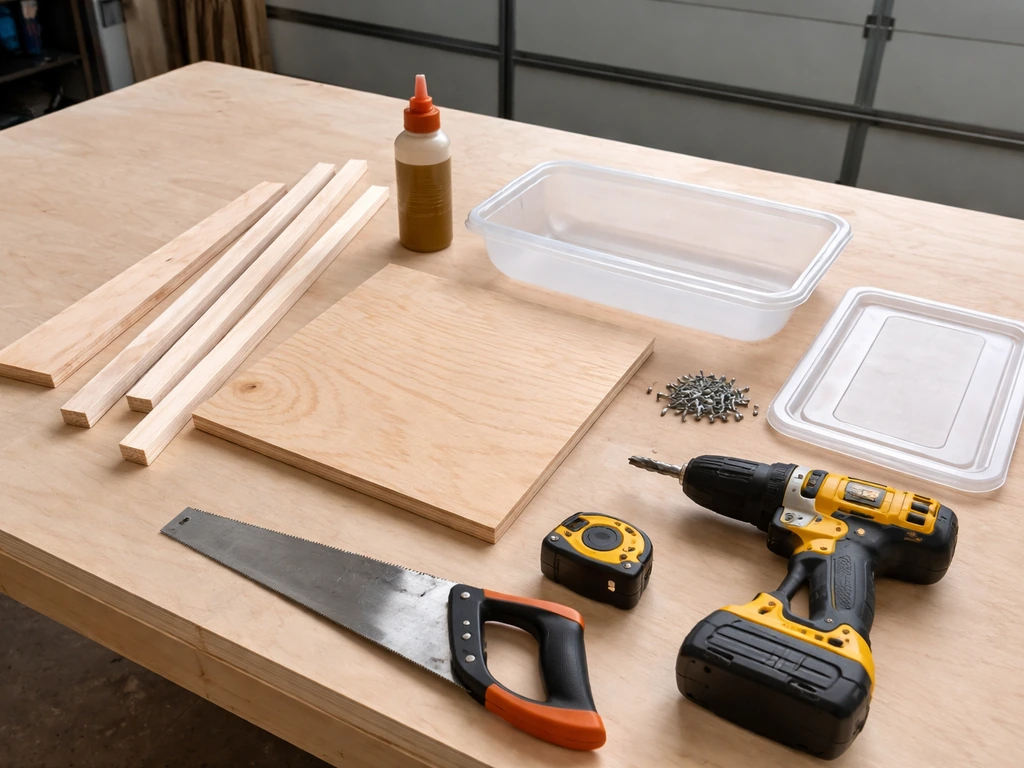
Most of what you need is already in your recycling bin or garage. Plywood scraps, plastic storage container lids, shallow food containers, and leftover hardware all work. Here's a realistic rundown of what each version requires.
For the bird feeder version
- One piece of 1/4-inch or 1/2-inch plywood, roughly 12 x 12 inches (or a shallow plastic container of similar size)
- Four 1x2 or 1x3 wood strips, each about 12 inches long, for the sidewalls (if using wood)
- Wood screws (1-inch length) or a staple gun if using thin wood
- Sandpaper (80-grit and 120-grit)
- Exterior wood glue or waterproof PVA glue
- Exterior paint, polyurethane sealer, or linseed oil if using raw wood
- A drill with a 1/4-inch bit for drainage holes
- Three to four small eye hooks or screw eyes
- Galvanized wire, paracord, or lightweight chain (about 3 feet total)
- A wire cutter and needle-nose pliers
For the bird cage version
- A shallow rectangular plastic container (a repurposed deli container, plastic shoebox lid, or large butter tub lid works well)
- Zip ties or thin wire for attaching to cage bars
- A utility knife or scissors to trim the container to size
- Optional: a square of mesh or screen to line the bottom so hulls fall through but seeds stay put
Total cost for the feeder version using new wood runs about $5 to $10 at a hardware store. If you're using scrap wood and recycled hardware, it's essentially free. The cage version using a repurposed plastic container costs nothing at all. For a middle-ground option, a shallow plastic storage bin (the kind sold in dollar stores for about $1 to $2) makes an excellent pre-formed tray for either version with minimal cutting required.
Get the measurements right before you cut anything
The single most common reason a DIY seed catcher tray fails is that it's too small. People underestimate how far seeds travel when a bird flicks its beak or when wind moves things around. Here's the rule I use: make the tray at least 4 inches wider on all sides than the feeder or cage opening above it. For a standard tube feeder with multiple ports, that means a tray of at least 10 to 12 inches across. For a larger platform or hopper feeder, go 14 to 16 inches.
Sidewall height matters almost as much as width. A flat tray with no walls will lose seed to the first gust of wind. Sidewalls of 1.5 to 2 inches are enough for a feeder tray. For a cage tray, go 2 to 3 inches since cage birds fling seed more aggressively than wild birds feeding on a platform.
Vertical placement is also important. For a feeder, hang the tray 2 to 4 inches directly below the lowest feeding port. Any farther and seed scatters past the tray edges before it reaches it. Any closer and the tray blocks bird access to the lower ports. For a cage, the tray should sit no more than 1 to 2 inches below the cage bar it clips to, right at the level of the food dish or seed port.
| Feeder/Cage Type | Recommended Tray Width | Sidewall Height | Hanging Distance Below Port |
|---|---|---|---|
| Standard tube feeder (6–12 inch body) | 10–12 inches | 1.5 inches | 2–3 inches |
| Hopper or platform feeder | 14–16 inches | 2 inches | 3–4 inches |
| Small bird cage (parakeet, finch) | 6–8 inches | 2–2.5 inches | 1–2 inches |
| Medium-large cage (cockatiel, parrot) | 10–14 inches | 3 inches | 1–2 inches |
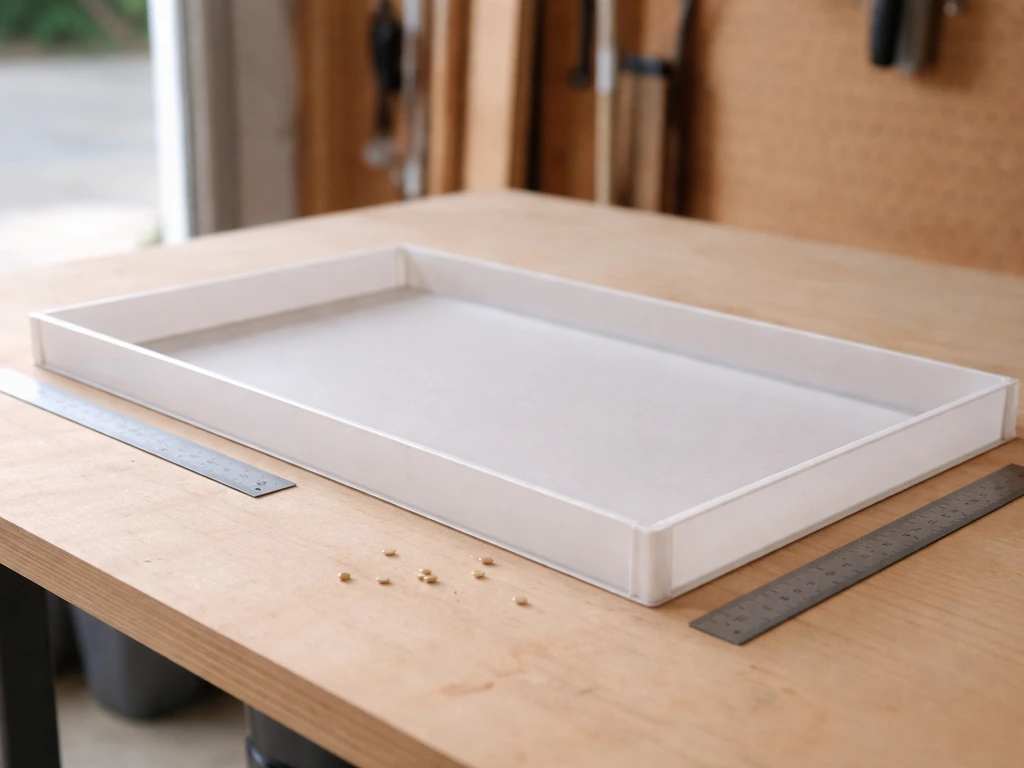
Step-by-step build: DIY seed catcher tray for a bird feeder
This version is built from plywood and takes about 45 minutes from start to finish, not counting drying time for any sealant you apply. If you're using a pre-formed plastic container instead of wood, skip steps 1 through 3 and go straight to drilling the drainage holes. Once you have your seed catcher tray figured out, you can use the same general approach to build a complete bird feeder box pre-formed plastic container.
- Cut your plywood base to size. For most tube feeders, 12 x 12 inches is the sweet spot. Use a jigsaw or handsaw and sand the edges smooth with 80-grit sandpaper so they don't split.
- Cut your four sidewall strips to match the perimeter. Two strips will match the base width exactly, and two will be the base width plus the thickness of the sidewall material on both ends (so they cap the corners neatly). Pre-drill a pilot hole every 4 inches along the side strips to prevent splitting.
- Glue and screw the sidewalls to the base. Apply exterior wood glue to the bottom edge of each sidewall strip, press it against the base edge, and drive your 1-inch screws through the pilot holes. Let the glue dry at least 20 minutes before moving on.
- Drill 4 to 6 drainage holes in the base using a 1/4-inch bit. Space them evenly across the center of the tray. These are non-negotiable: without them, any rainfall or morning dew turns your seed catch into a moldy puddle within 24 hours.
- Sand the entire tray with 120-grit sandpaper, then seal or paint it. Two coats of exterior polyurethane or a good brushing with linseed oil will protect raw wood from moisture. Let it cure fully before hanging (24 hours for most sealants).
- Screw three or four small eye hooks into the top outer edges of the sidewalls, evenly spaced. If you're using three hooks, space them at 120-degree intervals for a stable hang. Four hooks at the corners also works well.
- Cut your wire or paracord into three or four equal lengths (about 8 to 10 inches each). Attach one end to each eye hook and bring all the free ends together at the top. Twist or knot them together and form a loop for hanging.
- Hang the tray from your feeder pole, feeder hook, or directly from the feeder's hanger hardware so it sits 2 to 4 inches below the lowest feeding port. Use a level or eyeball it carefully: a tipped tray spills everything to one side.
- Test by filling the feeder and watching where seed lands for 10 to 15 minutes. If seed consistently misses one side, adjust the hanging cords to level the tray or shift it slightly in the direction the seed is falling.
If you want this tray to double as a feeding platform for ground-feeding birds like doves and juncos (blank" rel="noopener noreferrer">the same principle behind commercial seed catcher and tray feeder combos), just add a small handful of millet or cracked corn to the tray itself. If you want to go beyond catching spilled seed and toward a full cardinal-friendly feeder setup, use these same tray principles while selecting a cardinal-appropriate feeder and placement how to make a cardinal bird feeder. The seed that falls from above becomes bonus food for birds who prefer eating at a lower level.
Step-by-step build: seed catcher for a bird cage
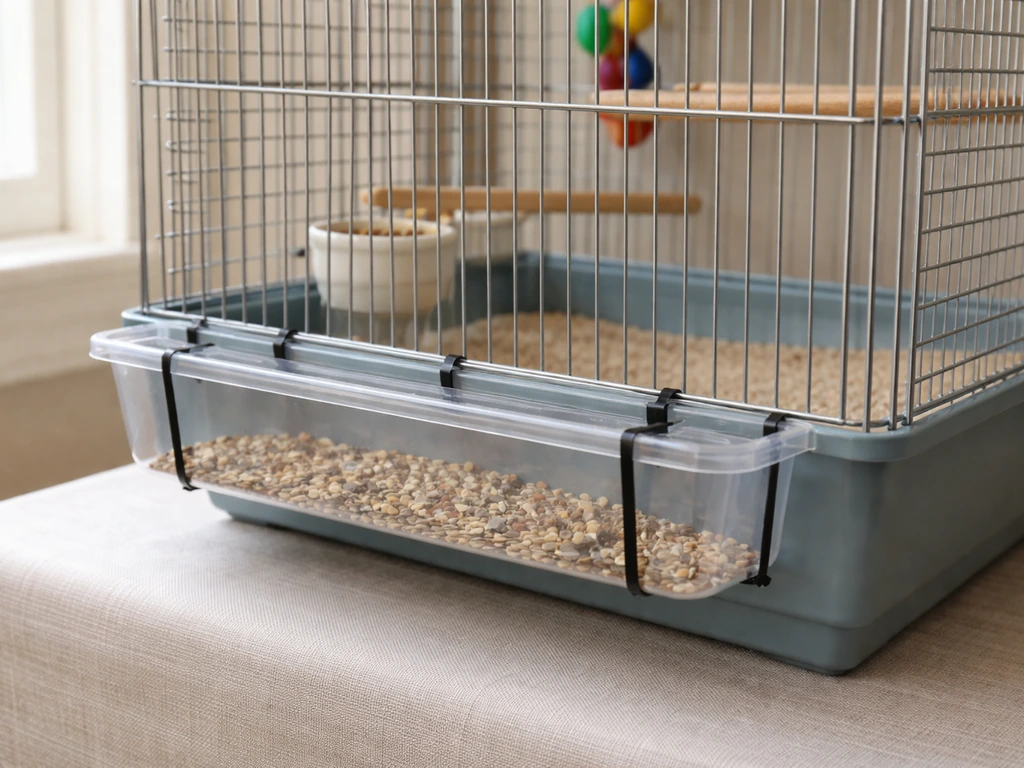
This version is faster and uses no tools beyond scissors or a utility knife and a handful of zip ties. Total build time is about 15 minutes.
- Find a shallow plastic container that's roughly the right width for your cage's seed port or food dish area. A deli container, large butter tub lid, or plastic shoebox lid are all ideal. The container should be rigid, not flimsy: soft plastic flexes when loaded with seed hulls and can pop off the cage bars.
- Measure the width of the cage section where you'll attach the tray. Trim the container with scissors or a utility knife if it's too wide to sit flush against the bars. You want the tray to clear the cage bars so it doesn't torque or tilt.
- If you want hulls to fall through but whole seeds to stay, cut a piece of 1/4-inch wire mesh or fiberglass screen slightly smaller than the container's interior. Drop it in the bottom. Hulls will pass through; uneaten whole seeds stay on the mesh and can be offered back to the bird.
- Hold the tray against the outside of the cage bars at the correct height (1 to 2 inches below the seed port or food dish). Use a marker to note where the bars align with the tray's outer wall.
- Use a utility knife or heated skewer to make small notches or holes at those bar-contact points. These notches let the tray sit flush against the cage without gaps that seed can escape through.
- Attach the tray to the cage bars using zip ties at two points, or use thin wire twisted around each bar. Pull the zip ties snug but not so tight that they crack the plastic. Check that the tray is level and doesn't tip forward when you press on the outer edge.
- Test by filling the food dish and watching where seed falls. If seed misses the tray on one side, adjust the height or add a small piece of cardboard as a temporary deflector until you can resize the tray.
For cage birds that are especially enthusiastic flingers (cockatiels and parakeets in particular), consider adding a second, slightly wider tray a few inches below the first to catch the seed that bounces off the first tray. Two stacked trays at different heights catch close to 90 percent of flung seed in my experience.
Hanging and mounting: making sure it actually stays put
A seed catcher tray that swings wildly in the wind or drops to the ground after a week defeats the purpose. The most common failure point is the connection between the tray and the feeder or pole, so spend a few extra minutes getting this right.
For feeder trays hung on wire or cord: galvanized wire is better than paracord in wet climates because paracord eventually rots or mildews where it contacts the wood. Twist the wire into a closed loop at each hook rather than just bending it: a proper closed loop won't work loose over time. After the first week, re-check all connections and re-tighten anything that has shifted.
For pole-mounted feeders, consider drilling a small hole through the pole just below the feeder and running a thin bolt or stainless steel screw through a wood block that supports the tray from below. This completely eliminates swinging and makes the tray behave more like a fixed platform. It's a slightly more involved modification but it's worth it in windy locations.
If your feeder hangs from a hook or branch, try to anchor the tray to the feeder's main body rather than letting it hang freely from the same hook. A tray that swings independently from the feeder will knock into it constantly and scare birds away. A short piece of wire connecting the tray's outer edge to the feeder body at two points adds just enough stability to stop the tipping without making it rigid.
For cage trays, the number one stability issue is the tray pulling away from the bars under the weight of accumulated hulls. Check the zip tie or wire connections after the first few days and tighten them if you see any gap forming between the tray and the cage bars. If the tray keeps pulling away, add a third attachment point at the center top edge of the tray.
Cleaning, maintenance, and fixing what goes wrong
A seed catcher tray only works if you actually clean it regularly. A tray loaded with old hulls, wet seed, and bird droppings is a petri dish for mold and salmonella, and birds will stop using the feeder area once they sense the contamination. For outdoor feeder trays, clean weekly at minimum during the spring and summer feeding season, and after every significant rain event. All About Birds also recommends cleaning bird feeders at least once a week, using hot water and soap and optionally adding a diluted bleach solution clean weekly at minimum during the spring and summer feeding season. For cage trays, clean every one to two days.
How to clean the tray
- Remove the tray from the feeder or cage.
- Dump all debris into a compost bin or yard waste bag. Do not dump it directly under the feeder: piled hulls create a slug and rodent magnet.
- Rinse the tray with a hose or under a faucet.
- Scrub with a stiff brush and a solution of 1 part white vinegar to 9 parts water, or a diluted bleach solution (1 part bleach to 9 parts water) for deeper disinfection.
- Rinse thoroughly and let air dry completely before reinstalling. Wet seed in a tray with moisture still present goes rancid and moldy within 24 hours.
Common problems and how to fix them
Seed getting wet and clumping: this is almost always a drainage issue. Check that your drainage holes haven't been plugged by compressed hulls, and clear them with a skewer or toothpick during each cleaning. If you're in a very rainy climate, drilling the holes at a slight angle (so they're not perfectly flat but angled downward) helps water exit faster.
Tray too small, seed still hits the ground: don't try to patch a small tray with added pieces. Cut a new base that's at least 4 inches wider on each side, then move the eye hooks and rehang. A too-small tray is the most frustrating problem because it looks like it should be working but never quite does.
Tray blowing or spinning: if your tray is spinning under the feeder in the wind, add weight. Gluing a few smooth river stones to the base interior (keeping drainage holes clear) adds stability without significant bulk. Alternatively, the wire-to-feeder-body stabilizer method described in the mounting section above is the most reliable fix.
Squirrels using the tray as a snack platform: this is honestly one of the harder problems to solve without changing your feeder mounting setup entirely. Adding a baffle above the feeder on the pole is the standard solution. The tray itself doesn't make the squirrel problem worse, but it does give them a convenient landing pad. If squirrels are a serious concern, check out what works for building a squirrel-resistant feeder setup and address the pole or hanging system before worrying further about the tray.
Wood tray showing signs of rot after one season: this usually means the sealant wore off or was never applied thickly enough. Strip and re-seal the wood in late fall before winter, or switch to a plastic container version of the tray for the wet seasons and store the wood tray during peak rain months. Alternatively, marine-grade exterior paint applied in two thick coats is more durable than polyurethane for outdoor birding equipment.
Once your seed catcher tray is working well, it naturally opens up the next question: is the feeder itself doing its job efficiently? If you want the full build, not just the tray, follow this guide on how to make a tray bird feeder for the related flat-platform setup. If you're building or upgrading other parts of your setup, there are detailed guides on constructing a tray bird feeder from scratch, which takes the same flat-platform concept further, as well as builds using egg cartons, shoeboxes, and cardboard that are worth exploring if you want low-cost feeder options to go alongside your new catcher tray. If you want an easy low-cost alternative to a tray bird feeder, see how to make a bird feeder out of egg carton. If you want a cardboard option, this guide also walks you through how to make a cardboard bird feeder that pairs well with a seed catcher tray. You can also use the same shoebox approach for an easy homemade feeder design alongside your seed catcher tray shoeboxes.
FAQ
Can I make a bird seed catcher tray without drainage holes?
Yes, but only if the surface is protected from standing water. For outdoor wood trays, use drainage holes plus a fully cured exterior sealer or paint, then let the tray dry thoroughly before refilling seed. If you line a drainage tray with non-breathable plastic, moisture can get trapped under the liner and increase mold.
What’s the safest way to attach parts to the tray (glue vs zip ties)?
For most feeder trays, skip adhesives and use mechanical fasteners or temporary ties so you can remove the tray and deep-clean it. If you do use glue, choose a food-safe exterior adhesive and avoid sealing over drainage holes, because clumps can block holes faster.
Why are birds stopping use of my feeder after installing the tray?
If birds avoid the feeder after you install the tray, check for two things: the tray may be blocking access to the lowest ports by being too close, or the tray may be collecting wet debris too quickly because holes are clogged or too few. Rehang the tray (2 to 4 inches below ports for feeders) and clear drainage before assuming birds just dislike the new setup.
Can I switch from plastic to wood (or wood to plastic) mid-build?
You can, but keep the drainage design in mind. Drilling a second set of small holes near the lowest point helps, but do not add so many that the tray loses sidewall strength. After any switch to heavier materials, re-test the tray for stability, especially under windy conditions.
How do I know the tray is big enough before the first real feeding?
Do a quick “coverage test” before final mounting. Put a handful of seed in the tray opening area, then gently shake or blow upward so seed travels. If you see consistent misses beyond the tray edges, increase the tray width rather than raising sidewalls only.
Should the tray be removable, and how should I plan access for cleaning?
Aim for easy daily access. For outdoor feeders, make the tray removable or at least swing-away where possible, because weekly cleaning is easier. If your connection points are buried or hard to reach, you may end up skipping cleaning, which is when mold and bacterial buildup become a problem.
My tray catches some seed but still leaks seed off one edge. What’s wrong?
If you see seed “running” off the tray, you likely need both more side height and better vertical spacing. Also confirm the tray is level, not pitched upward, since pitched trays encourage seed to escape through one side. Use a small level during installation when possible.
How long should I wait after cleaning before adding new seed?
Drying time matters. After washing, let the tray fully air-dry before refilling, especially if you feed in humid climates. If you refill while the tray is still damp, clumping and biofilm buildup happen faster, and birds may reduce visits.
Is it safe to add extra seed to the tray for ground-feeding birds?
Yes, but make it a planned change. Add only a small amount of ground-friendly food and keep it in the catcher tray so it stays close to where birds naturally fall. Increase only if you see ground-feeding species using it, because extra seed can also add to buildup if you miss cleaning.
Will adding a tray increase squirrel activity, and what should I do?
Yes, but it needs a different strategy to avoid attracting more pests. Use shorter cleaning intervals, ensure drainage stays clear, and do not let seed accumulate deeply, since deeper piles hold moisture. If squirrels are persistent, address the feeder mounting and add a baffle, since the tray alone is still an attractive landing surface.
What if the tray drains slowly or water pools inside?
If drainage holes are angled, keep them from clogging by clearing compressed hulls at every cleaning. If you see standing water, increase the drainage hole size or number slightly, and confirm the tray is not sagging. Also check that the tray bottom is not sealed flat inside a way that traps water.
How can I stop the tray from swinging, spinning, or dropping after a week?
If the tray is moving, treat it as a mounting problem, not a tray problem. Tighten early connections after the first few days, then re-check weekly during high wind or active feeding. For maximum stability outdoors, a rigid anchor to the feeder body or pole is more reliable than relying on the same hook.