Mount your Netvue bird feeder at about 2.2 to 3.5 meters (roughly 7 to 11 feet) off the ground in an open spot with Wi-Fi coverage, then attach it using the strap, screw, or tripod method that matches your setup, charge the battery fully before first use, and connect it to a 2.4GHz Wi-Fi network through the Birdfy app. That's the whole process in a sentence. The rest of this guide walks through each step so nothing gets skipped and you're not out there in the yard puzzling over a bracket with the manual on your phone.
How to Mount Netvue Bird Feeder Step by Step Setup

Marcus Brennan
20 May 2026
What's in the box: your parts checklist
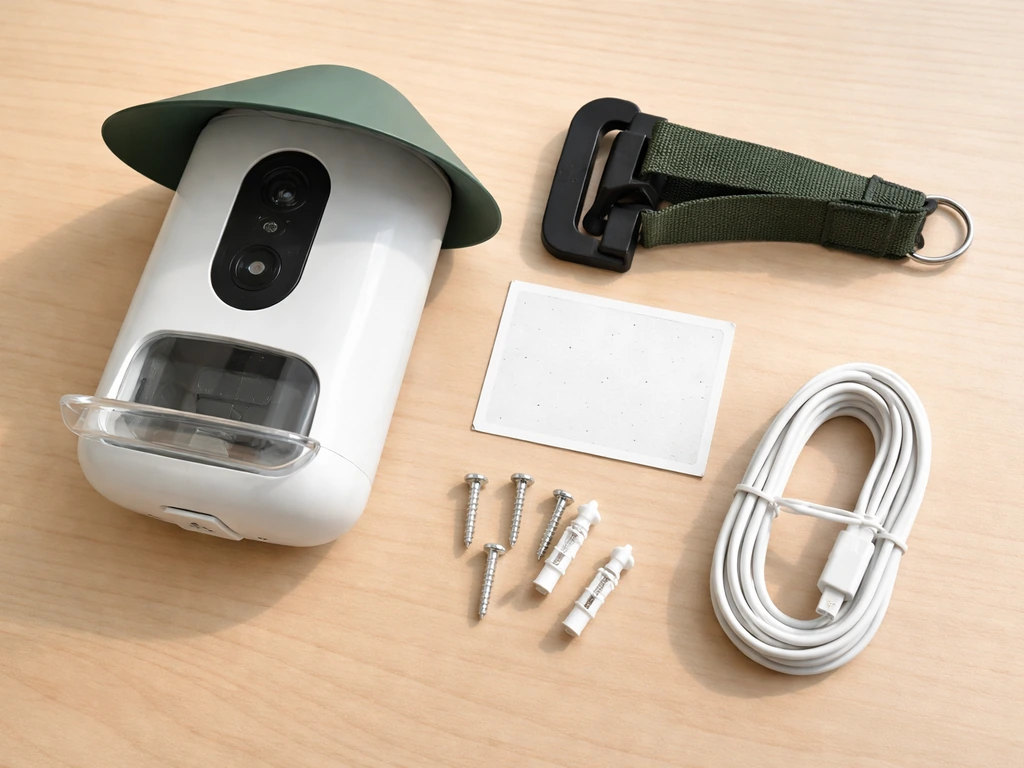
Before you touch a screw or pick a spot, lay everything out on a table. Netvue packages vary slightly by model (the Birdfy Feeder 2 is the most common current unit), but you should find all of these in the box. If anything is missing, stop and contact Netvue support before proceeding, because the mounting hardware is model-specific.
- The feeder body itself (with integrated or attachable camera)
- Hanging bracket (the main mounting piece that connects the feeder to your surface)
- Black strap (for wrapping around a tree or post)
- Hose clips (for pole-mounting the bracket firmly)
- Wall mounting screws and plastic anchors (for drilling into masonry or wood)
- Front camera screw (Birdfy Feeder 2 has this separately for attaching the camera module)
- Charging cable (USB Type-C)
- Optional: side camera bracket (if your kit includes a second camera or side-angle viewing)
- Optional: solar panel and connection cable (if your bundle includes the solar panel add-on)
Keep the charging cable handy right now because the battery will need time before you mount the feeder outdoors. More on that in the powering section below.
Picking the right spot before you drill anything
Placement is honestly the decision that matters most. A feeder that's in the wrong spot won't attract birds no matter how well it's mounted. Here's what to think through before committing to a location.
Height and openness
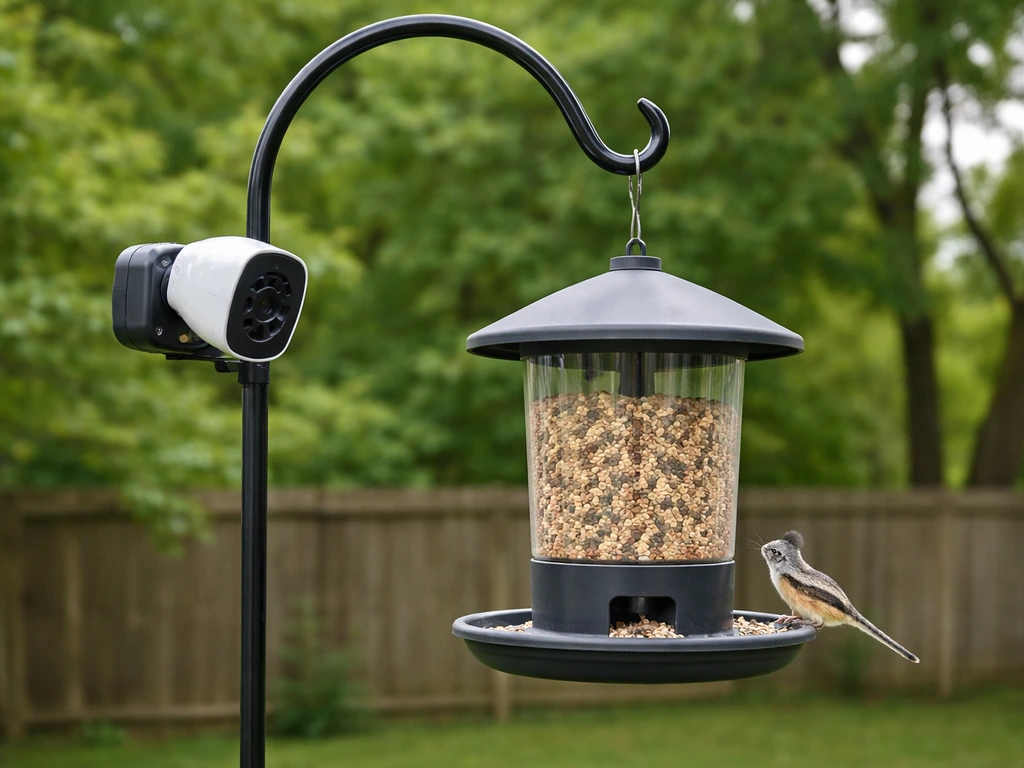
Netvue's own guidance specifies 2.2 to 3.5 meters (about 7 to 11.5 feet) as the ideal installation height, placed in an open area. That height puts the feeder in the zone where birds are comfortable landing and the camera angle captures them clearly. When you mount your bird feeder with a camera, aim the lens so it faces the main landing and feeding area, not just the feeder housing. Going much lower invites ground predators; going much higher makes refilling a pain and can push the feeder out of your router's reliable Wi-Fi range.
Window distance and safety
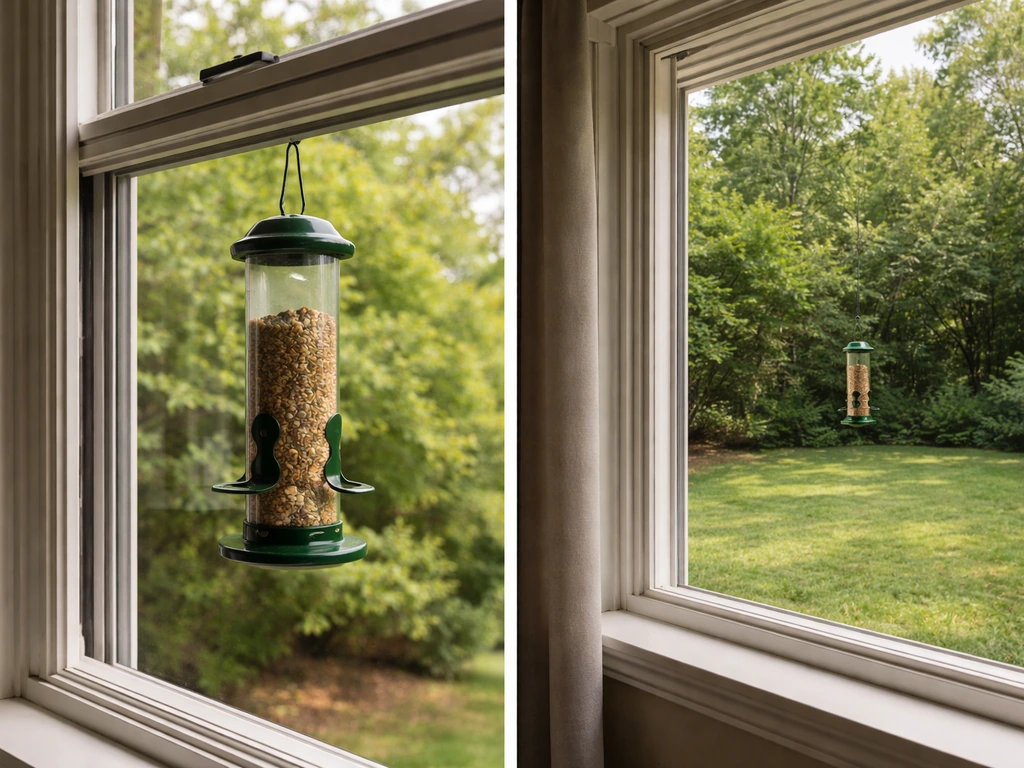
Place the feeder either very close to a window (within 3 feet) or well beyond 30 feet from any glass. If you're specifically trying to hang a bird feeder outside a window, choose the safe placement and distance guidelines so birds can approach without hitting glass how to hang a bird feeder outside a window. Everything in between creates a dangerous flight corridor where birds build up speed and can't correct in time. If you're planning a window-adjacent install, the very-close option is safer than mid-yard distance from a window.
Wi-Fi signal and obstructions
Since this is a smart camera feeder, it needs a solid Wi-Fi signal at its mounting point. Walk out to your planned location with your phone and check the signal strength before drilling. The feeder only works on 2.4GHz Wi-Fi, so if your router broadcasts both bands under the same name, you may need to split them in your router settings. Walls, thick hedges, and metal structures between the feeder and your router all degrade signal, so favor a location with a clear line of sight back toward the house.
Shelter, traffic, and squirrel exposure
A little overhead cover (a wide eave, a tree canopy) keeps the feeder drier and the camera lens cleaner. Avoid positioning directly over walkways or outdoor seating, since seed hulls and droppings will fall below. If squirrels are a problem in your yard, a freestanding pole with a baffle is harder to defeat than a feeder hung from a tree branch, where squirrels can drop down from above.
Step-by-step mounting: wall, pole, and tree methods
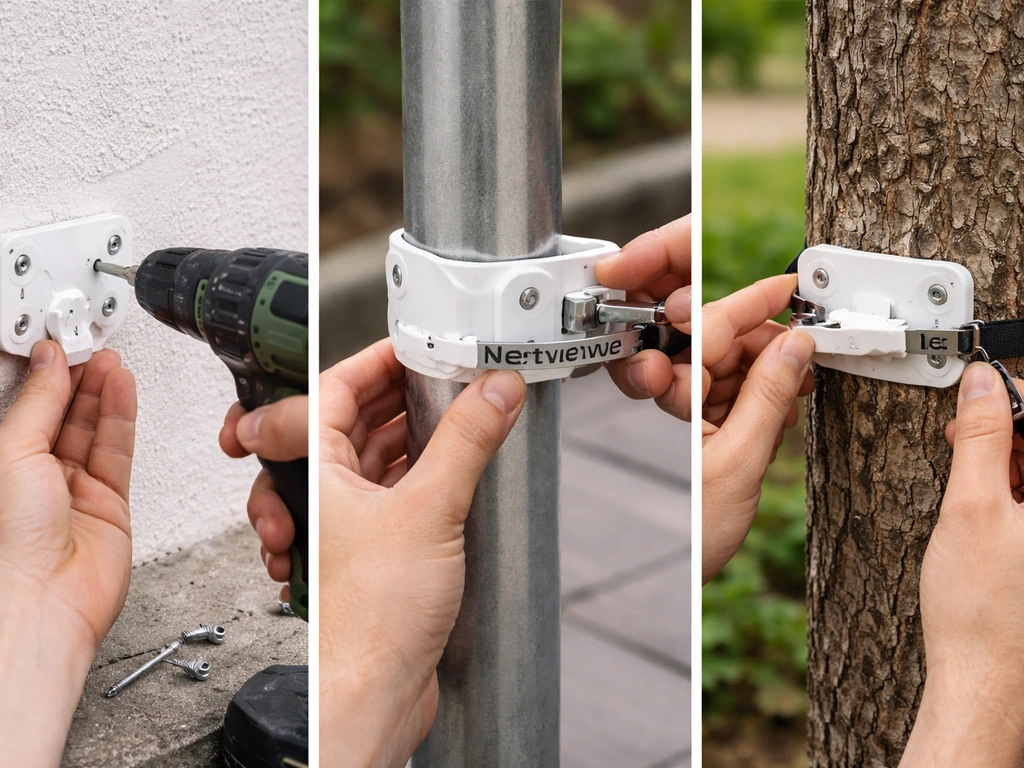
The Netvue Birdfy feeder supports three main mounting approaches. If you want the pole mount version, follow the pole and baffle steps so the feeder stays stable and birds can access it safely mount a bird feeder on a pole. If you do not have a tree available, use the pole or wall mounting approach instead to hang your bird feeder securely. Choose the one that matches your backyard setup, and follow the steps for that method.
After you’ve chosen the tree method, make sure the mounting hardware is tight so the bracket stays stable how to attach bird feeder to tree. All three end with the same result: a stable hanging bracket that the feeder clips or hangs onto. If you're mounting it from your house, use the wall or pole method to create a stable hanging bracket and keep the feeder secure.
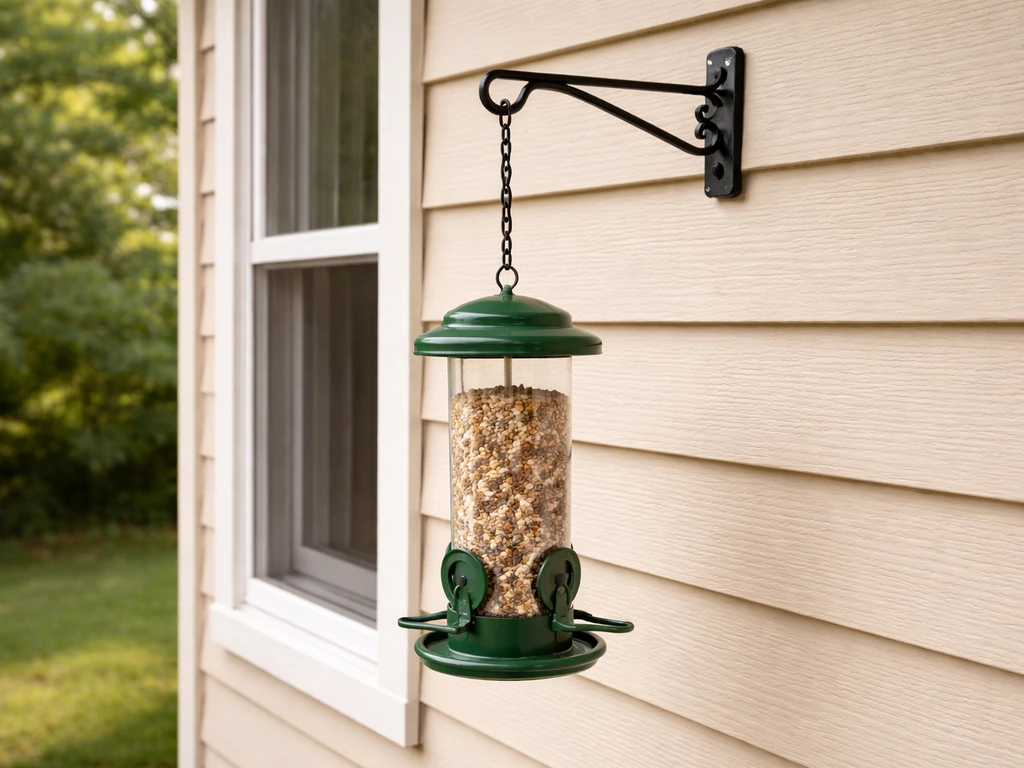
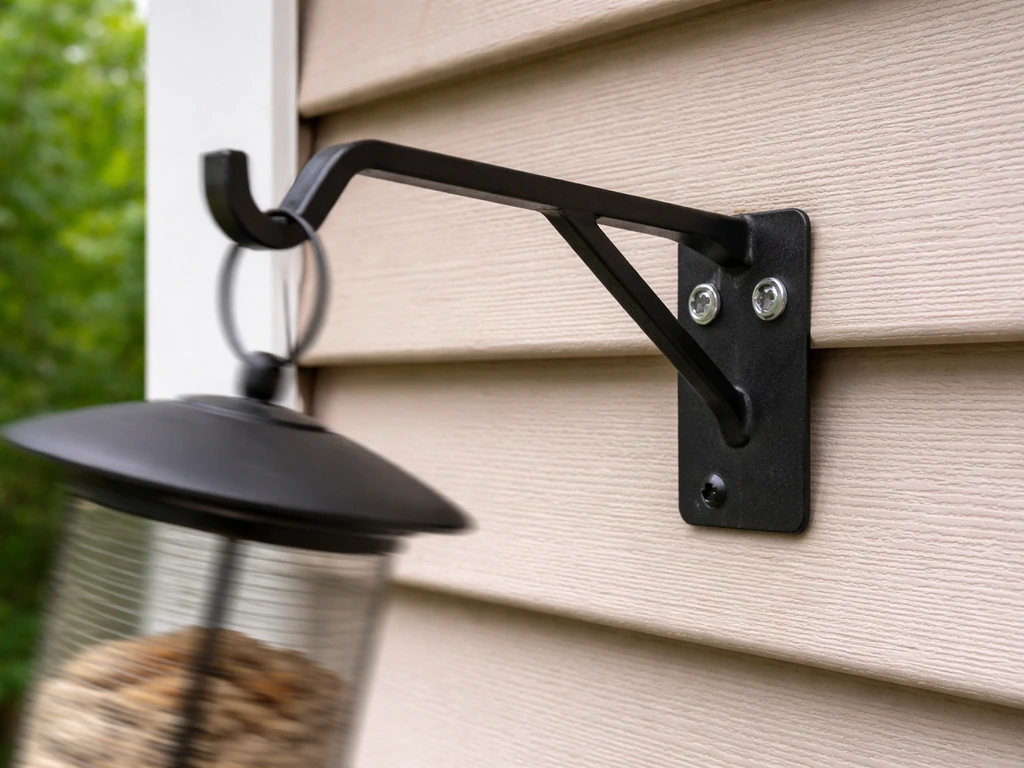
Wall mounting (screw method)
- Use the included drilling template (if provided) or hold the hanging bracket against the wall and mark the screw hole positions with a pencil.
- Drill into the wall using a 15/64-inch (6mm) drill bit. For masonry or brick, use a masonry bit and insert the plastic anchors before screwing.
- Drive the included screws through the bracket and into the anchors or directly into wood studs.
- Tug the bracket firmly to confirm it doesn't move. It should feel completely solid before you hang anything on it.
- Hang the feeder body onto the bracket according to the rail or hook design shown in your specific model's manual.
Pole mounting (hose clip method)
- Position the hanging bracket against the pole at your chosen height.
- Feed the hose clips around the pole and through the bracket, then tighten them with a flathead screwdriver until the bracket cannot rotate or slide down.
- If you're adding a solar panel to the pole at the same time, screw the mounting arm into the bracket, attach the solar panel, and connect it with the provided connection cable.
- Hang or clip the feeder body onto the bracket.
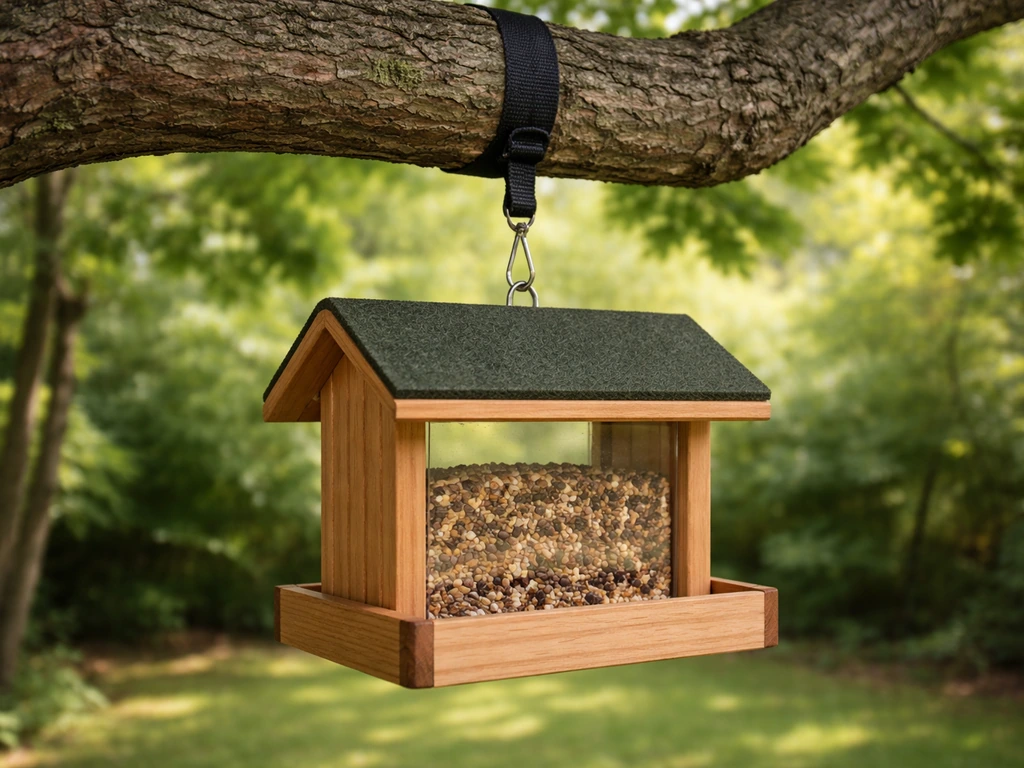
Tree mounting (strap method)
- Wrap the black strap around the tree trunk or a sturdy horizontal branch at your target height.
- Thread the strap through the hanging bracket and cinch it tight so the bracket sits flush against the bark.
- Double-check that the bracket is level, then hang the feeder on it.
- Give the whole assembly a firm shake. If it shifts or swings more than a centimeter or two, retighten the strap.
Stand or flat-surface placement
If you want to place the feeder on a deck railing, fence post cap, or flat surface temporarily, it can sit on a flat surface. For proper stability, install the backplane using the drilling template and included screws and anchors so it can't tip over in wind. This works well on a wide fence rail or a tabletop-style platform.
Charging and getting the electronics running
Here's the step a lot of people skip: the battery is not fully charged when it ships. Do not mount the feeder outdoors and expect it to work immediately. Charge it first.
First charge
Plug the included USB Type-C charging cable into the feeder's charging port. Use a 5V/1.5A adapter (not always included, so grab a phone charger if needed). The Birdfy Feeder 2 needs about 10 hours for a full first charge. The N003 series takes up to 14 hours. Watch the status light: on the Birdfy Feeder 2, a solid red light means it's charging and solid blue means it's working/charged. On the N003, solid yellow means charging and solid green means fully charged. Don't mount it until you see the fully-charged indicator.
Turning it on and entering Wi-Fi setup mode
- Long-press the power button for 3 seconds to turn the device on. The status light should turn solid blue.
- Double-click the power button to enter Wi-Fi configuration mode. The status light will flash blue.
- Open the Birdfy app on your phone and follow the in-app instructions to add a new device.
- When prompted, enter your 2.4GHz Wi-Fi network name and password. If you're unsure which band is 2.4GHz, check your router settings or temporarily create a separate 2.4GHz network.
- Hold your phone 15 to 25 centimeters (about 6 to 10 inches) in front of the camera lens so it can scan the QR code displayed in the app. Avoid doing this in direct harsh sunlight, since strong light interferes with QR scanning.
- Wait for the app to confirm the connection. Once paired, the status light returns to solid blue.
Adding the solar panel (if you have one)
The solar panel mounts separately using its own bracket and arm, then connects to the feeder via the provided connection cable. Install the solar panel bracket on the same pole or wall as the feeder, orienting it to face south (in the northern hemisphere) for maximum sun exposure. Once the cable is connected, the solar panel will top up the battery during daylight hours, which means in a sunny location you may rarely need to plug in again.
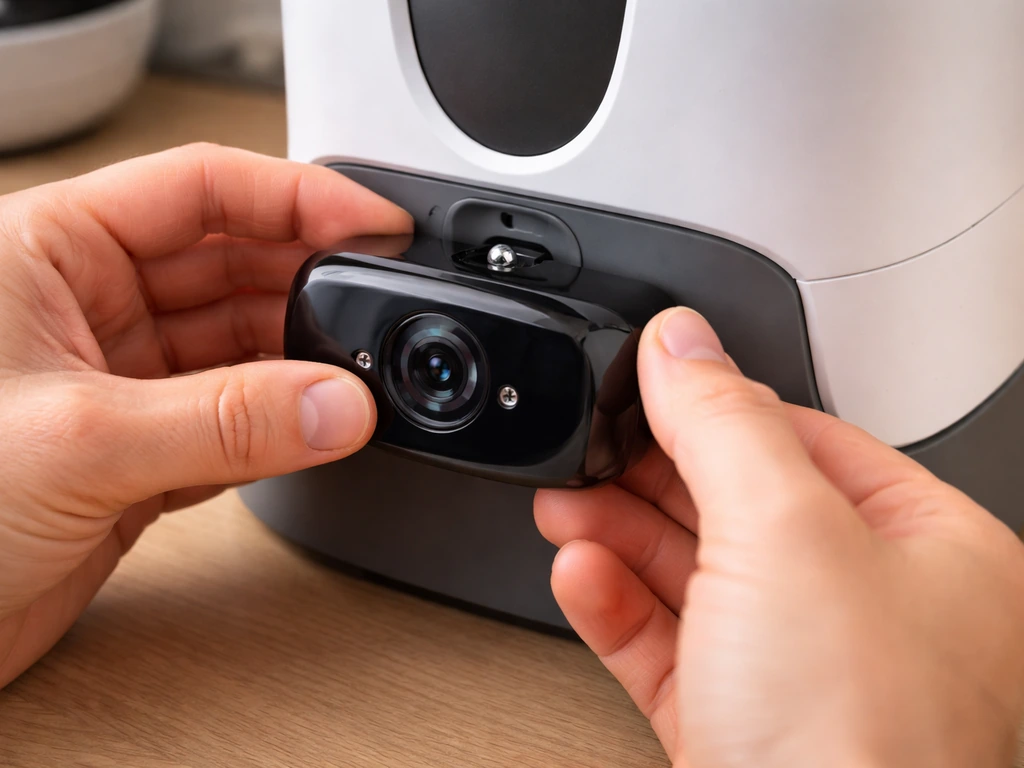
Camera assembly steps
On the Birdfy Feeder 2, attach the front camera to the feeder body using the provided screw before you hang the whole unit. If your kit includes an optional side camera, attach the side camera bracket at this stage too. Getting the cameras attached on the ground is much easier than trying to do it while the feeder is already mounted.
Adjusting the feeder so birds actually use it
Once the feeder is up and the app is connected, take a few minutes to set it up from the bird's perspective. This is the part most guides skip, but it makes a real difference in how quickly birds start visiting.
- Fill the seed tray before you walk away. To fill on the N003-style feeder: open the buckle on the back, turn the feeder cover clockwise to open it, pour in seed, and close it back up. Use a seed that matches the birds you want to attract (black oil sunflower seed is the safest all-around choice).
- Check that the seed ports or tray openings are unobstructed after mounting. Sometimes the bracket sits slightly in front of a port opening depending on how it's attached.
- Make sure the feeder is level. A feeder tilted to one side causes seeds to pile unevenly and can block ports on the low side.
- If the Birdfy AI bird identification feature is included with your model as Lifetime Free AI, it activates automatically. If it's subscription-based, activate it at my.birdfy.com before expecting ID results in the app.
- Position the camera angle in the app's live view. Most feeding activity happens at the perches and tray, so make sure those are in the center frame and not at the edge.
Weather-proofing and stability checks before you walk inside
The Birdfy Feeder 2 series is rated IP66 waterproof, and the original Birdfy feeder is IP65. That means it handles rain and snow fine. The operating temperature range runs from 14°F to 122°F (-10°C to 50°C), so it's built for real outdoor conditions. Even so, a few physical checks after mounting will save you a service call later.
- Push the feeder sideways with moderate force. It should swing or resist, not wobble on a loose bracket. If the bracket shifts, tighten the screws, hose clips, or strap.
- Check that all cable connections (charging port cover, solar panel connector) are seated and any rubber port covers are closed. Water intrusion through open ports is the most common way electronics fail outdoors.
- If you're in a high-wind area, consider running the strap around the feeder body itself as a secondary tie to the pole or tree, preventing it from swinging out wide and banging back.
- Look at the camera lens angle in the app's live view after a light rain. If water droplets are pooling on the lens regularly, a small angled roof or eave above the feeder can help keep the view clear.
Troubleshooting after mounting: what goes wrong and how to fix it
The feeder is wobbling or swinging
A little movement in wind is normal, but if the feeder is twisting or the bracket is visibly loose, go back and check the specific fastener for your mount type. For hose clips on a pole, they can loosen over the first week or two as the metal settles, so check them again after the first rain or wind event. For the strap method on a tree, bark compresses slightly after installation and the strap can loosen. Retighten it.
Birds aren't showing up yet
Give it at least one to two weeks, especially if you're introducing a feeder to a spot that hasn't had one before. Birds are creatures of habit and they need time to discover a new food source. The most common reasons for slow adoption are: the feeder is too exposed (no nearby perching shrubs or trees within a short flight), the seed type doesn't match local birds, or the feeder is positioned too close to a busy door or high-traffic area. Try adding a small brush pile or planting a nearby shrub for perching cover if activity stays low after two weeks.
Wi-Fi keeps dropping or the app loses connection
The two most common causes are signal range and the 2. 4GHz vs 5GHz band issue. If you're borderline on range, a Wi-Fi extender placed near the feeder's side of the house fixes most drop problems. If your network dropped the feeder onto the 5GHz band after a router reboot (some routers switch automatically), you'll need to re-pair the device or force it to the 2.
VicoHome also recommends using a Wi‑Fi extender near the feeder when you are borderline on range to prevent dropouts How to Add Your Bird Feeder Camera via QR Code. 4GHz band in your router's settings.
If the feeder is near a microwave oven or dense metal structures, try moving it a few feet to reduce interference.
Squirrels are emptying the feeder
If you mounted to a pole, add a pole baffle below the feeder, at least 4 to 5 feet off the ground and at least 6 to 8 feet from any jumping-off point (fence, tree, wall). The camera will at least record exactly which squirrel is responsible, which is genuinely useful for knowing whether the problem is jumpers or climbers so you can target the right fix. If you hung the feeder from a tree, squirrels can usually reach it from above, which is why a pole mount with a baffle is the most effective long-term pest solution.
Refilling is awkward or messy
If you mounted high (above eye level), refilling becomes the main maintenance annoyance. A small step stool or platform positioned permanently below the feeder makes this easier. Some people lower their feeder's mounting height slightly after the first season once they know birds are actively using the spot. Alternatively, the pole-mount method is the most refill-friendly because you can lower a pulley-style setup if you plan ahead, though the Netvue doesn't include one out of the box.
Camera not recording or status light is wrong
Check the status light first: solid blue means working normally, flashing blue means it's waiting to be configured to Wi-Fi, and solid red (on Birdfy Feeder 2) means it's still charging. If the light is off entirely, the battery is likely dead. Bring it inside to charge. For persistent camera or recording issues, the Birdfy Help Center has a dedicated troubleshooting section for the Feeder 2 series, and Netvue support is reachable at support@birdfy.
On the Birdfy Feeder 2 series, the Birdfy Help Center also has a dedicated Status Light page that explains what each LED state means, such as charging and Wi‑Fi configuration the Birdfy Help Center has a dedicated troubleshooting section for the Feeder 2 series. com for hardware-specific problems.
Your next steps right now
The most important thing to do today is plug the feeder in to charge while you go pick your mounting location and gather your tools. Don't let the 10 to 14 hour charge window slow you down: use that time to walk your yard, check the Wi-Fi signal in two or three candidate spots, and gather your drill, screwdriver, and ladder. By the time you're ready to mount, the battery will be ready too. Once it's up, give the birds a week or two and check in on the app's motion-triggered recordings. That's usually when the whole thing clicks into place and feels worth every step.
If you're still deciding between a mounted install and other options, the same placement logic applies whether you're working with a tree, a balcony railing, or a windowsill, so the fundamentals here will carry over no matter where you land. If you want to hang a bird feeder on a balcony railing, focus first on stable mounting points and safe placement before you drill or attach the bracket.
FAQ
Can I mount a Netvue bird feeder indoors and use it outdoors later?
Yes, but you still need to charge it fully before the first outdoor session. Also test the camera view and motion detection from the intended outdoor perch area, because indoor mounting can produce a different “bird approach” angle and you may need to re-aim the lens after relocation.
What if my yard has no clear spot with Wi-Fi, can I still mount the feeder?
You can, but you should plan for a signal solution before drilling. Use a Wi-Fi extender or a wired-backhaul mesh node placed near the feeder side of the house, then re-check 2.4GHz signal at the exact mounting height. Avoid relying on a weak signal and later trying to fix it by moving the router.
How do I tell if the feeder is actually on the right Wi-Fi band?
If your router broadcasts 2.4GHz and 5GHz under one name, the feeder might connect to the wrong band after a reboot. In the router’s client list (or device settings), verify the feeder’s connection is on 2.4GHz. If it keeps jumping bands, split the SSIDs temporarily and pair again on the 2.4GHz name.
Is 2.2 to 3.5 meters (7 to 11 feet) a strict requirement?
It is a strong target, but the bigger priority is comfort for landing and camera framing. If you go slightly lower for access, keep the feeder away from ground-predator paths, and ensure there is a clear line of sight for approaching birds. If you go higher, expect more refilling difficulty and a potential Wi-Fi range drop.
Where should the camera face if birds don’t show up in the recordings?
Point the lens toward the birds’ main landing and feeding area, not just toward the feeder body. Then confirm there is enough perching space nearby (shrubs or a natural landing point). If birds approach from a side you do not see, recordings can look like “no activity” even when there is feeding.
Can I mount it too close to a window and still be safe for birds?
The safest approach is either within about 3 feet of glass or well beyond about 30 feet. If you have a placement in the middle range, birds may fly faster and cannot correct in time. If you must compromise, improve visibility management (for example, with appropriate window deterrents) rather than placing the feeder in the unsafe corridor.
What should I do if the feeder twists after mounting?
Re-tighten the specific fastener for your mount type. For pole mounts, hose-style clips and straps can loosen after the metal settles, so check again after the first rain or strong wind. For tree strap installs, bark compression can loosen the strap, so retighten after the first day or two and again after the first weather event.
How long before birds start using the feeder consistently?
Plan on 1 to 2 weeks for adoption, especially when the spot is new. If activity stays low after that window, adjust placement for perching cover, verify the seed mix matches local birds, and reduce human disturbance near the approach path.
What happens if I don’t attach the solar panel or it stays in the shade?
The solar panel is optional in function but affects whether you will need to plug in again. If the panel is shaded most of the day, it may not top up the battery reliably, so you could see lower uptime. Install the panel so it faces the right direction for your hemisphere and keep the cable connection secure.
Do I need to attach the cameras before mounting, or can I do it afterward?
Attach cameras on the ground before hanging whenever possible. Mounting first makes screw alignment harder and increases the chance of cross-threading or leaving a camera slightly mis-aimed. If you must do it after, fully power down and stabilize the unit so you do not strain the camera wiring.
If the status light is off, is the feeder broken?
Most of the time it is simply uncharged. Bring it inside and recharge, using the recommended USB-C cable and a 5V/1.5A adapter. If the light never returns after a proper charge attempt, that points to a hardware issue and you should contact support with your model number.
How should I mount a Netvue feeder when squirrels are an ongoing problem?
A pole mount with a baffle is generally more effective than a tree-hung install, because it blocks climbing from below and reduces access from overhead. If you are using a pole, place the baffle high enough to cover the jump route and keep it away from fence, tree, or wall “launch points” that squirrels can use.
Can I place the feeder on a deck railing or flat surface instead of mounting it to a pole or tree?
Yes, but stability matters. Use the provided drilling template to install the backplane with the included screws and anchors so the unit cannot tip in wind. A temporary-looking install often fails to stay aligned, which can reduce camera quality and make the feeder wobble.
What maintenance checks should I do after the first couple of weeks?
After birds begin using the feeder, inspect the mount for looseness and check the app for stable motion recording. Also confirm the mounting area still has a clear approach path, because nearby growth or new perches can shift where birds land and which parts of the scene the camera captures.